(1)
Marina Spine Center, Marina del Rey, CA, USA
1.
Place the patient in the left lateral decubitus position. The radiopaque “bean-bag” for positioning allows adequate intraoperative X-ray visualization. Slightly flex the knees, place the axillary pad, and support the head sufficiently. Too much hip flexion at this point will limit the operative exposure anteriorly. Position the left hip flexed less than the right.
2.
The surgeon stands anterior to the patient. The assistant stands posterior to the patient. Begin the incision equidistant between the lowest rib and the superior iliac crest in the midaxillary line and extend it approximately to the edge of the rectus sheath. The level of the incision varies according to the level of the spine approached. L5–S1 is in the lower half of the distance between umbilicus and symphysis, L4–L5 is in the upper half, L3–L4 at the umbilicus, and L2–L3 above it (Fig. 25.1). With self-retaining retractors, the assistant spreads the skin and subcutaneous tissue, using two Adson pick-ups for rapid cauterization of bleeders in the subcutaneous tissue.
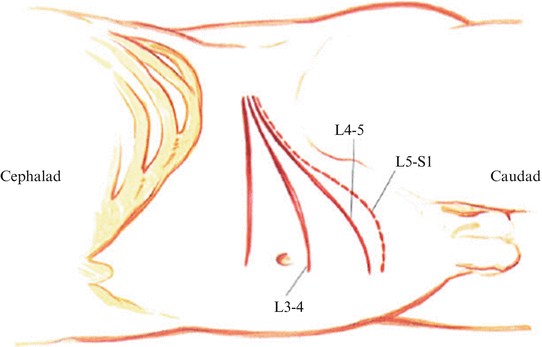

Fig. 25.1
Patient in left lateral decubitus position. Using the radiopaque beanbag for positioning allows adequate intraoperative X-ray visualization. Slightly flex the knees, place the axillary pad, and support the head sufficiently. Too much hip flexion at this point will limit the exposure anteriorly. Have the left hip only slightly flexed. Begin the incision equidistant between the lowest rib and superior iliac crest in the midaxillary line (it may be closer to the crest for lower levels) and extend it proximally to the edge of the rectus sheath. The level of incision varies according to the level of the spine approached. L5–S1 is in the lower half of the distance between the umbilicus and the symphysis pubis. L4–L5 lies in the upper half of this distance, L3–L4 at the umbilicus, and L2–L3 above. Incise through the skin and subcutaneous tissue, retracting with self-retaining retractors
3.
Muscle relaxation allows greater mobility to the abdominal wall and decreases the contractility of the muscle as it is incised. Expose the fascia of the external oblique muscle. The surgeon cauterizes through the muscle, and the assistant picks up bleeding points before and after they are cut. Dissect through the external oblique to the internal oblique muscle (Fig. 25.2); use the same procedure through the internal oblique. Inferior to the internal oblique is the transversus abdominis. Care must be used in inserting the self-retaining retractors into the muscle layers so as not to damage the peritoneum. If the transversus abdominis muscle is well developed, cauterize it down to its lower layers (Fig. 25.3). Often, this is a very thin or absent muscle layer. Bluntly spread the thin muscle in line with its fibers to expose the transversalis fascia (Fig. 25.4).
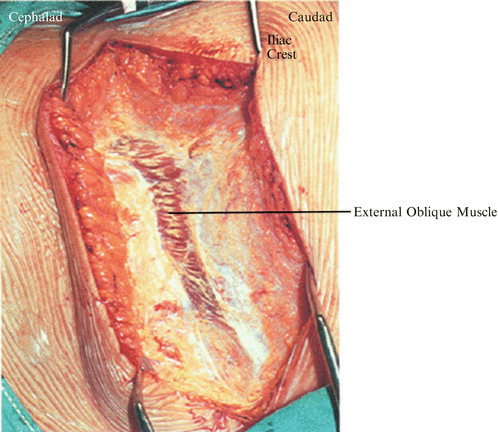
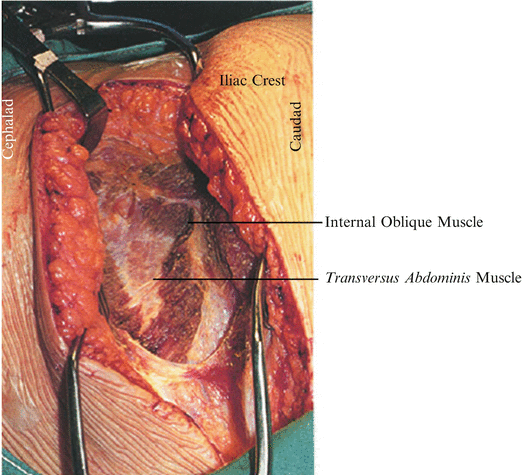
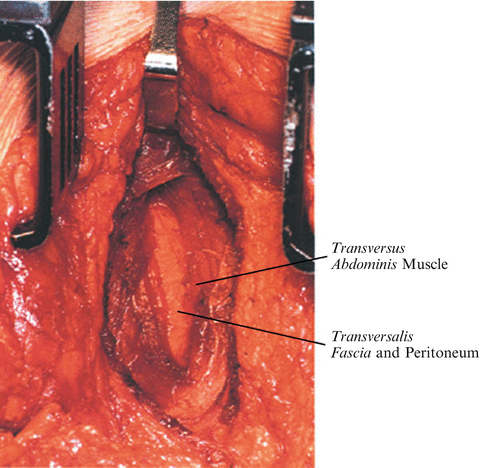

Fig. 25.2
With the surgeon standing anterior to the patient and the assistant posterior, incise through each muscle layer of the abdominal wall with electrocautery

Fig. 25.3
The assistant standing behind the patient should use forceps to pick up each intramuscular bleeding point for cauterization as the surgeon cuts through the muscle layers with the electrocautery. Muscle layers thin out anteriorly into a more superficial fascial layer. Penetration of the peritoneum is common near the rectus sheath, and caution should be used as the incision is taken more medially as one leaves the muscle layers. It is safer in the lateral, muscular portion of the wound

Fig. 25.4
The transversus abdominis muscle layer, often the thinnest of the three muscle layers of the abdominal wall, must be opened very carefully. The transversalis fascia underneath the transversus abdominis muscle should also be opened very carefully, as the peritoneum is the next most immediate layer under the transversalis fascia. Spread through the transversalis muscle, identify the transversalis fascia, penetrate the transversalis fascia in the more lateral aspect of the wound, and identify the peritoneum
4.
Open the transversalis fascia in the posterior portion of the wound. Lift the transversalis fascia with the Adson and carefully open it with blunt scissors. The retroperitoneal fat allows room to enter the extraperitoneal space. Dissection of the muscle layers becomes more difficult medially. The muscle layers thin out and the layers of fascia become almost joined medially. The peritoneum is very superficial (Fig. 25.5). Inadvertent penetration of the peritoneum is most likely just lateral to the rectus sheath.
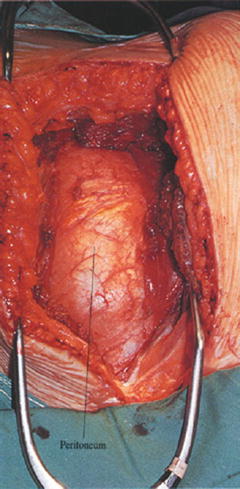

Fig. 25.5
The peritoneal layer under and adjacent to the transversalis fascia layer should be bluntly swept forward
5.
Get Clinical Tree app for offline access

Enter the retroperitoneal space laterally (Fig. 25.6). Identify the peritoneum and the fat of the retroperitoneal space. Remove the peritoneum from the remaining transversalis fascia medially, with the surgeon in the anterior position lifting the abdominal wall and the assistant in the posterior position peeling the peritoneum off the undersurface of the fascia with a 4 × 4 sponge. Extend the incision medially, after the peritoneum has been safely removed. Take the dissection to the edge of the rectus sheath. The sheath may be incised for added exposure. Torn peritoneum should be repaired promptly [1].
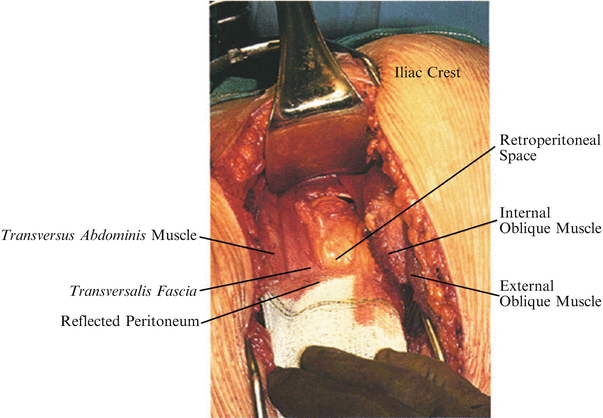

Fig. 25.6


Identify the fatty layer of the retroperitoneal space as the peritoneal sac and cavity is brought medially. Bluntly penetrate the retroperitoneal space with the hand. In addition, remove the peritoneum from the remaining transversalis fascia medially by having the surgeon in the anterior position lift the abdominal wall and the assistant in the posterior position peel the peritoneum off the undersurface of the fascia with a 4 × 4 sponge and extend the incision medially after the peritoneum has been safely removed from under the remaining musculofascial layers of the abdominal wall
Stay updated, free articles. Join our Telegram channel

Full access? Get Clinical Tree


