(1)
Marina Spine Center, Marina del Rey, CA, USA
1.
For the left retroperitoneal approach to L5-S1, place the patient in the right lateral decubitus position held by either the inflatable “beanbag” or appropriate towel padding. Take care to prevent any degree of left hip flexion, which could permit the thigh to interfere with the exposure.
2.
Make the incision from the midaxillary line, midway between the iliac crest and lowest rib, curving in a lazy-S configuration to the lower half of the symphysis-to-umbilicus distance. This point is approximately at the junction of the middle and distal third (Fig. 27.1) [1 , 2].
Fig. 27.1
For the left retroperitoneal approach to L5–S1, place the patient in the left lateral decubitus position. Take care to prevent any flexion of the left hip greater than 30 degrees, as the thigh will interfere with the exposure. Incise the skin and subcutaneous tissue from the midaxillary line, midway between the iliac crest and lower rib, curving in a lazy “S” configuration of the lower half of the symphysis-to-umbilicus distance; this is approximately at the junction of the middle and distal third of the distance between the symphysis and umbilicus. Divide with the electrocautery the external oblique, internal oblique, arid transversus abdominis muscles, much as described in Chapter 21. Enter the retroperitoneal space and retract medially the peritoneal sac
3.
With the electrocautery, divide the fascia and the external oblique and internal oblique muscles in the line of the incision. The transversus abdominis muscle is very thin. Open it in the posterior portions of the incision closer to the midaxillary line. Each of these muscle layers thins out anteriorly, and the peritoneum is very superficial at the edge of the rectus sheath. This is the area where the peritoneum is often inadvertently entered. If this occurs, repair the peritoneum after it has been well exposed and before the spinal work. With identification of the peritoneum and retroperitoneal space in the midaxillary line, bluntly dissect the peritoneum from the undersurface of the transversalis fascia before opening the rest of the abdominal wall incision.
4.
For added exposure, bluntly dissect the peritoneum from the posterior aspect of the rectus sheath. The edge of the rectus sheath itself can be opened and the rectus muscle can be partially cut.
5.
Proceed directly to the psoas muscle. Identify the genitofemoral nerve running on the surface of this muscle. The spine is medial to the muscle. With identification of the muscle, retract the peritoneal sac and ureter on the undersurface of the peritoneum medially.
6.
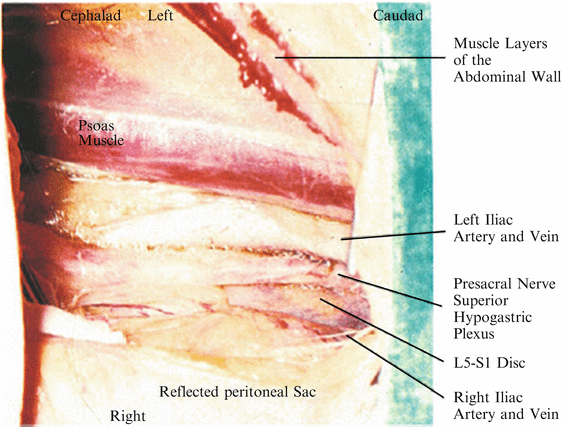
Palpate the spine with a finger and find a disc for orientation: usually it is the L4–L5 disc (Fig. 27.2). With identification of the L4–L5 disc, palpate the pulse of the left common iliac artery and the aortic bifurcation.
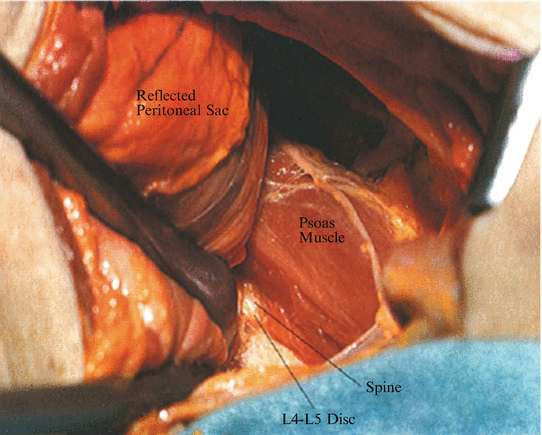
Fig. 27.2
Identify the psoas muscle. The psoas muscle is the key to the retroperitoneal exposure. The genitofemoral nerve on the psoas muscle helps with this identification. Sweep the peritoneal sac from left to right and identify the spine. Find the disc space. Most commonly this is the L4–L5 space or the L3–L4 space. Obtain an identifying X-ray at this point to localize the level. For the approach to L5–S1, after identification of the spine itself, palpate in the midline within the bifurcation to locate the L5–S1 disc
7.
The bifurcation of the aorta is critical in determining the exact approach from this point. The usual bifurcation at the L4–L5 disc level was present in 69% of anatomical dissections by Harmon, but there is great variation [3].
8.
Palpate the left common iliac artery and pass over it medially to the L5–S1 disc. By placement of the finger and a subsequent blunt retractor such as a sponge-covered elevator, develop a plane just to the right of the left common iliac artery. (Fig. 27.3).