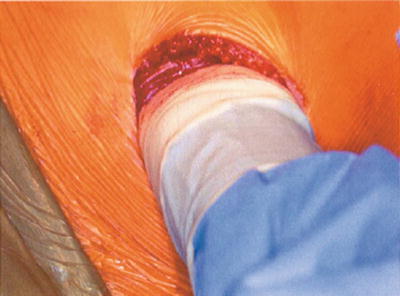
(1)
Cedars-Sinai Spine Center, Los Angeles, CA, USA
1.
Place the patient in the supine position on a Jackson or other X-ray table with an inflatable bag under the lumbar region. Discretionary inflation of the bag allows extension of the spine at the time of discectomy and graft placement, if needed.
2.
The approach surgeon stands on the left and the assistant on the right. The level of the transverse incision in the craniocaudad plane depends on the level of the spine to be approached (Fig. 26.1). The incision for L5–S1 is usually placed at the junction of the lower and middle third of the distance between the umbilicus and the symphysis pubis (Fig. 26.2). For L4–L5, the incision is placed just below the umbilicus and for L3–L4 just above. For L2–L3, the incision is placed about 5 cm above the umbilicus. The incision, however, should be moved caudad or cephalad depending on the angle of L5–S1 and the relationship of L4–L5 to the iliac crest as seen on a lateral X-ray of the lumbar spine. The information seen on that X-ray allows the surgeon to place the incision precisely by palpating the iliac crest, then moving the incision site accordingly. Because the incision is small, especially when compared to the size of a paramedian incision used for the same levels, optimal placement is crucial for introducing the working sleeves, templates, and inserters at the proper angle, parallel to the vertebral end plates, in a straight anteroposterior (AP) plane. It is usually better to be a little below rather than a little above the disc space; so when in doubt, go lower. The lateral X-ray of the lumbar spine will also show whether there is osteophytic activity or major vessel calcification, or possibly both. These conditions will warn the surgeon that a much more difficult situation is at hand.
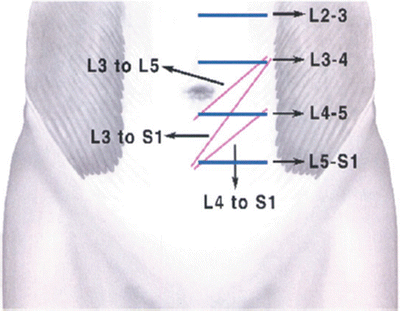
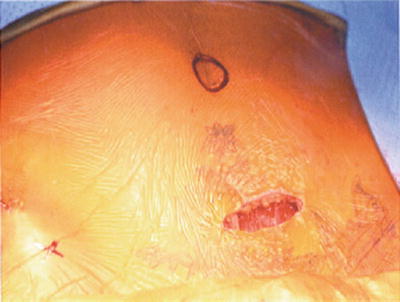

Fig. 26.1
Typical location of incision

Fig. 26.2
Incision for L5–S1 with a steep angle
3.
Begin the incision at the midline and carry it transversely to the lateral edge of the left rectus muscle. For two-level exposure, the incision should be more oblique, starting midline at the level of the lower disc and ending at the level of the upper disc at the lateral edge of the left rectus muscle (Fig. 26.3). For three levels, the obliquity increases, but the incision is never vertical or paramedian.
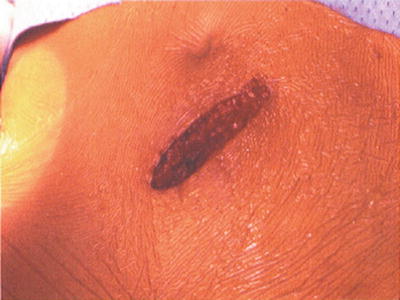

Fig. 26.3
Typical incision for L4–L5, L5–S1 approach in a normal weight patient
4.
Carry the incision to the anterior rectus sheath using electrocautery and carry the subcutaneous portion of the incision beyond the ends of the skin incision both medially and laterally. This technique should expose this fascia from beyond the midline to the external oblique aponeurosis. Incise the rectus fascia from 1 cm to the right of the midline to the edge of the rectus laterally. The anterior rectus sheath is then elevated anteriorly away from the muscle belly for a distance of 4 to 6 cm both superiorly and inferiorly to allow full mobilization of the rectus muscle (Fig. 26.4). Medial, lateral, and posterior dissection of the muscle is then carried out both with cautery and with finger dissection, taking great care to avoid injury to the inferior epigastric vessels. The inferior epigastric vessels run along the undersurface of the muscle and must be elevated with the muscle and retracted with it using an appropriate curved retractor. The rectus muscle is now mobilized circumferentially (Fig. 26.5) and can easily be retracted both medially and laterally. Lateral mobilization of the rectus should not result in rectus denervation in exposing up to three levels (L3 to S1). In approaching multiple levels that include L2–L3, care must be taken not to injure the intercostal nerve that perforates the posterior rectus sheath and enters the muscle at that level as that trauma may result in rectus muscle paresis.
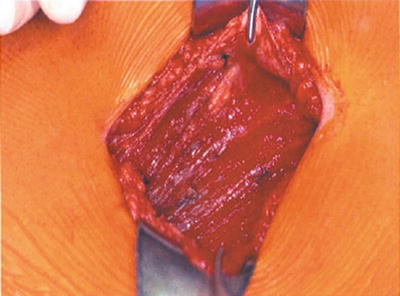
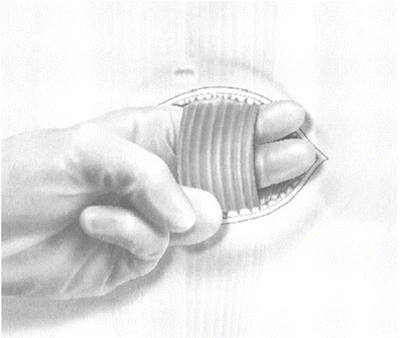

Fig. 26.4
Anterior rectus sheath elevated away from left rectus muscle

Fig. 26.5
Left rectus muscle mobilized circumferentially
5.
With the rectus muscle initially retracted medially (Fig. 26.6), and for level L4–L5 or above, carefully incise the posterior sheath with a knife for 4 to 5 mm until the peritoneum is seen to shine through. Grasp the edges with a hemostat, then lift it away and very carefully dissect it from the peritoneum and incise it with scissors as far inferiorly and superiorly as possible. This layer can be quite tenuous, and care must be exercised to prevent peritoneal lacerations. The peritoneum will now bulge upward (Fig. 26.7). Using your index finger, carefully push the peritoneum posteriorly at the edge of the fascial incision and slowly develop a plane between it and the undersurface of the internal oblique and transversus muscles and fascia; this will lead you into the retroperitoneal space (Fig. 26.8).
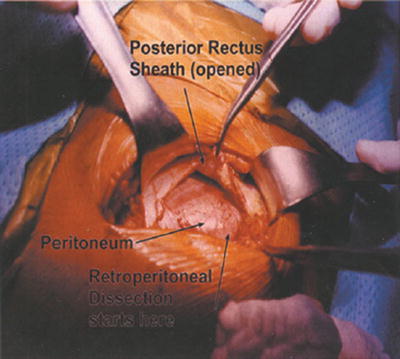
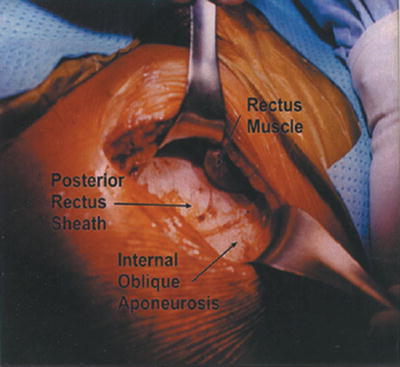
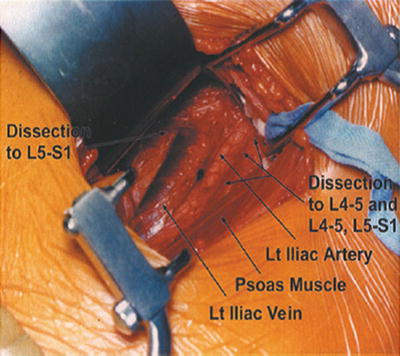

Fig. 26.6
Left rectus muscle elevated away from the posterior rectus sheath

Fig. 26.7
Posterior rectus sheath incised and elevated to expose underlying peritoneum

Fig. 26.8
Path to retroperitoneum
6.
Continue careful blunt finger dissection posteriorly and then start pushing medially, trying to elevate the peritoneum away from the psoas muscle. Should the peritoneum be entered, the tear should be repaired with absorbable suture material at that time; delaying this repair will only lead to major peritoneal repairs later on. Be careful not to enter the retropsoas space at this point because this error will lead to unnecessary bleeding in a blind pouch. The genitofemoral nerve can be easily identified over the psoas. The ureter can usually be identified as the peritoneum is lifted away from the psoas. Both these structures should be preserved from injury (Fig. 26.9).
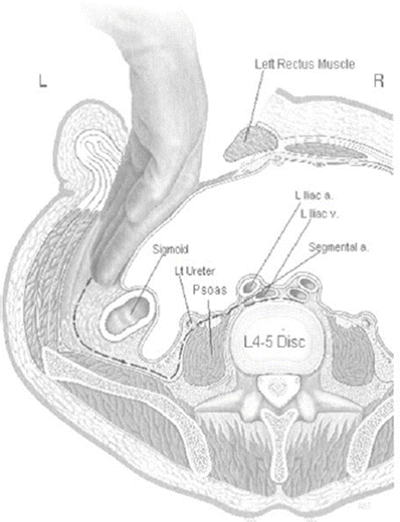

Fig. 26.9
The ureter is identified above the psoas muscle as the peritoneum is elevated anteriorly
7.
Once the psoas is identified, palpate medially to feel for the discs and vertebral bodies and the iliac artery. At this point, insert the entire hand (if the size of the incision allows) and make a fist in the retroperitoneal area (Fig. 26.10). Sweep with the closed fist up and down to elevate the peritoneum away in all directions. Most single-level incisions are too small to allow a full fist to enter the retroperitoneum, so sweep with individual fingers or a sponge stick. A Harrington retractor is then inserted to elevate the peritoneal contents away from the vessels and allow further dissection. A Balfour retractor with appropriately deep blades is then inserted to keep the incision open in the craniocaudad plane. A dry lap sponge tucked superiorly into the space above the psoas before insertion of the Balfour is helpful in keeping retroperitoneal fat from creeping down and obscuring the field.
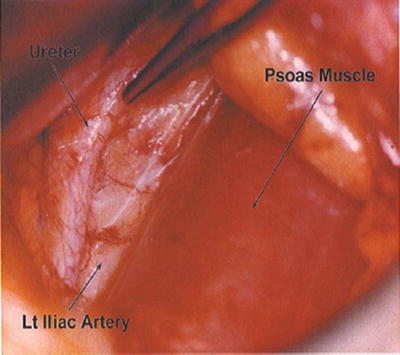

Fig. 26.10
The fist is used to elevate the peritoneum away from retroperitoneal structures
8.
For operations on only L4–L5 or for operations that combine L4–L5 with either L3–L4 or L5–S1, the iliolumbar vein(s) must be ligated and cut because they serve as a tether, preventing mobilization of the iliac vein away from the anterior surface of the spine, and thus prevent proper exposure. With the Harrington-Balfour retractor combination in place, dissect bluntly just above the iliac artery and move the retroperitoneal tissues away from it (Fig. 26.11). Expose and skeletonize the entire length of the common and external iliac arteries as far distally as possible (Fig. 26.12). This distal mobilization will allow these vessels to be moved to the right for proper exposure of L4–L5. Using a Kittner or peanut sponge, proceed with sweeping blunt dissection along the lateral edge of the artery, going deep; this can usually be done fairly quickly because there are no branches of the iliac artery at this level. The lymphatics present in this area are easily swept away as well, but some hemostasis may be necessary with clips or cautery. This step will expose the left common iliac vein just underneath and medial to the artery. Continue the sweeping blunt dissection posteriorly to identify the iliolumbar vein(s), which crosses the body of L5 and dives into the left paraspinous area. Variations in the formation of the common iliac vein and the iliolumbar veins are common, and great care must be exercised to identify, ligate, and transect these veins and avoid avulsion (Fig. 26.13). Ligation should be carried out in place before transection and not too close to the junction to the iliac vein itself to avoid injury to its sidewalk. For any operation that involves L4–L5, these maneuvers are mandatory, unless the approach can be done below the bifurcation and between the iliac vessels.

