(1)
Marina Spine Center, Marina del Rey, CA, USA
1.
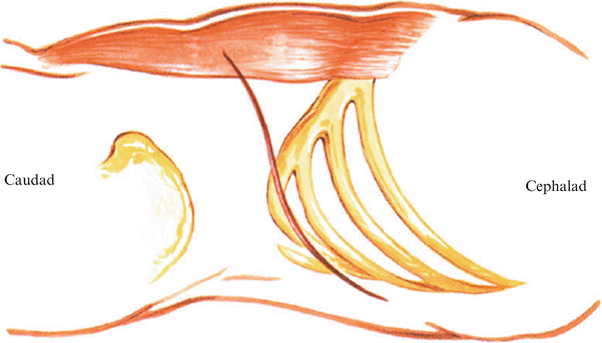
Make a standard skin incision over the entire length of the left 11th rib. Extend the incision from the rib tip medioinferiorly to the edge of the rectus sheath (Fig. 20.1). You can expand the incision by curving the posterior arm cephalad to allow for removal of additional rib and by extending the anterior arm down the abdominal wall vertically for exposure of more of the lumbar spine retroperitoneally.


Fig. 20.1
Make a standard incision over the left 11th rib extending from the tip of the 11th rib to the edge of the rectus sheath. Remove the 11th rib and split the costal cartilage (as demonstrated in Chapter 18). Separate the split cartilaginous tips and bluntly dissect with utmost care the separating leaves of tissue. Dissect the parietal pleura from the undersurface of the rib bed, starting at the split cartilage
2.
Resect the 11th rib from the angle of the rib to the junction of rib and costal cartilage, leaving the rib bed intact.
3.
The most crucial step of the operation is to remain in the extrapleural and retroperitoneal plane at this point.
4.
Split the costal cartilage. The insertion of the diaphragm is into the cephalad edge of costal cartilage and adjacent rib bed; likewise, the insertion of the transversus abdominus musculature and transversalis fascia is into the caudad portion. The pleura and the pleural cavity are under the rib bed.
5.
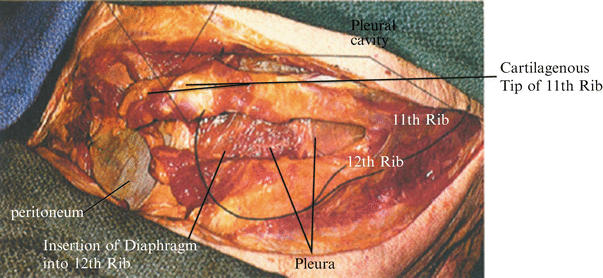
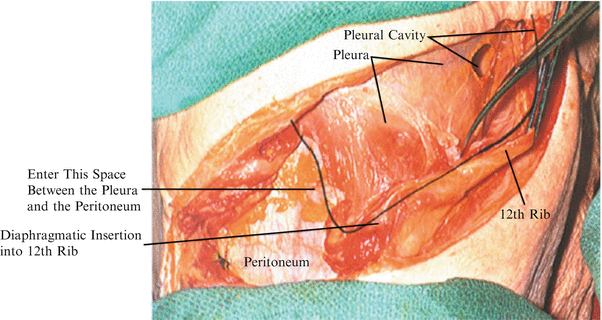
The key is to open the split cartilage and dissect carefully under the costal cartilage several inches toward the rib bed to protect the parietal pleura (Figs. 20.2, 20.3). Do not damage the pleura while the retroperitoneal space is being opened.


Fig. 20.2
In a dissected specimen, note the important relationships of the pleura and peritoneum to the cartilage at the tip of the 11th rib. Understanding the anatomy of the undersurface of the 11th rib bed is important in maintaining an extrapleural retroperitoneal approach.
The intimate relationship of the pleural cavity and the peritoneal cavity is seen under the 11th and 12th ribs. The attachment of the abdominal musculature to the cartilage tip of the 11th rib has been removed. The diaphragmatic insertions into ribs 11 and 12 are present. The objective of the dissection is to enter the space between the peritoneal cavity and the pleural cavity
6.
Get Clinical Tree app for offline access

Bluntly dissect the upper cartilage tag cephalad and the lower tag caudad (Fig. 20.3). At this point, identify the retroperitoneal space and the peritoneum. Extend this incision from the level of the costal cartilage medially 3 inches. Divide each muscle layer (external oblique, internal oblique, transversus abdominis) from the tip of the 11th rib.


Fig. 20.3
The distal extent of the pleural cavity in close proximity to the peritoneal cavity. Dissection takes place between these two planes in the retroperitoneal, extrapleural space, reflecting cephalad the parietal pleura seen here
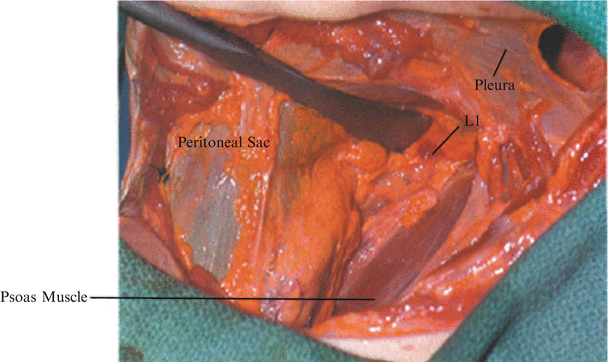
Caution: The muscle layers thin out dramatically medially and the peritoneum is easily entered. If this happens, repair it immediately with pursestring sutures. After the peritoneum is reached, it is bluntly dissected from the undersurface of the transversalis fascia, the fascia opened, and the peritoneal retracted (Fig. 20.4 ).


Fig. 20.4


Another view of the retroperitoneal space approaching L1 extrapleurally and retroperitoneally. With the peritoneal sac forward, dissect and retract the pleura cephalad
Stay updated, free articles. Join our Telegram channel

Full access? Get Clinical Tree


