Fig. 1
Configuration of the stereotactic frame for injection of rat dorsal root ganglia. (a) First the electrode holder is placed in inverted orientation. (b) The manipulator is swiveled 180° about the vertical axis so that the electrode holder is held outside the frame. (c) The manipulator is then rotated 90° in the vertical plane to bring the electrode holder to a horizontal position. (d) The injection needle is then mounted on the electrode holder using adhesive putty
2.3.2 Surgical Approach
A dorsal approach to the DRG is taken so that it can be injected with a vertically held needle, mounted on a stereotactic frame as described above.
Following induction of anesthesia, the location of the L4/L5 DRG can be identified using the iliac crest as a reference. The L5 DRG is located level with or slightly rostral to the line of the iliac crest (see Fig. 2). The L4 DRG will be approximately 8 mm rostral in a young adult rat. An area of about 6–7 cm long centered over the DRG should be shaved, cleaned, and sterilized with alcohol.
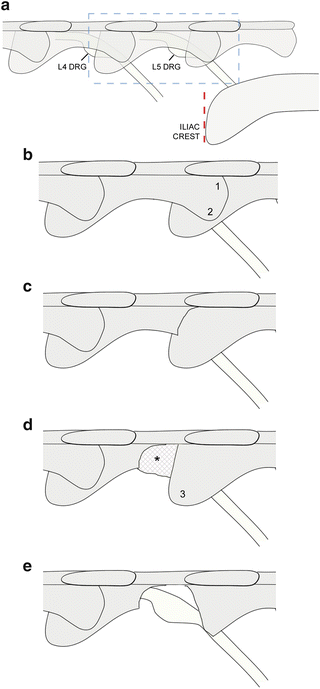
Fig. 2
Location and exposure of the L4/L5 dorsal root ganglia. (a) Location of the L4 and L5 DRG with respect to the level of the iliac crest (dotted line). The overlying vertebrae (L4–L6) are shown as semi-transparent. The boxed area (L5 vertebra and DRG) is shown in panels (b–e). (b, c) Exposure begins by removing the L5 caudal articular process (1) and accessory process (2). (d) The L6 cranial articular process (3) is exposed and laminectomy of the L5 vertebra continues rostrally. Connective tissue (asterisk) may cover the DRG at this point. (e) The connective tissue is removed and the L6 cranial articular process is partially removed to complete the exposure of the L5 DRG. The L4 DRG should then be exposed in the same way before injecting both ganglia with viral vector
A longitudinal skin incision of about 4 cm is made over the position of the L4/L5 DRG to the left of the spinous processes, and the muscles attached to these processes on the left side are separated from the vertebrae by cutting. Retractors (17008-07; Fine Science Tools, Heidelberg, Germany) can be inserted to keep the muscles apart. To expose the L5 DRG, first remove the accessory process and the caudal articular process of the L5 vertebra using Friedman-Pearson rongeurs (16021-14; Fine Science Tools). This will expose the L6 cranial articular process (see Fig. 2). From here remove 1–2 mm more of the L5 vertebral lamina in the rostral direction, exposing the proximal edge of the DRG. To fully expose the DRG it is then necessary to remove at least the rostral half of the L6 cranial articular process.
The area containing the DRG is now exposed although the ganglion itself may not be visible due to overlying connective tissue and more laterally, muscle, containing the dorsal ramus of the spinal nerve. Care should be taken not to damage this. A small incision in the muscle parallel to the line of the spinal nerve and slightly rostral to it can help to make the DRG visible.
The DRG is identifiable as a cream-colored enlargement as compared to the surrounding dorsal root and spinal nerve. Often a microscopically small capillary network is visible on top of the DRG in the center.
It is important to open the epineurium of the DRG prior to insertion of the injection needle. This must be done without damaging the endoneurial tissue of the ganglion itself—as this will result in poor retention of the injected liquid. Insertion of the needle through the intact epineurium, on the other hand, will risk considerable compression of the ganglion which may compromise the viability of the tissue.
The epineurium can be opened by picking it with a 30 G needle (mounted on a 1 ml syringe to hold). An opening should be made where the needle will be inserted and needs to be only large enough for this.
Before beginning with injections the L4 DRG should be exposed in the same way.
2.3.3 Loading the Viral Vector
To load viral vector into the glass needle, it can be first pipetted onto a hydrophobic surface such as a piece of Nesco film or Parafilm, and then withdrawn into the needle while it is mounted ready for injection, with the aid of the microscope. Manual withdrawal of the pusher block holding the syringe plunger can be used, or the pump controls. We routinely add 0.1 % Fast Green FCF, to visualize the injected fluid during the injection procedure. This is useful to monitor the success of the injection and the degree of leakage into surrounding tissue.
2.3.4 Injecting the Viral Vector
An important factor in the success of this technique is in the positioning of the needle. This should be done so that the needle tip is as close to the center of the ganglion as possible when inserted. It is helpful therefore to make sure the edges of the ganglion are visible. Best results are achieved by inserting the needle into the thickest part of the ganglion at a depth of 400–500 μm. This can be measured using the Vernier gauge of the stereotactic frame. The needle should be rested on the surface of the ganglion so it is visibly in contact and the vertical position of the holding arm read. Move the needle down quickly until it penetrates the ganglion, while observing through the microscope. Then withdraw slightly and adjust the depth. After the needle is inserted, wait approximately 2 min before beginning to infuse liquid. This will allow the tissue to seal around the needle and help prevent leakage. Likewise, following injection, it is advisable to wait 2 min before removing the needle to allow the injected liquid to be absorbed into the endoneurium and avoid leakage from reflux.
Up to 1.2 μl virus can be injected in one DRG, with a flow speed of 0.2 μl/min.
After both DRG have been injected the overlying muscles are closed with a 5-0 suture and the wound closed with clips. The animal is allowed to recover in a heated box.
2.3.5 Notes
Breathing. Movement of the DRG due to the animal’s breathing can cause problems such as increased leakage. Lifting the animal slightly by placement of a roll of tissue under the belly, either directly below the DRG or slightly more rostral, will minimize this movement.
Bleeding. Performing the laminectomy can lead to persistent bleeding. This is particularly the case if the laminectomy is extended too far rostro-medially and caudo-medially. Bleeding can usually be stopped by inserting a small piece of gelfoam (spongostan, MS0002; Johnson & Johnson Medical) between the lamina and the spinal cord.
2.4 Intrathecal Delivery of Viral Vector
Intrathecal catheterization is performed in many laboratories to provide sustained delivery of drugs or biologically active molecules, particularly in the study of nociception and neuropathic pain. Drugs delivered in this way target the spinal cord and dorsal root ganglia. More recently the technique has been used to deliver AAV vectors to target the DRG [20–23]. This has the advantage that only a single injection is necessary to achieve long-term effects. Our intrathecal injection technique is adapted from the method by Yaksh and Rudy [24, 25] to place a chronic PE-10 tube in the dorsal subarachnoid space of rats. They inserted a PE-10 tube 8.5 cm through the foramen magnum to reach the lumbar enlargement of the rat. In recent years a number of groups including ourselves (Fig. 3) have used this technique to allow AAV injections in the intrathecal space with considerable success. Storek and colleagues investigated intrathecal injections of conventional and self complementary (sc) AAV vectors expressing eGFP packaged with capsids of the serotypes 1, 2, 3, and 5 in rats [20]. No expression was seen with conventional AAV serotypes 1 and 5 and with sc-AAV serotypes 2 and 3. Long term strong eGFP expression was observed for sc-AAV serotype 1 and weak expression for sc-AAV serotype 5, as measured by Western Blots of the lumbar segments of the spinal cord and cauda equina. Additionally they achieved successful long-term transduction of DRG neurons using sc-AAV serotype 8 expressing eGFP in rats [21] and demonstrated functional effects of rIL-10 and prepro-β-endorphin delivered with the same sc-AAV serotype 8 in a chronic neuropathic pain model. Towne and colleagues have seen similar transduction efficiency of DRG neurons in mice using AAV serotype 6 through different delivery methods [22]. They concluded that intrathecal delivery of AAV6 expressing eGFP is an efficient method to transduce DRG neurons. Xu and colleagues showed successful transduction of lumbar DRG using sc-AAV serotype 5 expressing eGFP and shRNA targeting mTor in rats, demonstrating the feasibility of gene knockdown in DRG neurons using AAV injected into the intrathecal space [23]. Other groups have used direct lumbar punctures in rodents [26, 27]. However, most of these injections lead to inferior transduction efficiency of DRG neurons and a laminectomy is needed in some cases [27]. Furthermore, considerable experience is needed to perform these direct lumbar punctures in a reproducible fashion.
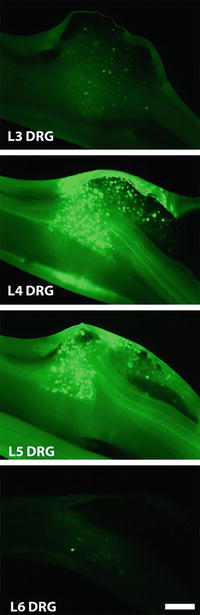
Fig. 3
Transduction of DRG following injection into the intrathecal space. DRG transduction pattern 2 weeks after intrathecal injection of AAV5-CMV-eGFP-WPRE. Whole mount photomicrographs of the L2-L6 DRG with native eGFP fluorescence are shown. Bar = 250 μm
2.5 Method B. Intrathecal AAV Delivery Targeting the Lumbar DRG Using a Catheter
The catheter is made from approximately 30 cm of stretched PE-10 tubing (800/100/100; 0.28 mm I.D., 0.61 mm O.D.; Hythe, UK). The stretching of tubing is done manually by warming it up between two hands after which the tips are grasped between two haemostatic forceps and pulled away from each other until an outer diameter of 0.4 mm is reached. This can best be done parallel to a flat surface which helps to avoid flexing of the tubing. Cut of both ends of the tubing and make sure that the tip on the side that will be introduced into the intrathecal space has no sharp edges that could damage the spinal cord while inserting. The tubing is then disinfected using 70 % ethanol and marked at 8.5 cm from the tip. We have determined that with this placement distance the tip of the tubing ends up around L2 level in Fischer 344 rats that weigh 180–250 g, which should result in bilateral transduction of the L2 to L6 DRG with maximum transduction rates at the L4/L5 level. The tubing is then connected to a 50 μl Hamilton syringe (549-1154; Hamilton) which should be properly sealed without need for adhesives. The syringe and tubing are filled with sterile water by removing the plunger, as described above for direct injections. After replacement of the Hamilton plunger, 2 μl of air should be taken up prior to loading with virus to prevent mixing.
2.5.1 Surgical Procedure
The anesthetized animal is mounted in a conventional stereotactic frame using ear bars. The animal is put on an elevated platform to straighten the spinal column. Hair is removed from the area between the ears to the neck using clippers and a skin incision of 2–3 cm is made starting behind the ears towards the neck. At the midline, blunt dissection between the two superficial muscles (m. Levator Auris Longus) is performed starting from the nuchal crest going caudally (Fig. 4a). To obtain access to the spinal column the deeper muscle layers (m. Platysma and m. Rectus Capitis) are split by blunt dissection by following the base of the skull across the midline of the rostro-caudal axis (Fig. 4b). The musculature is then retracted laterally using a curved mouse retractor (17003-03; Fine Science Tools) to obtain clear view of the yellow colored atlanto-occipital membrane covering the foramen magnum, which gives access to the underlying spinal cord and cisterna magna, both enclosed by the dura mater (Fig. 4c).
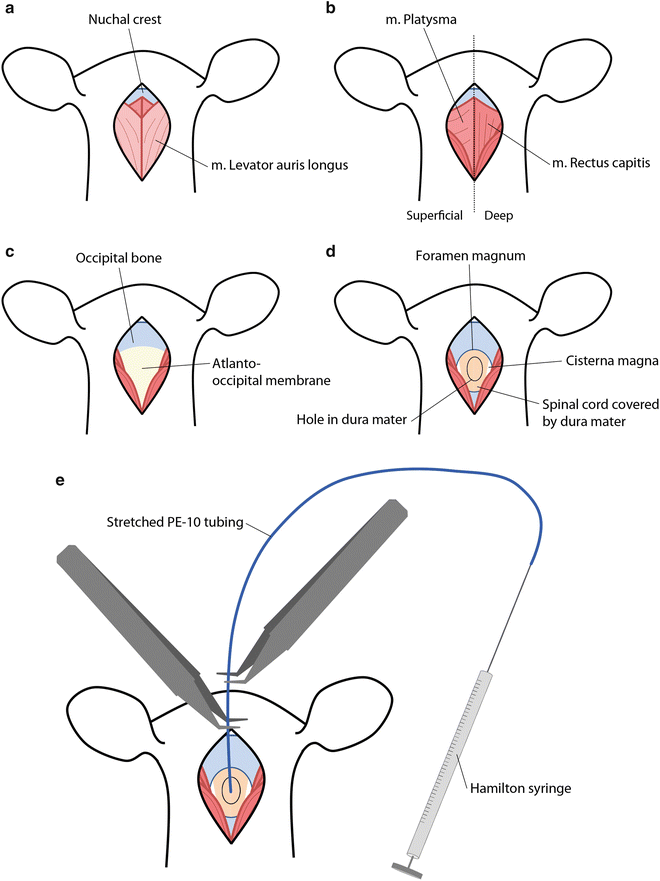
Fig. 4
 Gene Therapy Approaches to Promoting Axonal Regeneration After Spinal Cord Injury
 Gene Therapy Approaches Using Reproducible and Fully Penetrant Lentivirus-Mediated Endogenous Glioma Models
 Gene Therapy for Huntington’s Disease
 Gene Therapy for Chronic Pain: How to Manipulate and Unravel Pain Control Circuits from the Brain?
 Adeno-Associated Vectors for Gene Delivery to the Nervous System
 Gene Therapy for Parkinson’s Disease: AAV5-Mediated Delivery of Glial Cell Line-Derived Neurotrophic Factor (GDNF)


Surgical procedure for access to the dorsal intrathecal space. (a) Incision of the skin at the base of the skull exposes the superficial muscles (m. levator auris and m. platysma). (b) Both muscles are split over the midline and retracted laterally, which exposes the underlying deeper muscle (m. rectus capitis) attached to the occipital bone. (c) After retraction of the m. rectus capitis the yellow-colored atlanto-occipital membrane becomes visible, which is then removed using forceps. (d) Removal of the atlanto-occipital membrane exposes the foramen magnum, which grants access to the spinal cord and cisterna magna. The dura mater is opened to access the arachnoid space. (e) The catheter is slowly inserted 8.5 cm into the dorsal intrathecal space using two forceps after which injection of the viral vector is performed
Related posts:
Gene Therapy Approaches to Promoting Axonal Regeneration After Spinal Cord Injury
Gene Therapy Approaches Using Reproducible and Fully Penetrant Lentivirus-Mediated Endogenous Glioma Models
Gene Therapy for Huntington’s Disease
Gene Therapy for Chronic Pain: How to Manipulate and Unravel Pain Control Circuits from the Brain?
Adeno-Associated Vectors for Gene Delivery to the Nervous System
Gene Therapy for Parkinson’s Disease: AAV5-Mediated Delivery of Glial Cell Line-Derived Neurotrophic Factor (GDNF)
Stay updated, free articles. Join our Telegram channel
Full access? Get Clinical Tree
