♦ Preoperative
Imaging
- Magnetic resonance imaging to assess brain stem or spinal cord compression
- Plain x-rays to evaluate alignment
- Computed tomography (CT) with sagittal reconstructions to visualize extent of possible exposure (hard palate and vallecula)
Preoperative Care
- Somatosensory evoked potential/motor-evoked potentials may be useful.
Equipment
- Self retaining anterior cervical retraction system
- Apfelbaum cervical retractor system (Aesculap, Inc.) is useful
- Cannulated screw system with options for lag screws
- Kirschner wires (K-wires) and wire driver
Operating Room Set-up
- Neutral position intubation to minimize neck manipulation
- Somatosensory and motor evoked potential monitoring (optional)
- Fluoroscopy (consider draping into field); need anteroposterior (AP) and lateral views
- Anesthesia at patient’s waist on the left to allow biplane fluoroscopy and assistant to stand on the left. Remember to secure the endotracheal tube and anesthesia circuit below the plane of the lateral image at a level that does not interfere with lateral image.
Positioning
- Supine on operating table
- Head on ring or fixed in Mayfield head holder with fracture reduced and mild extension
- Obtain preoperative lateral radiograph with K-wire taped along ideal screw trajectory to see if technically feasible with patient’s anatomy. If not possible, consider posterior C1–C2 fusion.
♦ Intraoperative
Exposure
- Horizontal incision in skin crease on right. Approximately C3–C4 level for thin necks and C4–C5 for stout necks.
- Divide platysma from midline to medial border of sternocleidomastoid.
- Mobilize submandibular gland rostrally.
- Standard anterior cervical approach then migrate rostrally to the C2–C3 disc
- Insert anterior cervical/Apfelbaum-type retractors (smooth blades).
- Confirm odontoid positioning, extent of exposure, and midline with fluoroscopy.
Screw Placement
- Confirm (and mark) midline and verify that the head has not rotated (if not secured with Mayfield head holder).
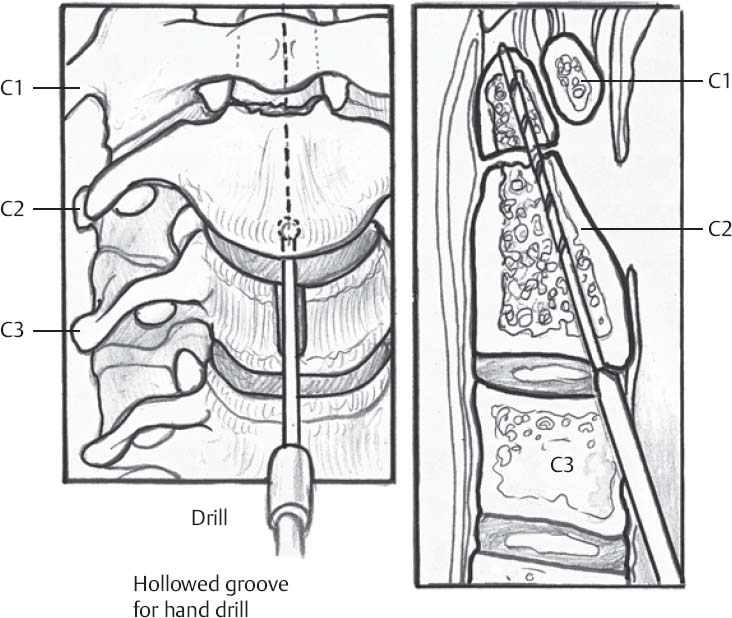
- Entry point is in the inferior endplate of C2, just inside the C2–C3 interspace (will need to “nick” annulus) (Fig. 89.1)
- Advance K-wire 1 cm aiming for apex of odontoid on lateral image and confirming straight midline trajectory on AP image.
- Once 1 cm of K-wire is within bone and in the midline, aiming for the apex of odontoid, continue advancing checking regular lateral and occasional AP images until apex of odontoid is engaged. Replace and redirect wire as needed to achieve ideal screw trajectory.
- Drill over wire with cannulated drill checking lateral and occasional AP images.
- Tap until apex of odontoid is engaged checking lateral and occasional AP images.
- Measure and place screw so that the head of the screw is flush with the C2 endplate and the apex of the odontoid is engaged. A lag screw may provide some increased reduction of fracture fragments.
- Confirm position with best available intraoperative imaging.
- There is little additional benefit of adding a second screw.
- Closure similar to routine anterior cervical approach: achieve hemostasis, remove retractors, confirm hemostasis, consider Jackson-Pratt drainage, close platysma with interrupted Vicryl sutures close subcutaneous tissues with 3–0 Vicryl inverted interrupted sutures and close skin as preferred (Dermabond, subcuticular running suture, or Steri-Strips)
< div class='tao-gold-member'>
Only gold members can continue reading. Log In or Register to continue
Related posts:

Stay updated, free articles. Join our Telegram channel

Full access? Get Clinical Tree


