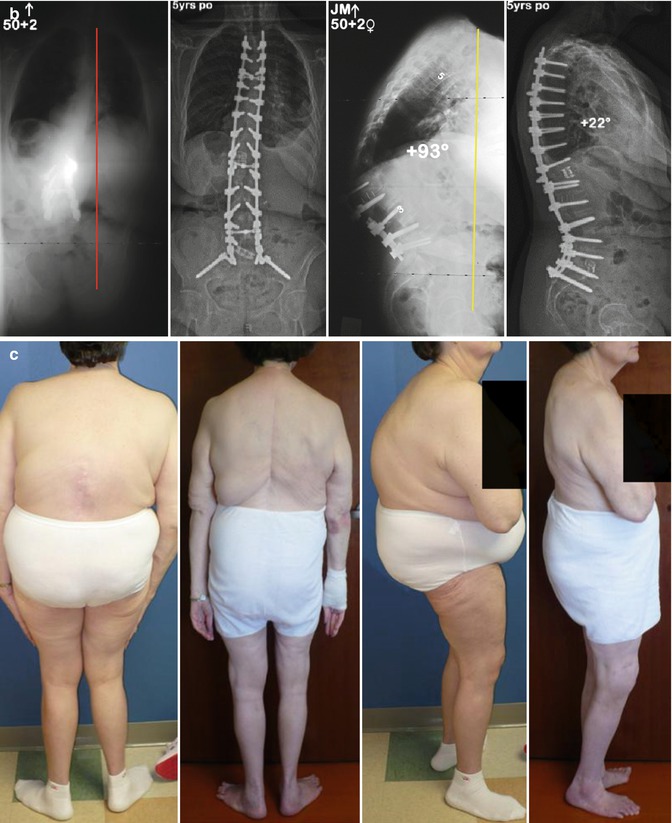
Fig 15.1
AP and lateral radiographs of a patient thought not to be a good candidate for elective spinal deformity surgery due to her severe debilitative state of having polio syndrome as a child, poor nutrition (wt. 34 kg), and overall poor health
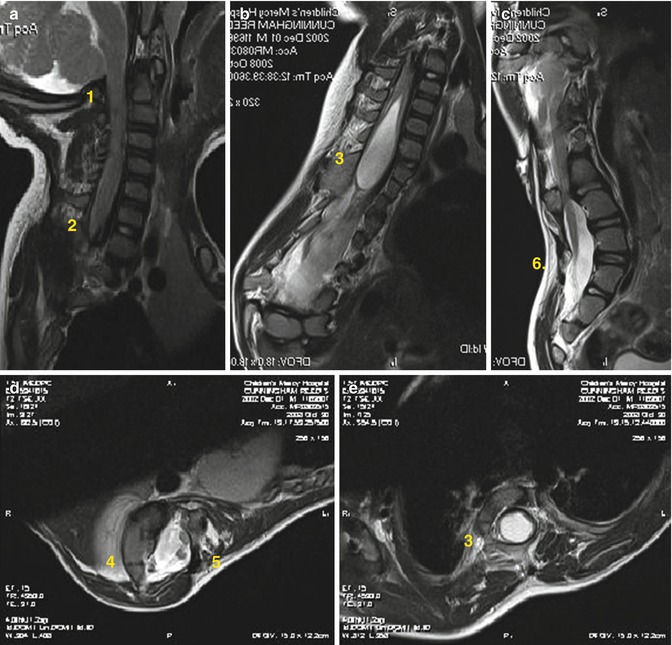
Fig 15.2
Variety of MRI abnormalities found in a single patient with a severe congenital spine deformity. (a) AC malformation, (b) cervical stenosis, (c) syringomyelia, (d) diastematomyelia, (e) diplomyelia. A screening MRI is imperative prior to any complex spinal reconstruction for spinal deformity
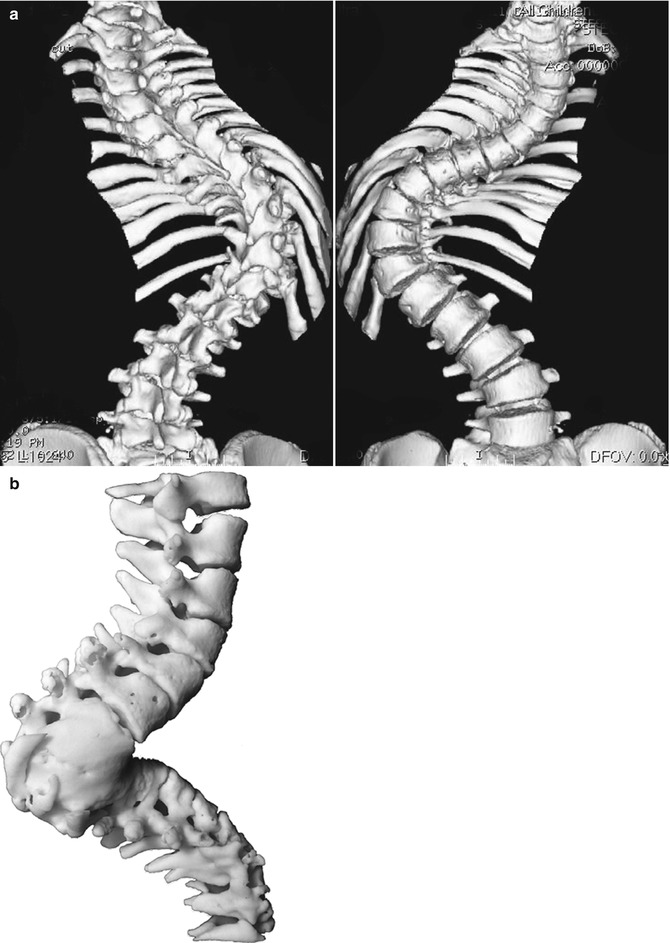
Fig 15.3
(a) 3D CT scans preoperatively can help precisely define the osseous anatomy encountered intraoperatively, and (b) often an actual 3D model will be created to assist in the most challenging cases of spinal deformity reconstruction to provide the operating team with the best information possible during surgery
One procedure we have found exceedingly helpful in preparing our most deformed and debilitated patients for surgery has been the use of preoperative halo-gravity traction (HGT). Following placement of a 6- or 8-pin halo under anesthesia, the spinal column is gradually lengthened by the application of approximately 3 lbs (approx. 1.25 kg) of weight/day to a maximum of 33–50 % of the patient’s body weight. Patients are then kept at that weight for several weeks/months, depending on the individual’s circumstances. We have found HGT to be most beneficial in early onset and juvenile deformities, as well as in cervicothoracic and proximal thoracic deformities. We have used HGT in all types of thoracic and even thoracolumbar deformities in both pediatric and adult patients. This traction not only safely stretches out the spinal column, but allows for optimized pulmonary and nutritional support to be concomitantly provided in a controlled health-care environment. Weekly radiographs assess the change in the amount of spinal length obtained, as well as correction of the major and minor deformities. Careful assessment of the upper and lower extremity neurologic and cranial nerve function must be performed to ensure these aren’t altered during the traction process. In those patients with preoperative myelopathy, perioperative oral steroids should be considered, especially if there is a subtle decline in the neurologic function/exam.
Lastly, prior to surgery, it is important that the patient and/or family be comfortable with the proposed operative plan and treatment. Ensuring a properly educated patient/family with appropriate informed consent is essential to a successful and safe procedure. Unfortunately, there will always be the risk of serious adverse events or complications that will stress the patient, family/caregivers, and surgeon alike. Having an excellent and supportive rapport with the patient/family/caregiver preoperatively will go a long way in successful management and a safe conclusion to any perioperative complications. This holds true not only for the surgeon–patient relationship, but also for the surgeon’s nurse–patient relationship as well. Finally, any preparatory procedures should be performed when necessary, such as hip replacement for an arthritic hip joint in an older adult or a preoperative tracheostomy in a pediatric patient at high risk for pulmonary or anesthetic complications.
15.2 Intraoperative Technical Execution
The spinal deformity patient needs to be adequately monitored during surgery, with anesthesia staff utilizing central venous and arterial lines. Use of a vascular access service to place the central venous catheter the day prior to surgery can help expedite the operative day. For positioning the patient, we recommend placing all adults into either Gardner–Wells tongs or halo traction to help keep the cervical spine in a neutral position and pressure off the orbits. We prefer a halo when there is a severe high thoracic or cervicothoracic kyphosis that will make access to the proximal thoracic spine difficult, as we can apply gentle flexion force to the posterior aspect of the halo. This also aids in passive correction of stiff/inflexible thoracic hyperkyphosis deformities (Fig. 15.4).
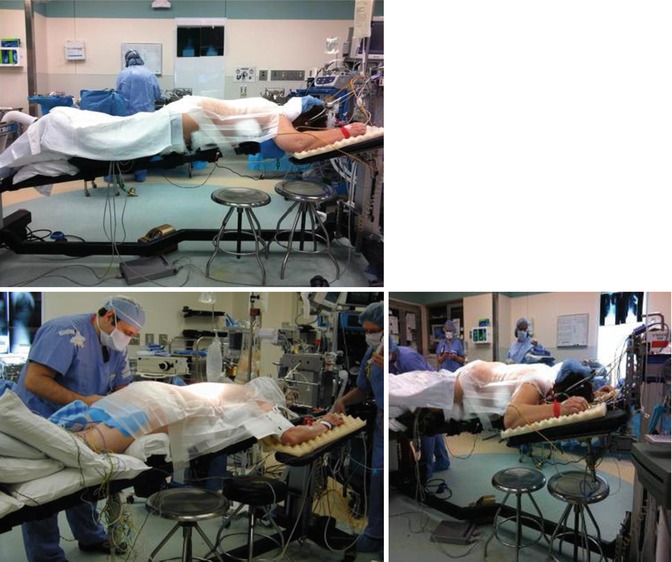

Fig 15.4
Positioning of the patient is crucial to avoid pressure neuropathies, maximize lumbar lordosis, and minimize blood loss. In addition, we always place our adult patients into either skull-tong traction or a halo device to keep the cervical spine in neutral position and keep the face and orbits free from any compression
Proper patient positioning is critical for avoiding peripheral nerve injuries and minimizing intraoperative blood loss by ensuring the abdomen is free and that the patient is always lying in a slight reverse Trendelenburg position to avoid pooling of fluids into the brain and eyes during long reconstructions. The arms should be placed in a 90–90 position, with the brachial plexus free from any compression or stretch. The lower and upper extremities should be checked and well-padded prior to placing the sterile drapes. The surgeon, and not one of his/her surrogates, should perform a confirmatory assessment of the patient positioning prior to sterile scrubbing of both the patient and surgeon. We will consider use of intraoperative halo or halo-femoral traction when indicated. We frequently utilize halo-ipsilateral high side femoral traction in those patients with fixed pelvic obliquity to help optimize patient positioning, curve correction, and pelvic alignment intraoperatively. For those patients with more angular and rigid deformities, especially in kyphosis or when preexisting tenting of the spinal cord is occurring at the apex of the deformity, we minimize traction weight to decrease further stretch of the spinal cord over the apical segments.
Standard prepping and draping is performed and prophylactic antibiotics are provided in a timely fashion. We utilize antifibrinolytics intraoperatively, in order to minimize blood loss. In our institution we prefer tranexamic acid dosed at 50 mg/kg loading dose and 5 mg/kg maintenance dose for pediatric patients, and 10 mg/kg loading dose and 1 mg/kg maintenance dose in adults during the entire procedure. Strict blood pressure control with maintenance of a mean arterial pressure (MAP) between 75 and 80 mmHg is required throughout the case, and all efforts employed to avoid sudden hypotension. Perioperative steroids should be provided to those patients with an abnormal neurologic exam and/or evidence of spinal cord tenting at the apex of the deformity to decrease edema of the neural elements during the surgical procedure.
The planned incision begins at the spinous process one level above the upper instrumented vertebra (UIV) and ends at the spinous process of the planned lower instrumented vertebra (LIV). A subperiosteal dissection is then performed to expose the posterior elements out to the tips of the transverse processes bilaterally. At the level of the planned resection, the dissection should be continued laterally to expose at least 5 to 6 cm of rib. In severe deformities with prominent rib humps, convex medial rib thoracoplasties may need to be performed to gain access to the transverse processes at the apex. The entire exposure should be performed expeditiously and thoroughly, with an aim to minimize blood loss, to avoid the occurrence of early coagulopathy (Fig. 15.5).
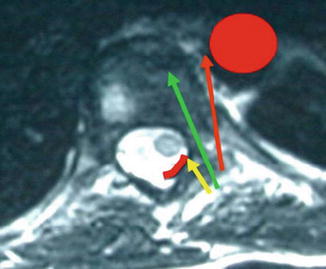

Fig 15.5
An axial MRI scan highlights the medial drift of the spinal cord at the apex of a scoliotic deformity. The green pathway down the pedicle tube is highlighted along with the yellow path that aims toward the spinal canal and abuts against the ventral lamina and the red pathway that proceeds more lateral, risking the anterolateral positioned aorta in the thoracic spine
Following exposure and thorough cleansing of the posterior elements out to the tips of the transverse processes in the thoracic and lumbar spine and to the lateral aspect of the lateral masses in the cervical spine, inferior facet excisions are performed at each thoracic and lumbar level. Resecting the inferior facet should be performed just caudal to the inferior tip of the transverse process and allow exposure of the entire superior articulating facet (SAF). These inferior facet excisions provide four main functions: (1) generating local bone graft, (2) loosening up the deformity to a certain extent, (3) exposing the SAF for removal of any articular cartilage that will aid in the arthrodesis, and (4) providing excellent visualization of anatomic landmarks for safe placement of any planned pedicle screws.
Safety in the insertion of pedicle screws is intuitive given the proximity of the screws to the neural elements inside the spinal canal, and the major vascular and visceral structures sitting anterior and lateral alongside the vertebral bodies. Although there are many different techniques that surgeons can use to safely and efficiently place pedicle screws, there are important anatomic relationships that will help keep the surgeon safe. In the lumbar spine, the starting point or “triple point” is located at the junction of the midpoint of the transverse process (TP) as it reaches the “upslope” to meet the SAF which should be located just lateral to the corresponding pars interarticularis. The third component of the “triple point” is the midpoint of the mammillary process that is often present between the transverse process and pars interarticularis. In the thoracic spine, the “superior facet rule” dictates that the starting point for thoracic screws begins in the lateral half of the lateral quadrant of the SAF (Fig. 15.6). Starting more medial than the midportion of the SAF will place the screw trajectory thru the ventral lamina which is the roof of the spinal canal, and thus directly into the canal/neural elements. The cephalocaudal starting point in the thoracic spine is level specific with 4 different variations: (1) midpoint of the TP: T1, T2, T3, and T12, (2) proximal 1/3 of the TP: T4, T5, and T11, (3) proximal edge of the TP: T6 and T10, and (4) the junction of the TP and SAF (“downslope”): T7, T8, and T9. The proper insertion trajectory depends on the level and any rotational deformity present. In general, one should aim for the contralateral TP as both pedicle “tubes” will run in the same geometric sagittal plane alignment. It is imperative to utilize the dorsal morphometry of the lamina intraoperatively to understand the relationship of the dorsal elements. At the apex of severe scoliotic curves, performing posterior column osteotomies (PCOs) prior to pedicle screw placement will allow for palpation of the concave medial pedicle border with a Woodsen dental or Penfield type device to provide visual and tactile information on the location of the medially displaced neural elements, which invariably rest against the medial surface of the concave pedicles.
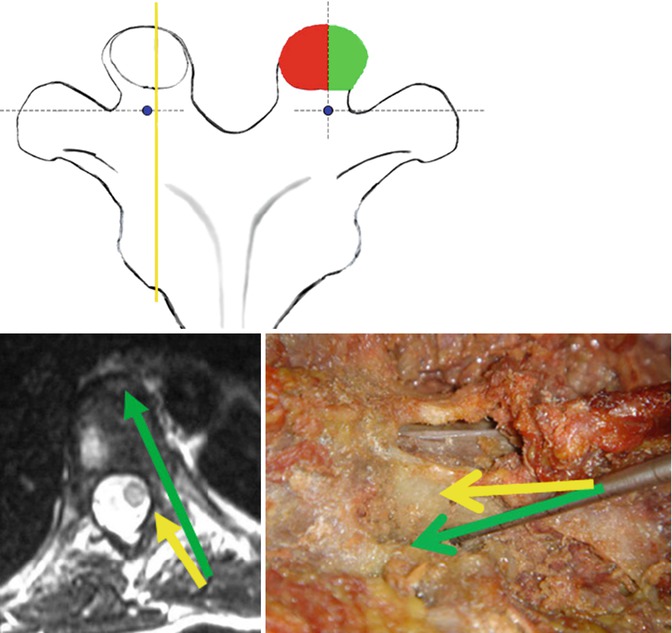

Fig 15.6
The superior facet rule mandates that the starting point for a thoracic pedicle screw begins in the lateral quadrant of the superior articular facet since the medial quadrant adjoins into the ventral lamina which is the roof of the spinal canal, and thus a medial starting point will place the trajectory directly into the spinal canal
We utilize a two-step process of passage down the pedicle shaft into the vertebral body aided by a specially designed gearshift (thoracic tactile pedicle probe Lenke Tip, Medtronic Spinal and Biologics, Memphis, TN). The probe is initially inserted with the curve pointing lateral to avoid inadvertent canal penetration as the probe tip will slide against the medial pedicle border into the base of the pedicle/body junction. Then the probe is quickly removed and reinserted with the tip facing medial to allow for penetration into the body underneath the spinal canal. This avoids any lateral body breach that could compromise the great vessels and also provides stronger fixation into the vertebrae. The pedicle tract formed is palpated with a fine-tip sounding device to ensure complete intraosseous borders, the tract is under-tapped by 1 mm and then repalpated to once again ensure complete intraosseous borders, and then the definitive screw is placed. Radiographic imaging is performed after all screws are placed to check for positioning and to ensure a harmonious arc of the screw tips. Also, pedicle screw stimulation using stimulus-evoked EMGs is performed to document intraosseous position as well (Figs. 15.7 and 15.8).
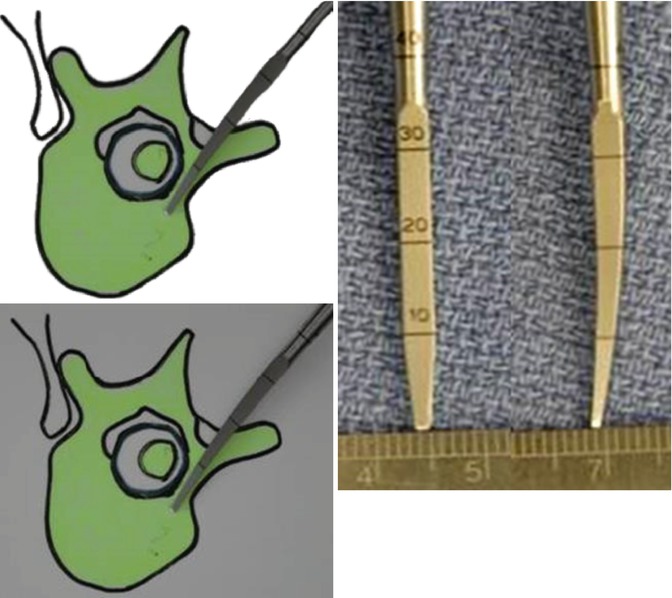
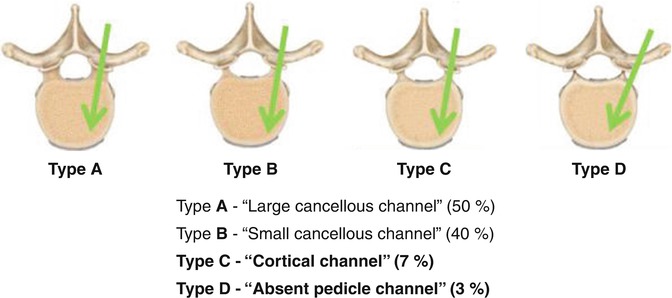

Fig. 15.7
We utilize a 2-step process in navigating down the pedicle tube into the vertebral body. The first step involves pointing the slightly curved pedicle probe lateral to avoid penetrating the ventral lamina or medial pedicle wall. Once the tip is past the spinal canal, typically at a depth of 20–25 mm, the probe is removed. The second step involves pointing the probe medial, advancing to the previous depth, and then pushing into the vertebral body ventral to the spinal canal. This 2-step process initially helps avoid spinal canal penetration, and then also avoids a more lateral trajectory which endangers the anterolaterally positioned vasculature

Fig 15.8
The four types of pedicle channels encountered and the techniques used to navigate down the pedicle into the vertebral body
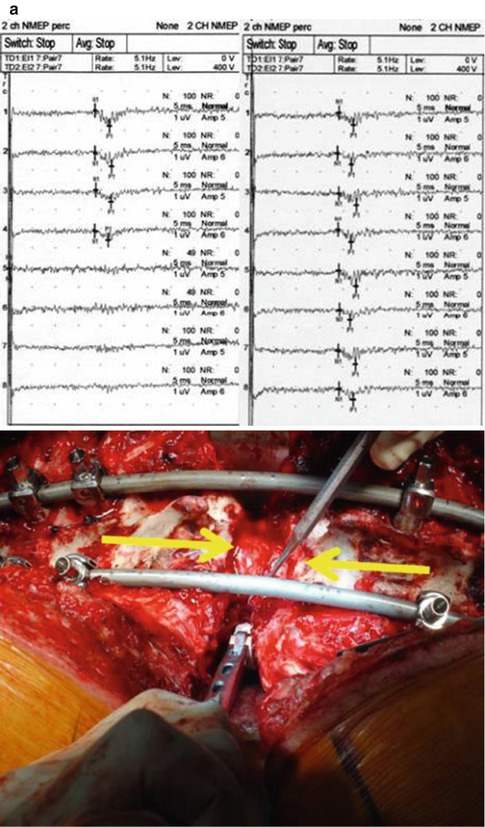
The use of intraoperative monitoring of the sensory and motor spinal tracts is mandatory for safe execution of a VCR. This can be accomplished in the form of somatosensory evoked potentials (SSEP) and either transcranial motor evoked potentials (TC-MEP) or descending neurogenic evoked potentials (DMEP) continuously throughout the procedure. Spontaneous EMGs can be useful when working on the lumbar spine. EMGs can also be used in a triggered fashion to test the integrity of pedicle screws from T6 to the first sacral level (S1). In unique situations such as patients with prior intraspinal lesions, tethered cord release, or Charcot–Marie-tooth disease, spinal cord monitoring may not be obtainable. Such cases carry a high risk of neurological deficit and will therefore require multiple intraoperative Stagnara wake-up tests (WUT) for confirmation of normal or stable neurological function (Fig. 15.9).
