(1)
Marina Spine Center, Marina del Rey, CA, USA
1.
Bleeding from lumbar spinal surgery is best minimized by proper positioning of the patient to prevent abdominal pressure that increases spinal venous pressure. A variety of frames exist that allow proper positioning with the abdomen hanging free. Position the patient on a conventional operating table prone on the horseshoe-shaped Pheasant cushion with separate shoulder posts. Put the patient’s iliac crest line at the angle on the cushion and at the break in the table. Put the table in flexion and level the back by raising the head. Pad the knees with foam rubber and the shins and anterior borders of the feet with pillows. Flex the knees with the padded 60-degree wooden wedge. Always check the pulses and use TED stockings. Adequate decompression of the abdomen and free excursion of the chest is the objective. Use a frame that allows a free abdomen and good chest expansion while still allowing some flexion and extension of the table. The shoulder posts allow full chest expansion. Position the upper arms at no more than 90 degrees to the trunk and pad the ulnar notch to prevent ulnar neuropraxia.
2.
For the operative approach itself, make the incision to dermis only. Inject 1:500,000 epinephrine in saline through the dermal incision into subcutaneous tissue. Then make a straight incision to the bone of the spinous process. Use of hemostats or electrocoagulation is a matter of choice, and digital pressure on the wound edge by the assistants is important. Clear the spinous process with the cutting cautery. If the technique of Cobb elevation of the spinous process is used, start the subperiosteal dissection with the small Cobb elevator. The medium-sized Cobb is then used for subperiosteal dissection of tissue off the lamina.
3.
Remember that the tip of the spinous process has a bulbous configuration; the elevator must first be directed with the cutting edge dorsally to go under the edge of the bulbous tip (Fig. 46.1). Cut to bone, then with the cutting edge turned ventrally sweep out across the lamina (Fig. 46.2). The potentially troublesome artery at the tip of the spinous process should be controlled in the dissection; it usually enters the cephalad third of the spinous process, and this can be avoided with a deep midline cut and careful subperiosteal dissection.
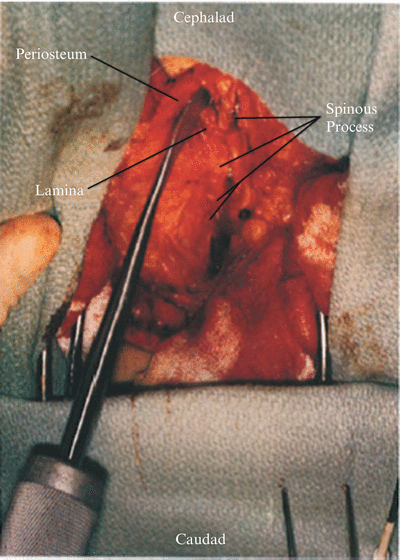
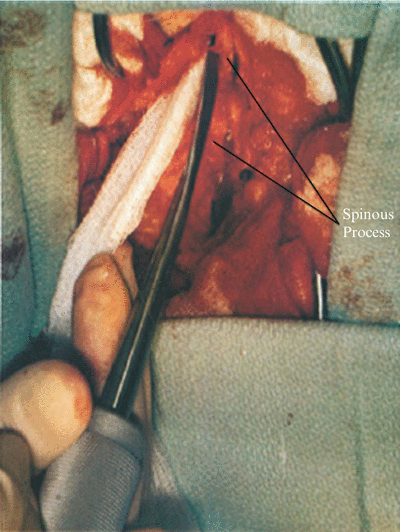
Fig. 46.1
For exposure of the lumbar spine with Cobb elevators, begin on the tip of the spinous process with the smallest Cobb to cut to bone and remove the dense attachments to the tip of the spinous process. Progressing laterally around the bulbous end of the spinous process, turn the elevator face up to allow dissection under the bulbous tip to the bone of the lamina in a subperiosteal plane. By cutting directly to bone in the midline, bleeding from the artery to the caudal tip of the process can be avoided. Electrocautery may be used to cut to the subperiosteal plane under the bulbous tip
Fig. 46.2
Sweep out on the lamina subperiosteally, removing the soft tissue
4.
Pack with 4 × 8 gauze after adequately sweeping the tissue off each lamina to the facet joints with the medium-sized Cobb (Fig. 46.3). Remove the packing, irrigate, and retract on the lamina with two medium Cobb elevators. Cut the intervening soft tissue from the interspinous tissue with the cautery (Figs. 46.4, 46.5); the broadest Cobb elevator then sweeps the material in the inner laminar area laterally to the facet joints (Fig. 46.5).
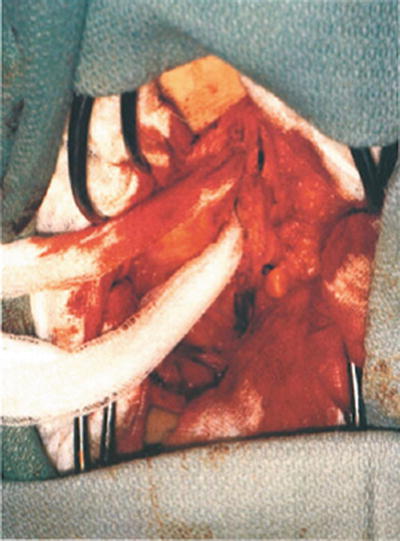
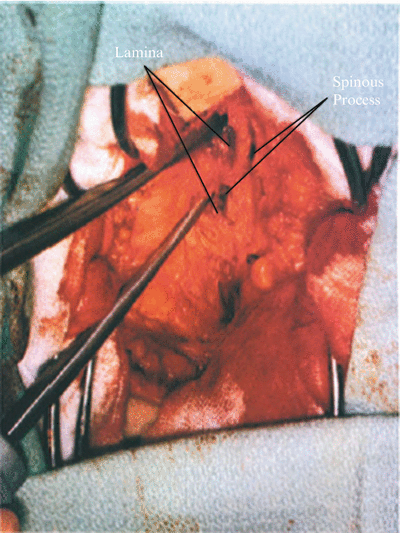

Fig. 46.3
Repeat the process at each level and pack with 4 × 8 sponges
Fig. 46.4
Remove the sponges and insert two elevator. retracting the soft tissue laterally
Fig. 46.5
Cut the remaining soft tissue in the interlaminar area with the electrocautery or #15 blade. Then sweep with the broadest Cobb in the interlaminar area out laterally to the level of the facet joints. Repack each level with a 4 × 8 sponge
5.
Insert a small, self-retaining retractor or, for maximum retraction, use the Taylor retractor of appropriate depth placed outside the facet joint by the finger tip. Then use roller gauze fashioned into a sling around the surgeon’s foot and tied over the handle of the Taylor retractor; this allows stay retraction of the area between the facet joints. Irrigate and visualize the interlaminar areas at each level. Various self-retaining claw retractors can be used.
6.
Expose and identify the sacrum as early as possible. Test motion at each spinous process with a Lewin clamp. Tap on each lamina to find the dull sound of the sacrum and look at the preoperative anteroposterior (AP) X-ray for aid in cases of sacralization of L5. Make a definite identification and obtain an X-ray.
7.
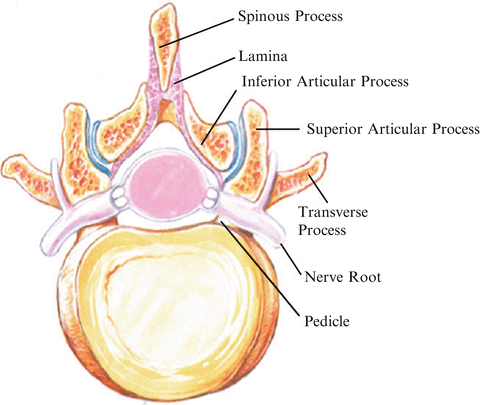
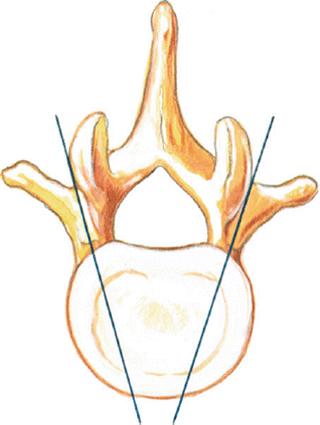
Three-dimensional thinking is most important in realizing the location of anterior structures when looking at the posterior spine. For example, when determining the location of the pedicle and the intervertebral disc in relation to the interlaminar area, remember that the L5–S1 intervertebral disc is at the level of the interlaminar space and the pedicle is caudad to the disc and under the S1 lamina. As one progresses in a cephalad direction, the disc space proportionately is in a more cephalad position than the interlaminar space. Therefore, exposure of the L2–L3 disc space requires significant removal of the second lumbar lamina, as this disc is in a more cephalad position compared with the interlaminar space. The facet joint is the important landmark for identification of spinal structures at the initial level of the spinal dissection. After identification of the facet joint, remember that the superior articular process is anterolateral to the inferior articular process. The joint capsule itself is a glistening structure with horizontal striations. By identifying the facet joints, the location of the transverse process is known. The transverse process projects laterally and slightly caudally from the base of the superior articular process. The pedicle is immediately anterior to the base of the superior articular process. The transverse process forms the third branch of this triplaned three-pronged structure made up of the superior articular process in the parasagittal plane, the pedicle projecting anteriorly in the transverse plane, and the transverse process projecting laterally in the coronal plane (Figs. 46.6, 46.7, 46.8, 46.9).

 Cervicothoracic Junction
 Supraclavicular Approach
 Anterior Lateral Approach to the Upper Cervical Spine
 Microcervical Foraminotomy: An Alternative Posterior Technique for Intractable Radicular Pain
 Lumbar Laminotomy, Foraminotomy, Root Decompression, and Discectomy in the Lateral Position
 Tubular Lateral Approach to the Thoracic and Thoracolumbar Junction


Fig. 46.6
A transverse plane section of the lumbar neuromotor segment emphasizing the orientation of the transverse process, superior articular process, and pedicle as a three-prong structure. The facet joint is seen as the roof of the lateral recess. The nerve exits below the pedicle at each level. The nerve branches into a dorsal primary ramus that innervates from one to three facet joints at adjoining spinal levels. The ventral primary ramus is responsible for limb function and sensation
Fig. 46.7
The initial identifying structure in the exposure of the spine is the spinous process. The laminae are next anteriorly after following the lamina laterally; the second important identifying structure is the facet joint. Three-dimensional thinking is vital to accurate spinal surgery and requires the ability to orient the intercanal structures from visualization of the posterior elements. With the facet joint identified, locate the transverse process immediately caudad and lateral to the facet. The transverse process can be exposed without dangerous plunging in the intertransverse area
Related posts:
Cervicothoracic Junction
Supraclavicular Approach
Anterior Lateral Approach to the Upper Cervical Spine
Microcervical Foraminotomy: An Alternative Posterior Technique for Intractable Radicular Pain
Lumbar Laminotomy, Foraminotomy, Root Decompression, and Discectomy in the Lateral Position
Tubular Lateral Approach to the Thoracic and Thoracolumbar Junction
Stay updated, free articles. Join our Telegram channel
Full access? Get Clinical Tree
