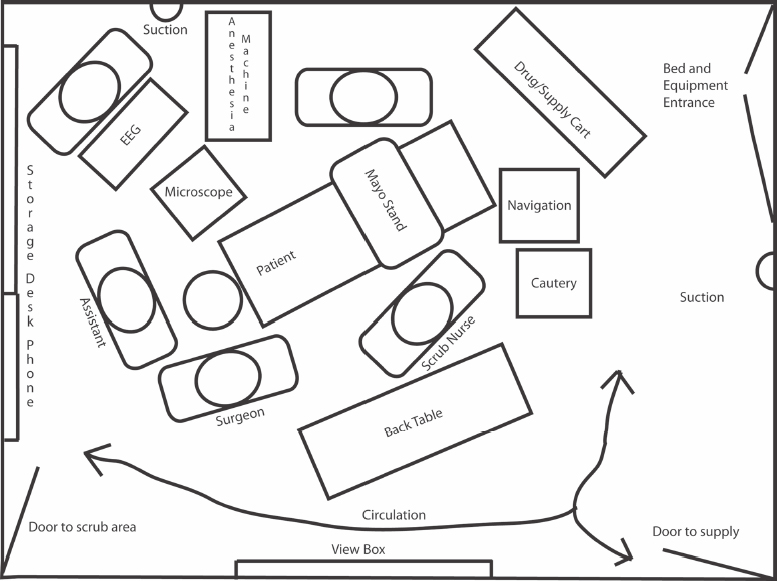
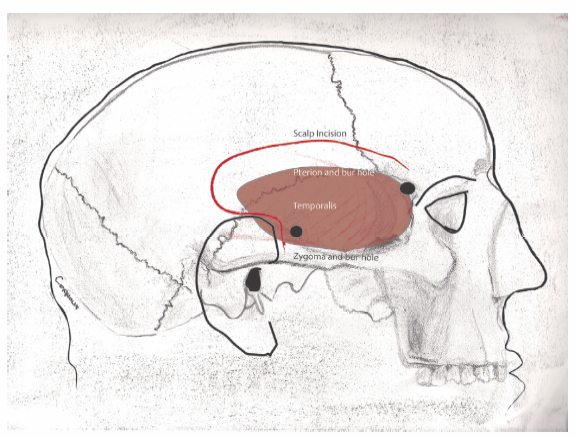
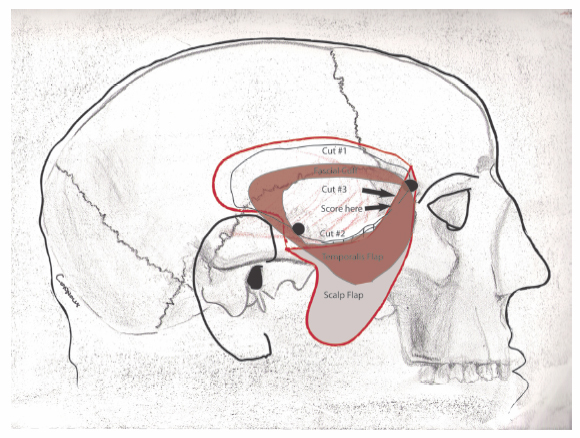
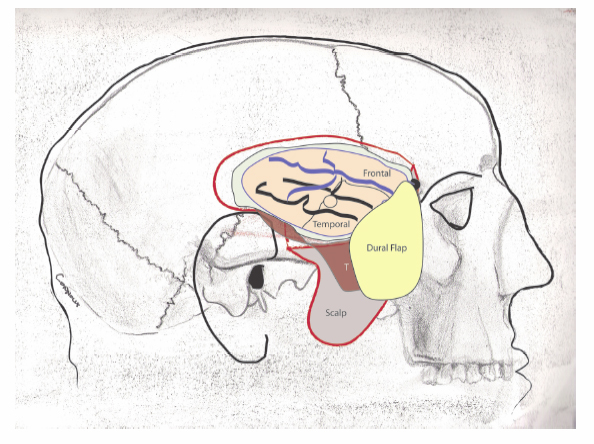
4 Temporal Lobectomy and Amygdalohippocampectomy A multidisciplinary team is required for epilepsy surgery and includes the anesthesiologist, circulating nurse, scrub nurse, surgical assistant or resident, neurophysiologist or neurologist, patient, and surgeon. The team utilizes several workstations that occupy floor space in the suite. They include the anesthesia machine, instrument tables, neurophysiology platform, navigational equipment, cautery machines, microscope, and operating table. Walls support view boxes, suction canisters, and electricity. The ceiling delivers anesthesia gases, general and task lighting, and sometimes a microscope. Adequate space and thoughtful placement of these items are necessary to minimize clutter and to maintain a safe environment for patient and personnel. An example of an operating room arrangement in shown in Fig. 4.1. However, the arrangement ultimately depends on the location of electricity, plumbing, doors, lighting, and even the occasional window. Place the patient in the supine position on the operating table, and secure him or her in the Mayfield headrest (Integra LifeSciences Corp., Plainsboro, NJ). There are two pinning options: (1) single pin in the forehead and two posteriorly; and (2) single pin at the root of the mastoid process, one pin in the forehead, and one just behind the hairline. The head is turned at least 45 degrees to the left. A shoulder roll may be necessary. Turn the bed as necessary to accommodate the various work zones. If surgical navigation is planned, attach the arm that holds the reference frame. It goes toward anesthesia, away from the operating field. Take care that the arm will not interfere with any retractor apparatus. Once this is done, then register the head into the surgical navigation software. The temporal lobe is contained by the middle fossa. It is bounded above by sphenoid bone and sylvian fissure, below by the temporal bone and the tentorium. Anteriorly, it is bounded by lateral orbital wall. Posteriorly, it is bounded by the parietal lobe. Several surface landmarks reveal the location of the middle fossa (Fig. 4.2). A typical temporal skin incision accomplishes several tasks while providing exposure to the temporal lobe and associated structures. It is (1) mostly concealed by hair; (2) preserves blood supply to scalp and temporalis; (3) avoids the facial nerve; and (4) avoids the ear canal. Its boundaries are determined by the root of the zygoma, superior temporal line, and, on the face, the amount of anterior temporal exposure required. For epilepsy surgery a fair amount of anterior exposure is necessary, so the scalp and temporalis are often dissected separately. The incision is the form of a question mark, Fig. 4.2. With a marking pen, start just below the root of the zygoma, and just in front of the ear, curve posterior to the ear, then superiorly and anteriorly. Note that the incision may be different on the nondominant side, compared with the dominant side. In some dominant lobe resections, language mapping may be necessary, and this requires greater surface exposure. If you begin the incision more than 1 cm in front of the ear you are likely to encounter the facial nerve and the superficial temporal artery. The incision will show prominently as well. Try to follow the hairline to its most facial extent. Extend the mark onto the face by 1 to 2 cm in case extra exposure is needed. Prepare the skin and drape. Preplace the retractor clamps so that no extra time is spent once the dura is open. Infiltrate local anesthetic into the wound. Epinephrine helps with hemostasis. Do not inject the superficial temporal vessels. Begin the incision rostrally, and open the scalp down to the bone until you reach the temporalis fascia. At that point, slide an elevator under the scalp to define a plane, then open sharply. Just open the skin for the last 2 cm of incision above the zygoma. Use Metzenbaum scissors to dissect in layers to the temporalis fascia, so that the superficial temporal vessels may be identified, secured with bipolar cautery, and cut. Cauterize any arteries in the scalp. Venous bleeding may be secured with Raney clips. Once this is done, then separate the galea from the temporalis fascia by finger or sharp dissection or cautery. You will need to identify the frontal process of the zygoma. This marks the frontal extent of the craniotomy. The pterion is just behind it. Fig. 4.1 Sample operating room layout. EEG, electroencephalogram. Fig. 4.2 Surface features demarcating the middle fossa. The zygoma outlines the anterior and inferior boundaries, the superior temporal line the superior boundary. The top of the tragus and external auditory meatus approximate the floor of the middle fossa. The position of the temporal lobe itself is estimated with red hatching within the temporalis. For brevity and clarity, the mandible is not drawn. Fig. 4.3 Extracranial dissection. Temporalis and scalp are reflected separately for increased anterior exposure. Cover them with a damp sponge and place a rolled sponge under the scalp to prevent vascular kinking and ischemia. Leave a cuff of temporalis fascia to sew. Note craniotome cuts and suggested sequence. The craniotome will not cross the sphenoid wing. The sphenoid should be scored and cracked. Hatched area indicates rongeured bone. The exact amount will vary. Note again the red hatched area estimating the temporal lobe location. Open the temporalis fascia sharply and curvilinearly from the frontal part of the zygoma to the root of the zygoma (Fig. 4.3). Leave a minimal 1 to 2 cm cuff of fascia to which to sew. Some surgeons prefer monopolar cautery to elevate the temporalis; others prefer to use periosteal elevators. Try to advance as anteriorly as possible along the lateral temporal bone. Drill two bur holes (Fig. 4.3) with either an acorn bit or a perforator, one at the pterion, the other at the root of the zygoma. Use a no. 3 Penfield dissector or an Adson periosteal elevator to elevate the dura in the epidural space. You may drill a third at the posterior edge of the craniotomy, if desired. Use a craniotome to make the long cuts first (Fig. 4.3). There will be two short cuts. First, advance anteriorly from the root of the zygoma along the middle fossa floor. Turn superiorly toward the pterional bur hole. The craniotome will be blocked by the wing of the sphenoid bone. Make a short cut (usually ~1 cm) from the pterion to the sphenoid wing. Score the remaining sphenoid segment with a craniotome bit without the footplate. Use a no. 3 Penfield dissector to elevate the bone. The sphenoid part will crack. Carefully dissect the bone away from the dura with a periosteal elevator. Do not allow the bone to lever into the brain. Obtain hemostasis. The middle meningeal artery may require attention at the sphenoid wing. There is often venous bleeding, which responds either to bone wax or to thrombin soaked Gelfoam powder (Pfizer Inc., New York, NY). Continue the bony dissection by using a rongeur to remove 1 to 2 cm more of squamous temporal bone anteriorly and inferiorly toward the floor of the middle fossa (Fig. 4.3). Reserve the chips for closure. Note whether there are any opened mastoid air cells along the floor. Wax these thoroughly. It is often helpful to drill some of the sphenoid wing. You need not go to the superior orbital fissure. Once you obtain hemostasis, it is time to open the dura. The dural flap should be based anteriorly. Make an apex posteriorly, then advance the durotomy medially and anteriorly. Then, advance it laterally and anteriorly, over the temporal lobe. Leave a 1-cm cuff of dura with which to close. Be careful about attached veins when reflecting the dura. With a brain ribbon, verify that there are no veins between the craniotomy edge and the temporal tip. Measure 4 cm from the temporal tip to ensure that the craniotomy is satisfactory and to plan the lateral temporal lobectomy (Fig. 4.4). Corticography is optional, depending on the case and preoperative mapping. It can be useful to record from the temporal and frontal areas with a subdural grid, either 4×4 or 4×5 contacts, particularly if subdural grids are not already present. A detailed discussion of electrocorticography can be found in Chapter 11. Once corticography has been perfomed, one can begin the resection (Fig. 4.4). Use a no. 7 Frazier suction and a bipolar cautery to make the initial pial incision ~4 cm posterior to the temporal tip, minding any large surface veins. The vein of Labbé has variable anatomy and is typically found over the posterior temporal lobe, but not always. Generally, the corticotomy can be made 3.5 to 4.5 cm from the temporal tip in the dominant hemisphere and 4 to 5 cm from the temporal tip in a nondominant hemisphere. Enter through the middle temporal gyrus and identify the ventricle. This will mark the medial extent of the lobectomy. Mark the ventricular opening with a cottonoid patty (Fig. 4.5). Work inferiorly along the posterior limb toward the floor of the middle fossa. For the rostral limb, some surgeons spare the superior temporal gyrus, others resect to the gray-white junction along the sylvian fissure, and still others resect all the way to the pia. It is neither necessary nor desirable to open the sylvian fissure.
Layout of the Operating Room and Positioning the Patient
Surface Anatomy and Designing the Incision for Right Temporal Lobectomy
Incision and Extracranial Dissection
Durotomy and Surface Exposure
Lateral Lobectomy
Related posts:


Stay updated, free articles. Join our Telegram channel

Full access? Get Clinical Tree


