(1)
Marina Spine Center, Marina del Rey, CA, USA
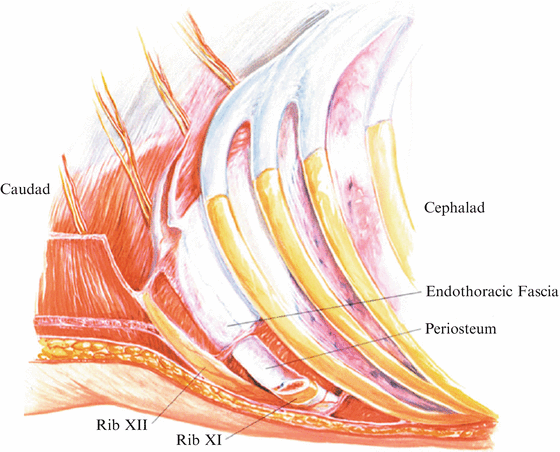
For approaches to the thoracolumbar junction (T10–L1), Hodgson recommends a 9th rib resection.1 Dwyer recommends a 10th rib resection with the standard thoracolumbar approach.2 For T12–L1, Perry3 recommends a 10th rib resection. The rules for resecting the best rib for exposure are much the same in this area as in the rest of the thoracic spine. Ideally, choosing the rib in the midaxillary line opposite the lesion or the apex of a curve allows adequate proximal exposure for working “down” or caudad on the lesion.
For maximum exposure of T11–T12, transthoracic resection of the 9th rib is usually best, and at T12–L1 a 10th rib thoracoabdominal approach is preferred; these involve detaching the diaphragm at its circumference. In patients in whom it is imperative that the diaphragm not be taken down, or when less exposure is needed, that is, resection of one disc with grafting, the 12th rib approach is used. For L1–L2 exposure, a 12th rib extrapleural, retroperitoneal approach is recommended.
Three additional approaches have use in special situations. The 11th rib approach is the highest practical, extrapleural, retroperitoneal, anterior approach for exposure of T10–L2. It is a more demanding approach with less expansive exposure, but avoids opening the pleural cavity and cutting the diaphragm in potentially high-morbidity patients.
The posterior costotransversectomy approach is a viable alternative for limited extrapleural exposure with low morbidity. By following the 12th subcostal nerve to T12–L1, the vertebral body and spinal canal can be exposed. The visualization needed for total discectomy, vertebrectomy, and strut grafting is inferior when compared with the anterior approach, unless at least two levels are costotransversectomized.
Use the 10th rib thoracolumbar approach for long exposures of the thoracic and lumbar spine because this allows proximal and distal extension for multilevel operations and optimum exposure for bony work.
Caution: Make an exposure that is cephalad enough to be above the entire working area.
Additional Anatomy
For thoracolumbar approaches, the anatomy of the diaphragm is most important. The diaphragm itself is markedly dome shaped, arching cephalad to approximately the T7 level. It is attached distally to the sternal part of the xyphoid process, the costal part to the inner surface of the costal cartilages and ribs 6–12, and to the lumbocostal arches, the crus of the diaphragm, and the lumbar vertebrae. There is a medial and lateral lumbocostal arch (Fig. 18.1). The medial lumbar costal arch extends from the crus of the diaphragm and vertebral body, arches over the cephalad portion of the psoas major muscle, and inserts on the anterior surface of the transverse process of L1. The lateral lumbocostal arch extends from this transverse process of L1, arching over the quadratus lumborum muscle to the tip of the 12th rib. The crura of the diaphragm consists of a large right crus extending down the right side of the L1, L2, and L3 vertebral bodies and a smaller left crus attaching to L1 and L2 (see Fig. 19.7). These crura extend cephalad and anterior to approximately the T11–T12 area medially in the midline to form the aortic hiatus. The esophageal hiatus and vena cava foramen lie in the anterior wall of the diaphragm. The aortic hiatus itself also gives passage to the azygos vein and the thoracic duct as well as the aorta. The esophageal hiatus at the approximate level of the 10th thoracic vertebra transmits the vagus nerve and the esophagus. Smaller apertures include those for the splenic nerves and hemiazygos vein. The sympathetic trunk usually enters under the medial lumbocostal arch.