Fig. 43.1
(a) Patient in sitting position with a compatible Mayfield being put in place; (b) tubular retractor system including sequential dilators; (c) working channel (retractor); (d) table-mounted flexible retractor arm; (e) operative view showing working channel, retractor arm, and endoscope; (f) intraoperative fluoroscopy (C-arm)
General Operative Setup
Patients are placed under general anesthesia and intubated endotracheally. Arterial line is obtained to allow optimal blood pressure control and thus avoid hypoperfusion of the spinal cord. Foley catheter is usually not required for short procedures. Neurophysiological monitoring in the form of EMG, somatosensory evoked potentials, and motor evoked potentials is connected to ensure early detection of neurological damage during the procedure. Intravenous perioperative antibiotics are given. Corticosteroids may be considered in certain instances; however, their use before or during surgery is operator- and case-dependent. Posterior approaches to the cervical spine can be performed while the patient is in the prone or sitting position. Of note, the sitting position is associated with reduced pooling of blood in the operative field, decreased epidural bleeding, and better lateral visualization on fluoroscopy (Fig. 43.2). Accordingly, the sitting position is preferred by the senior author (RGF) [30]. After patient positioning, the head is fixed using a Mayfield 3-pin head holder. The neck is maintained in an upright position, perpendicular to the floor, and the head is slightly flexed not to compromise airway patency and jugular venous drainage. All pressure points are properly padded and the arms are appropriately supported. A pearl for this procedure is the placement of a pillow under the buttocks of the patient to facilitate the upright position so that the patient does not slip downwards (Fig. 43.1a). The C-arm is set up in a way that allows easy manipulation underneath the patient to obtain lateral fluoroscopic images. A 1.8 cm longitudinal incision line is then marked approximately 1.5 cm off the midline ipsilateral to the side of surgical intervention (Fig. 43.2).
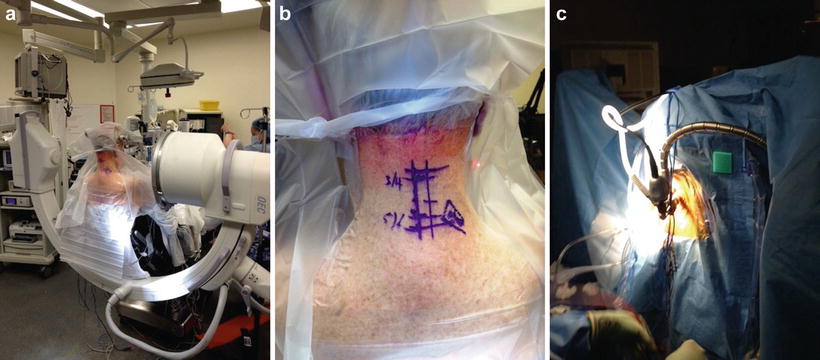
Fig. 43.2
(a) Operative sitting position; (b) incision line; (c) working channel stabilized using a table-mounted flexible retractor arm
Operative Technique
The cervical spine is prepped and draped in usual sterile fashion. The operative level(s) is then confirmed under fluoroscopy guidance using a K-wire. Local anesthesia (0.5 % Marcaine with epinephrine) is injected along the incision line and the incision is made using a sharp blade. Hemostasis is maintained using a bipolar cautery. Slight retraction of the skin allows direct visualization of the underlying fascia which is then dissected using a Bovie cautery. Using the Metz scissors, blunt dilation is performed down to the lateral bone mass. The smallest dilator is then inserted through the posterior cervical musculature under fluoroscopic guidance. It is advised to project the dilator laterally reaching down to the facet-lamina junction at the targeted level. This technique can avoid injury to the spinal canal which is located medial to the working area. Subsequent serial dilators of increasing sizes are gently inserted until a 16 or 18 mm METRx retractor is eventually put in place, angulated, and secured over the facet-lamina junction. The retractor is then stabilized using a table-mounted flexible retractor arm and the dilators are removed (Fig. 43.2). At this point, fluoroscopic confirmation of the retractor position is made (Fig. 43.1). A 25° angled endoscope is then placed and connected to the tubular retractor using a cylindrical plastic friction-couple. Remaining soft tissue is removed off the target lamina using Bovie cautery and pituitary rongeurs. An up-angled curette is used to define the sublaminar space and to gently detach the ligamentum flavum. The surgical technique for each of CMEF/D and CMEDS is described below.
CMEF/D technique: The CMEF/D continues with a hemilaminotomy and foraminotomy performed using a Kerrison punch or a high-speed drill. It is important to start with the medial facet joint and then move laterally, utilizing the drill if needed, until adequate decompression is achieved, which is defined as being able to palpate the medial and lateral pedicle with a small nerve hook for the pedicle below and above. This will allow adequate exposure of the nerve root inside the foramen without compromising the biomechanical integrity of the spine at that level [31]. Using a fine cutting bit and an adjustable guard sleeve can protect important nervous structures during bone drilling. After the laminotomy is completed, the ligamentum flavum can be manipulated medially to expose the dura and the proximal aspect of the nerve root (Fig. 43.3). The nerve root can now be directly observed for any compression caused by an osteophyte or a disc fragment. A fine angled dissector can further be used to gently palpate anterior to the nerve root to check for any hidden compressing lesion (Fig. 43.3). Excessive retraction of the nerve root should be avoided. It may be wise to drill the superomedial quadrant of the caudal pedicle to allow greater exposure. It is important not to miss the opportunity to remove any compressing lesion in the area, as this may directly impact postoperative pain and overall patient outcomes. At the completion of decompression, the field should be copiously irrigated with antibiotic solution. Hemostasis is obtained using Gelfoam (Baxter Healthcare, Glendale, CA) and the entire apparatus is removed. The fascia and subcutaneous tissue are closed in layers and the skin is finally closed using subcuticular stitch and Dermabond.
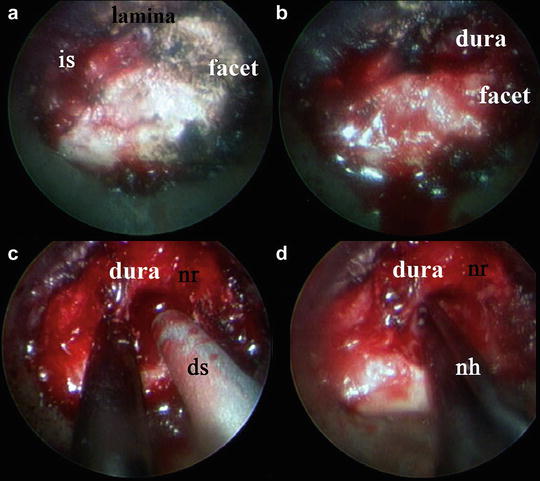
Fig. 43.3
Surgical decompression CMEF/D. Superficial osseous structures are revealed after soft tissue excision (a). Lateral edge of dura is identified after laminotomy (b). Performing foraminotomy using Kerrison punch and drill and unroofing the nerve root (c). Nerve hook under the nerve root in search for disc fragments (d). is interlaminar space, ds drill sleeve, nr nerve root, nh nerve hook
CMEDS technique: The CMEDS technique continues with achieving a complete ipsilateral laminotomy at the level of interest. In contrast to CMEF/D, initial manipulation of the ligamentum flavum is not performed during CMEDS; instead, it is left to serve as a natural barrier that protects the dura. After completing the laminotomy, the working channel is repositioned medially towards the contralateral side at an angle of approximately 45° off the midline. Decompression then proceeds using a high-speed drill and a protecting sleeve to remove the contralateral lamina. Drilling is continued carefully until the contralateral facet is reached (Fig. 43.4). Dissection and removal of the ligamentum flavum is then begun using a combination of micro-curettes and Kerrison punch. While the dura becomes more exposed with the ongoing decompression, any bony prominence or spur that might cause dural injury or compression should be drilled off or removed using a Kerrison punch (Fig. 43.4). After the decompression is completed, a fine probe can be used to ensure proper decompression of the contralateral foramen. The working channel is then returned to the initial position and further ipsilateral decompression is performed. If deemed necessary, surgical decompression of the adjacent levels can be achieved by angulating the working channel either superiorly or inferiorly. Eventually, a decompressed and pulsatile spinal cord and dura should be obtained. As discussed above, the field should then be irrigated with antibiotic solution and good hemostasis and closure should be performed.
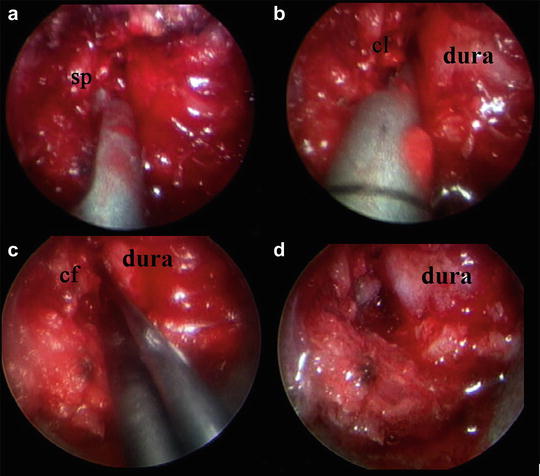
Fig. 43.4
Surgical decompression CMEDS: Decompression of stenosis proceeds medially to the base of the spinous process and the ventral side of the contralateral lamina (a, b). Palpation of the contralateral pedicle after completion of contralateral decompression (c). Completely decompressed, pulsatile dura (d). sp spinous process, cl contralateral lamina, cf contralateral foramen
Clinical Outcomes
Several studies have reported favorable outcomes for CMEF/D with a symptomatic relief rate ranging between 87 and 97 % [3, 6, 32–35]. This technique has shown an efficacy comparable to that of open procedures, but with fewer postoperative sequelae and shortened hospital stay [6, 33]. In their recent review of prospectively collected database, Lawton and the senior author (RGF) noted significant improvement in short-term (1 year follow-up) and long-term (3–6 years follow-up) outcomes of 38 patients who underwent CMEF/D [3]. Only one complication related to the procedure was reported in the study being “durotomy” which required no further intervention [3]. Another patient required an anterior decompression (AND FUSION?) surgery on follow-up due to non-resolved radiculopathy [3]. Average operation times, blood loss, and hospital stay were 154.27 ±26.79 min, 27.92 mL, and 21.22 ± 14.23 h, respectively [3]. Similarly, Lidar et al. reported favorable outcomes for CMED (discectomy alone) performed in 32 patients with herniated discs [32]. The mean follow-up duration was 39 months (range: 20–67 months) [32]. This study also reported one intraoperative complication consisting of dural tear and one case of non-resolved neck pain [32]. Further, in a study comparing outcomes of CMEF (foraminotomy alone) performed in 25 patients to those of open surgery performed in 26 patients, the senior author and Khou reported lower overall operative time (115 vs. 171 min), less blood loss (138 vs. 246 mL per level), and shorter hospital stay (20 vs. 68 h) compared to open surgery [6]. The authors concluded that the minimally invasive approach can achieve results equivalent to those of open surgery, with a smoother postoperative clinical course [6].
Related posts:


Stay updated, free articles. Join our Telegram channel

Full access? Get Clinical Tree


