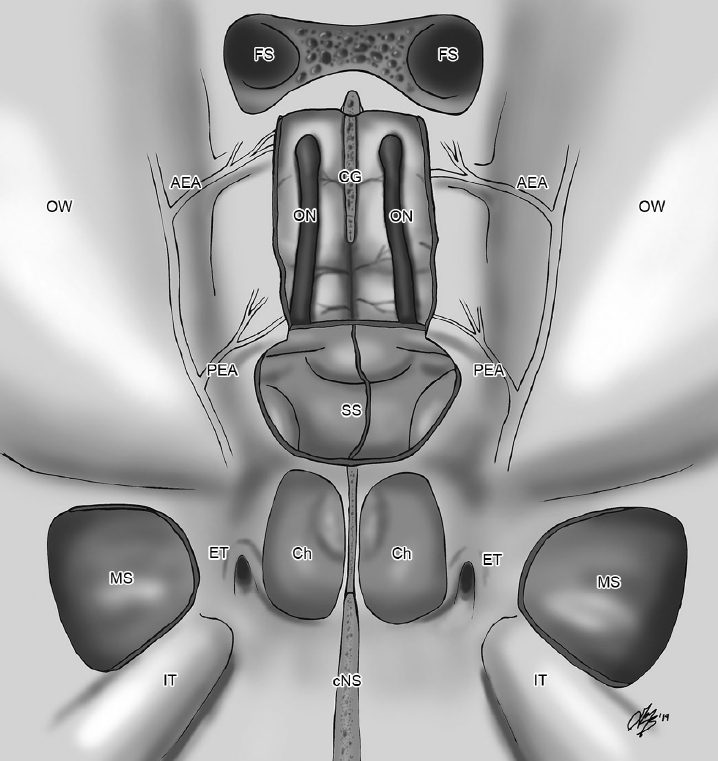
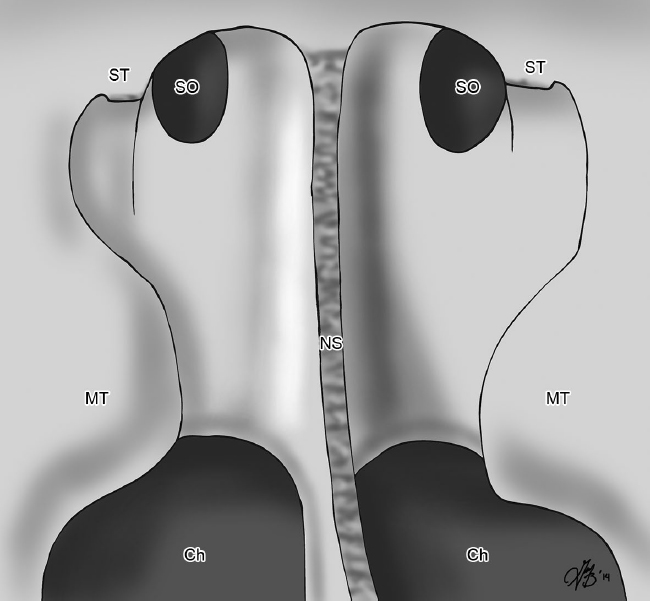
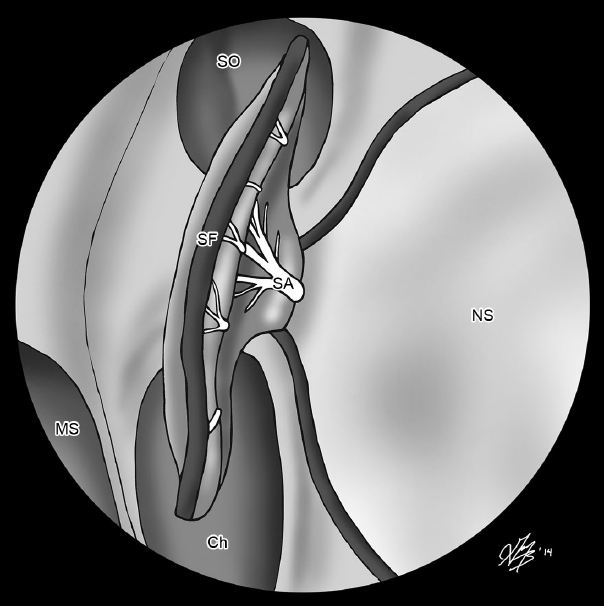
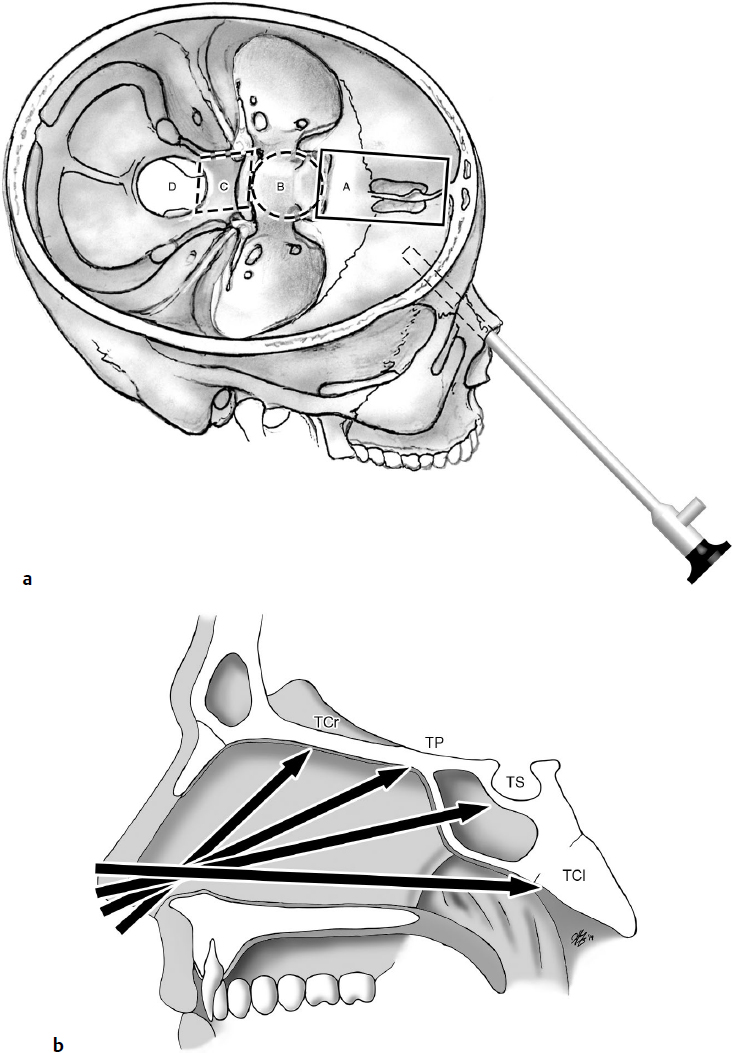
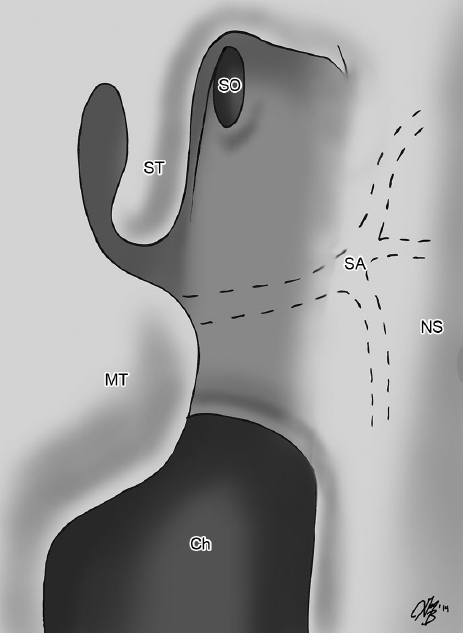
16 Endoscopic Transsphenoidal Approaches 1. Tumors and lesions involving the sella, parasellar regions, and suprasellar region 2. Lesions in the frontal fossa, clivus, petrous apex, and foramen magnum (extended approaches) • Considered the standard midline corridor for ventral endoscopic skull base approaches. • Combined with expanded approaches, the endoscopic transsphenoidal approaches provide access from the crista galli to the craniocervical junction1–9 (Fig. 16.1). • The biportal four-handed technique, described by Cusimano and Fenton1 in 1996, has become the standard approach and the basis for all the endonasal transsphenoidal and extended transsphenoidal approaches. Surgical Anatomy Pearl Sphenoid sinus: the gateway to the skull base. • Anatomy of the nasal cavity including the presence of a deviated septum • Pneumatization patterns of the sphenoid sinus (conchal, presellar, sellar, postsellar; see Chapter 2, Fig. 2.14, page 53) • The relationship of the sphenoid intersinus septa and the internal carotid arteries (ICAs) • The presence of a sphenoethmoidal cell (Onodi), which if unopened will limit access in the sphenoid and planum • The lateral pneumatization of the sphenoid, which may provide further access in the coronal plane (including the cavernous ICA, middle cranial fossa) Typically the patient is placed in the supine position with the head neutral, the nose straight up, or with a slight amount of head extension. The bed should be in 10 to 15 degrees of reverse Trendelenburg to enable venous drainage. • The head is typically fixed in a head frame (Sugita/Mayfield) to stabilize the head especially during bone removal near the critical structures (ICA, optic nerves). • Stereotactic frameless navigation can be employed to help verify critical landmarks, but this must be regularly checked throughout the procedure on known visual landmarks (e.g., midline septum, nasal cavity floor, nasopharynx) to verify accurate registration. • If a large cerebrospinal fluid (CSF) leak is expected as part of tumor removal (e.g., craniopharyngioma), a lumbar drain can be placed prior to surgery. • Prepare and expose any areas of the body that may be required for skull base reconstruction (e.g., abdominal fat, tensor fascia lata). • Adequately decongest the nasal cavity with ribbon gauze or pledgets soaked in topical 1:1,000 epinephrine at the beginning of the procedure. • The superior turbinate is the key anatomic structure that provides the location of the natural sphenoid ostium (Fig. 16.2). • A partial posterior ethmoidectomy can be completed to enhance visualization of the medial orbital wall. Be careful opening the sphenoid too inferiorly at this point in the operation, as the posterior septal branch of the sphenopalatine artery is located midway between the natural sphenoid ostium and the arch of the choana (this is the vascular pedicle to the nasoseptal flap). • At this juncture of the endoscopic approach, there are three options for addressing the vascular pedicle: 1. If no flap is anticipated to be required for the procedure, the artery and the surrounding mucosa may be cauterized with either monopolar or bipolar cautery. 2. If a flap may not be required for the procedure but the surgeon wants to preserve the pedicle without having to harvest a flap, the mucosa may be reflected inferior to the sphenoid ostium (with the accompanying artery) with a Freer/Cottle elevator to expose the bony face of the sphenoid and sphenoid rostrum. 3. If a flap is anticipated for part of the reconstruction at the end of the procedure, the surgeon may harvest the nasoseptal flap (see below). At this stage, the harvested nasoseptal flap can be placed in the nasopharynx for reconstruction at the end of the procedure. • Any septal deviation can often be dealt with by bony or cartilaginous removal during the posterior septectomy. • Once both sphenoid sinuses are widely opened and the posterior septostomy is completed, the endoscopic view through one nostril should include both sphenoid sinuses and the remaining sphenoid rostrum (Fig. 16.3). Fig. 16.3 Endoscopic view after completion of the posterior septectomy and bilateral sphenoidotomies. SO, sphenoid sinus/ostium; ST, cut edge of superior turbinate; NS, cut edge of posterior nasal septum; MT, middle turbinate; Ch, choana. • For pathology confined to the sella, only the bony septations restricting access to the floor and the anterior face of the sella need to be removed (if these are thick, it is safest to use a high-speed diamond irrigating drill bit to remove the intersinus septa; otherwise, a large pituitary rongeur can be used). • Addressing the vascular pedicle: Tip: make the inferior incision of the nasoseptal flap first, leaving the superior attachment of the septal mucosa until the end to allow for easier elevation of the flap. Fig. 16.4 Harvesting a right-sided nasoseptal flap. SO, sphenoid ostium, SF, nasoseptal flap; SA, posterior septal artery; NS, nasal septum; Ch, choana; MS, maxillary sinus. • The incision line is brought anteriorly until the required length of the flap has been reached. • This flap is based on the anterior blood supply to the septal mucosa (branches of the descending palatine, anterior ethmoidal, facial artery). • It is used to cover exposed septal cartilage after harvesting a nasoseptal flap, with the goal of reducing nasal crusting following surgery. These approaches are indicated for lesions extending superiorly beyond the sella in the parasagittal plane (e.g., large macroadenomas, craniopharyngiomas, meningiomas, anterior circulation aneurysms) (Fig 16.1). • For adequate endoscopic exposure to the planum sphenoidale, a more complete anterior and posterior ethmoidectomy is usually required, as the anterior limit of bone removal often extends to the posterior ethmoidal arteries. • If the skull base lesion extends far laterally to the plane of the medial orbital wall, bilateral maxillary antrostomies are first performed. • The posterior ethmoidal artery may be directly visualized if it is within a bony mesentery below the skull base. • The anterior limit of bone removal during the transplanum approach is the posterior ethmoidal arteries, which may need to be cauterized with bipolar cautery. • At this stage, there should be an unobstructed endoscopic view extending from the sella to the planum sphenoidale with a 30-degree endoscope. These approaches are indicated for tumors involving the frontal lobe and the olfactory bulb (e.g., olfactory groove meningioma, esthesioneuroblastoma). • For access to the cribriform plate and anterior cranial fossa, it is necessary to fully expose the floor of the skull base within the paranasal sinuses. • The frontal sinus outflow tract is usually identified posterior and medial to the agger nasi cell (the most anterior ethmoid air cell). Review the preoperative computed tomography (CT) imaging carefully to identify the frontal sinus outflow tract and the presence of additional frontal recess cells. • An endoscopic modified Lothrop procedure (Draf III) is usually performed to remove the entire floor of the frontal sinus and create an interconnecting frontal sinus (which provides exposure to the anterior-most aspect of the anterior cranial fossa and the crista galli). • With this step complete, the entire anterior skull base is exposed from the sella to the planum and cribriform plate (Fig. 16.5).
 Indications
 Key Anatomical Considerations
 Patient Positioning
 Transnasal Approach
 Surgical Approaches
 All the of following steps are performed using a 0-degree endoscope. If a deviated septum is present, begin on the side opposite the deviation.

 Variation: Out-fracture the inferior turbinate to improve nasal access.
 Once the middle turbinate is visualized, there are two options to gain access to the posterior nasal space and the location of the superior turbinate:

 The middle turbinate can be lateralized with a freer elevator. Advantage: preservation of an anatomic structure, although it is distorted and crushed. Disadvantage: limited transnasal access for instrumentation and the potential for nasal synechiae.

 Amputate the inferior portion of the middle turbinate using endoscopic scissors. The base of the middle turbinate must be cauterized to minimize bleeding from branches of the sphenopalatine artery. Advantage: provides a greater freedom of movement of the instruments for tumor dissection and removal. Potential disadvantage: synechiae formation between remnant middle turbinate and the lateral nasal wall.
 The ostium is located just posteromedial to the superior turbinate and approximately 1.5 cm superior to the arch of the choana. Tip: Use a pledget soaked in topical 1:1,000 epinephrine to help vasoconstrict the mucosa in this area and visualize the natural ostium.
 Displace or resect the inferior half of the superior turbinate with straight-through cutting instruments.

 If a sphenoethmoidal (Onodi) cell is present, open the cell and expose the skull base, but recognize that the optic nerve can be dehiscent because of this pneumatization pattern.

 If the ostium cannot be easily visualized because of swollen mucosa, the blunt end of a Freer elevator can be used to probe the general location of the natural sphenoid ostium (the tip of the Freer should easily fall into the sphenoid without any pressure); alternatively, an image guidance navigated pointer can be used to confirm the correct trajectory into the sphenoid sinus.
 Once the ostium is identified, open widely the sphenoid using forward-and backward-biting Kerrison punches. Tip: Open the sphenoid superiorly to the skull base and laterally to the medial orbital wall. This ensures that the surgeon will not have a restricted range of motion when working with longer curettes/suctions/dissecting instruments in the sella.
 Posterior septostomy: perform the removal of mucosa and bone to enable using the bi-nostril, four-hand, two-surgeon technique; rather than drill and remove this portion of the bony septum, a large piece of the vomer can often be removed and saved for possible reconstruction of the sella/skull base.
 Resect the contralateral posterior septal mucosa using either a microdebrider or through-cutting forceps.

 Variation: An option at this stage is to use the contralateral posterior septal mucosa as a reverse flap and cover the exposed septal cartilage on the ipsilateral side if a nasoseptal flap was harvested (see below).
 Once this stage is completed, perform the same transnasal steps on the contralateral side.
 The exception is if the septal deviation is significant and extends anteriorly to the nasal vestibule.
 Remove most of the sphenoid rostrum with either backward-biting Kerrison punches or a high-speed cutting/diamond irrigating drill bit. Leave a small piece in the midline as a landmark.
 Depending on the shape, the bony sphenoid rostrum can occasionally be harvested as a piece of bone for sellar reconstruction.
 Do not twist and remove the sphenoid rostrum with grasping forceps, as it is often attached to the sphenoid intersinus septum (which, in turn, may be in close relationship with the ICA).
 This opening prevents any curved curettes/dissectors from being restricted at the sphenoid opening.
 Furthermore, it provides sufficient room for instrument dissection within the sphenoid and sella.
 Once within the sphenoid, note all the relevant anatomy including the bulge of the sella, the carotid protuberances, the medial and lateral opticocarotid recesses, the clival recess, and the sphenoid bony septations (see Chapter 2, Fig. 2.15, page 54).
 If the intersinus septum is attaching to the midline sella, it must be removed until it is flush with the floor of the sella.
 Before performing the sellotomy/craniectomy, elevate the sphenoid mucosa overlying the sella with a Cottle elevator and displace it laterally.

 Variation: If a nasoseptal flap is anticipated to be used at the end of the procedure, the surgeon may remove the mucosa overlying the portions of the sphenoid sinus floor, which will be covered with the flap. This is done to prevent the possible future mucocele formation.
 At this stage, perform the sellotomy (resect the bone window en bloc by using chisels to save the small bone flap, which can be used for the reconstruction of the sellar floor).

 Variation: Drill the sellar floor away or remove it with curettes.
 Resect sellar/pituitary pathology (see Chapter 21.2, page 498).
 Harvesting a Nasoseptal Flap
 Inject the septum with 1% xylocaine with 1:100,000 epinephrine at multiple spots to help hydrodissect the mucosa from the underlying septal bone and cartilage.

 If a wider flap is required, the mucosa over the bony nasal cavity floor is also injected.
 The sphenoid ostium marks the superior margin of the horizontal incision line and can be extended medially over the bony sphenoid rostrum with either an insulated monopolar tip cautery or a sickle-shaped scalpel.
 With these two incisions, the vascular pedicle has been preserved (Fig. 16.4).
 Make the inferior incision line of the nasoseptal flap at the junction of the septum and the nasal cavity floor.

 If a wider flap is required, the incision line can be made to incorporate the mucosa of the nasal floor extending laterally to the inferior meatus.
 The anterior limit of the flap can be extended as far as the mucocutaneous junction of the nasal vestibule.
 The length of the nasoseptal flap depends on two main factors:
 The proposed area of reconstruction (e.g., sella, planum, cribriform plate, clivus, foramen magnum). Defects involving more anterior aspects of the skull base require the longest length of flap because of the distance from the sphenopalatine artery pedicle.
 The pneumatization/depth of the sphenoid sinus as well as the bulge of the sella within the sphenoid.
 A deeply pneumatized sphenoid may require a long length of the flap to lie properly within the sphenoid and cover the sellar defect.
 A sella that bulges significantly into the sphenoid sinus may require a shorter flap because the distance from the pedicle to the sella is shortened.
 Make the superior horizontal incision with endoscopic scissors and connect it to the superior incision above the vascular pedicle. Preserve at least 1 cm of superior septal mucosa adjacent to the skull base, in order to preserve olfactory nerve fibers and minimize olfactory disturbance following surgery.
 Once the flap is harvested, place it into the nasopharynx for reconstruction at the end of the procedure. Be sure to inspect and achieve hemostasis from the cut edge of the superior septum as this can frequently bleed and obscure visualization during the procedure.
 Reverse Septal Flap for Coverage of Exposed Septal Cartilage (After Nasoseptal Flap Harvest)12
 Surgical Approaches
 After removing the posterior bony septum, make a vertical incision along the contralateral septal mucosa (usually at the level of the sphenoid rostrum).
 Make the superior and horizontal mucosal incisions parallel to the nasoseptal flap cuts on the contralateral side.
 Expanded Transplanum Approaches5,13,14
Indications
 Surgical Steps
 The same transnasal steps as described for a transsphenoidal approach are undertaken (including the harvest of a nasoseptal flap), with the following additional modifications:
 The antrostomy facilitates identification of the orbital floor and the medial orbital wall (lateral boundaries of the ethmoid corridor).
 Additionally, it prevents iatrogenic maxillary sinus ostium obstruction if a more complete ethmoidectomy is performed.

 Variation: Using a 30-degree endoscope, skeletonize the skull base along the posterior ethmoid cavity by removing bony partitions with an up-biting, through-cutting instrument. This is an essential step.
 Use the image guidance pointer to confirm that there will be adequate endoscopic exposure to the anterior limit of the skull base tumor.
 Expose the dura overlying the planum. If the lesion is a meningioma, carefully cauterize the dura and then open it widely. Perform resection of the tuberculum/planum pathology using standard neurosurgical techniques.
 Expanded Transcribriform Approaches15–17
Indications
Surgical Steps
 Complete the transnasal portion of the transsphenoidal and transplanum steps.
 Skeletonize the entire ethmoid skull base. Remove the anterior and posterior ethmoid partitions using up-biting, through-cutting instruments (a 30-degree endoscope may be required).
 Identify and expose the frontal sinus.
 With the frontal sinus identified, enlarge the opening widely so that the posterior table of the frontal sinus is adequately visualized.
 Remove the superior portion of the nasal septum as well as the inferior portion of the frontal sinus intersinus septum. This may require a 70-degree endoscope and a curved irrigating drill bit.
Neupsy Key
Fastest Neupsy Insight Engine
 If this is the case, a traditional septoplasty with a hemi-transfixion incision may need to be performed at the beginning of the procedure to provide adequate transnasal access.
 The inferior margin of the horizontal incision line is made at the arch of the choana. This incision is carried medially using either a cautery or a sickle-shaped scalpel to the posteroinferior aspect of the septum; the incision can be curved to follow the natural curvature of the posterior septum inferiorly.
 Preserve the anterior pedicle to the flap and reverse the septal mucosa to cover the exposed septal cartilage on the contralateral side. This is held in place with 4-0 absorbable sutures to reapproximate the contralateral septal mucosa flap and the remaining free edge of the contralateral anterior septal mucosa.
 Using a high-speed diamond irrigating drill bit, thin out a groove and then either use an osteotome to elevate and preserve the bone for reconstruction or just drill out the bone overlying the planum and then remove it with Kerrison rongeurs.