Cranioplasty
The use of cranioplasties in the pediatric population has undergone a number of significant changes during the last 25 years. A newer appreciation has developed of what materials can be implanted in a child and what materials cannot.
To put the subject in perspective, this chapter begins with a historical introduction that reviews the techniques introduced by surgeons over the last several hundred years. The types of cranioplasties currently in use are reviewed specifically as they apply to children and adolescents. The fact that childhood is a phase of continual growth, and infancy of rapid growth, means that a great deal of thought has to go into the repair of cranial defects in this unique surgical population. Cranioplasty entails distinctive considerations in each pre-adult phase of life—infancy, childhood, and adolescence—and these, too, are discussed. The various cranioplasty repair materials are reviewed, along with their unique ability or inability to repair a defect well. Complex scalp injuries are often associated with cranioplasty; therefore, techniques for their repair are also reviewed.
58.1 Early History of Cranioplasty
In reviewing the history of repairing holes in the head, one is continually amazed by what our surgical brethren have used as materials for cranioplasties. A phenomenal variety of materials have been used over the years to repair holes in the head. Although not a surgeon, Hippocrates provided evidence of considerable surgical expertise in his writings on skull injuries. In dealing with comminuted compound fractures of the skull, Hippocrates advocated the removal of free skull fragments. In place of the bone, lint dressing soaked with wine was placed—an interesting and very early technique for achieving wound asepsis. The wound edges were pulled together and secured with adhesive lint segments.1–3
The first printed work to deal with injuries to the head, Tractatus de Fractura Calvae sive Cranei (“Treatise on Fractures of the Calvaria or Cranium”), was written by Berengario da Carpi (ca. 1460–1530) and published in 1518.4 Berengario offered several suggestions for dealing with fractured skulls, some of which would not be accepted today: “When large parts of the skull are removed, the wound should be sprinkled with shredded dry gourd (frustulum cucurbitae siccae), which promotes healing. Smaller defects are covered with ‘flesh’ [carne]—this is done to allow free drainage of the sanies; after that time, unguents may be applied.”4 In the same period (1517), a European surgeon, Hans von Gersdorff (1455–1529), described a cranioplasty made of a mixture of wine and wood oil and packed with wood wool; this was compressed until it became hard.5 However, Gersdorff appropriately noted that it should not be pressed hard against the dura because to do so would be “deadly” (▶ Fig. 58.1).
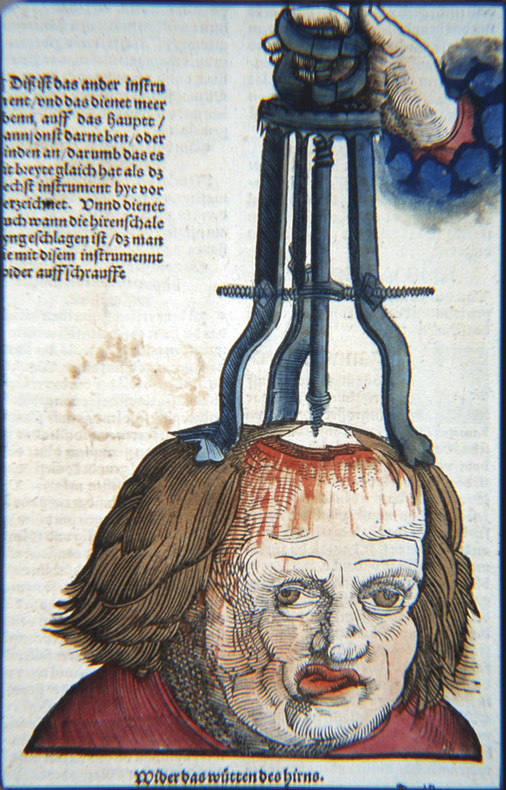
Fig. 58.1 Illustration from Gersdorff’s classic surgical work5 in which he shows the technique of elevating a depressed skull fracture. He then forms a cranioplasty made from wood wool mixed with wine and wood oil to place back into the surgical defect. (Image courtesy of the University of Alabama Library, Reynolds Collection, Birmingham, Alabama.)
In South America, in what is now Peru, the Chimu and then later the Inca were skilled surgeons when it came to the management of head injuries. Recently excavated human skulls reveal some of the earliest uses of metal implants to repair skull defects. In museum collections are a number of skulls that were trephined, then repaired with gold or silver cranioplasties. These cranioplasties were well placed and contoured, and the patients clearly survived the surgeries with well-healed implants. Whether gold or silver was used appeared to be determined by the patient’s social class. Metal plates of other types have also been advocated for use in repairing skull defects, as will be seen (▶ Fig. 58.2).
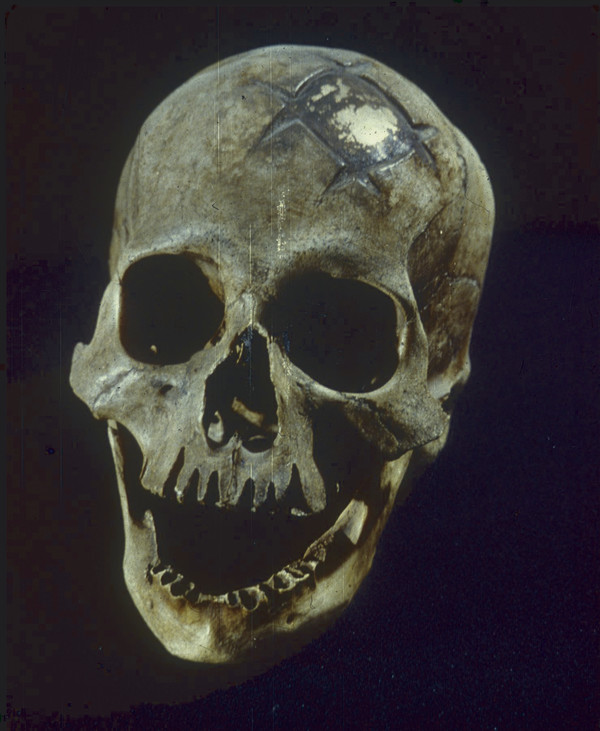
Fig. 58.2 Early example of a successful cranioplasty (Peru, ca. 400 AD). The patient survived, as evidenced by the well-healed in situ cranioplasty made from a gold inlay. (Image courtesy of the Museum of Gold, Lima, Peru.)
The concept of cleaning and replacing autologous bone in a craniotomy dates back to the brilliant French surgeon Ambroise Paré (1510–1590). Paré was performing autologous cranioplasties 500 years ago. His book La Méthode Curative des Playes et Fractures de la Tete Humaine6 contains an excellent description of the repair of skull fractures. Discussing the management of a large injury of this type, he noted that the bones were removed, and then he “turned them around and replaced them.” This technique of flipping over the bone flap is now in common use around the world. Paré also noted that he rarely covered cranial defects except those in the middle of the forehead, where for aesthetic reasons he used plaster. For postoperative protection of the skull, Paré designed a molded leather helmet.6,7 One of the earliest illustrations of a “metal plate” cranioplasty appears in a book by Belloste, The Hospital Surgeon.8,9 In both the French and English editions, published in the early 18th century, a frontispiece shows a surgeon placing a lead plate cranioplasty. In the text, Belloste describes the procedure: “[W]hen the dura mater is uncovr’d I prepare a plate of lead very thin, and very smooth, pierc’d it holes in several places with an inequality, cut and fitted to the bigness of the opening.” Interestingly, Belloste observed that some patients reported discomfort around the cranioplasty site when the weather turned to extremes of hot or cold—“symptoms of the trephined”—a complaint still echoed today by patients in whom artificial and especially metal cranioplasty materials are used (▶ Fig. 58.3).
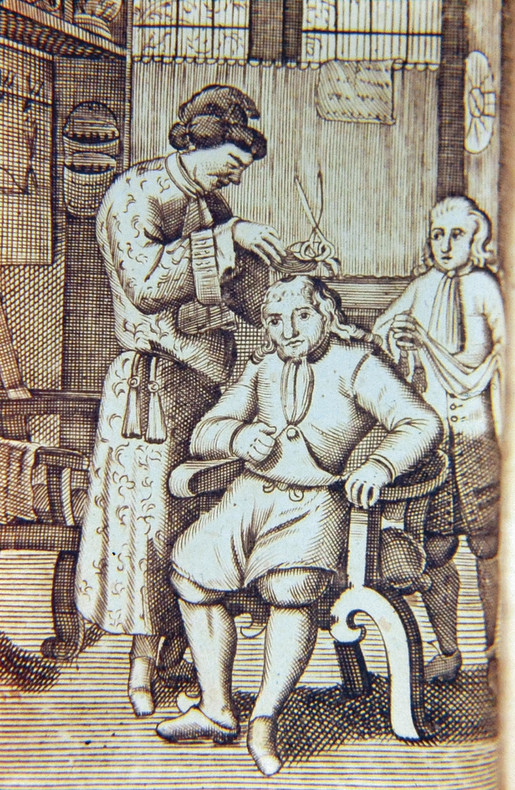
Fig. 58.3 Frontispiece engraving from Belloste’s The Hospital Surgeon showing an 18th century surgeon performing a “lead plate” cranioplasty for a skull defect.8
The use of skull bone material from nonhumans for cranioplasty dates back to at least the middle of the 17th century. In 1682, Job Janszoon van Meekerren (1611–1666) reported the case of a Russian soldier who had sustained a skull defect as a result of a war injury.10 An imaginative surgeon, he performed a cranioplasty with a piece of dog calvaria. Subsequently, the Catholic Church learned of this treatment, found it in violation of canon law, and ordered the dog bone to be removed. If the bone was not removed, the patient would be excommunicated. Unfortunately, we have no long-term follow-up of this case (▶ Fig. 58.4).
Fig. 58.4 An unusual 17th century case reported by Meekeren on the use of a dog skull bone cranioplasty to repair a skull defect in a Russian soldier.10
John Woodall (1570–1643) was an early advocate of the use of cleaned and debrided bone to close a cranioplasty defect. In The Surgeon’s Mate, published in London in 1617, Woodall stated that cleaned, fractured bone could be replaced without difficulty.11 Woodall commented, nearly 400 years before the advent of high-speed pneumatic motors, that young surgeons who wished to trephine should practice first on the skulls of calves before attempting the procedure on a human skull—a remarkable early insight (▶ Fig. 58.5).
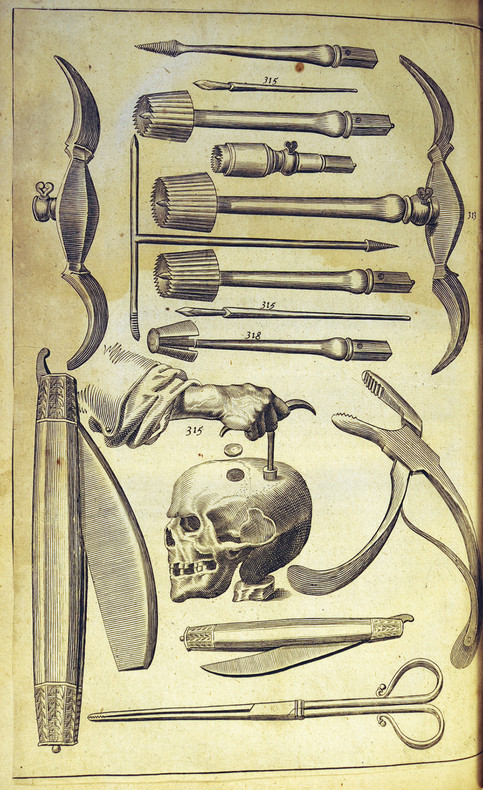
Fig. 58.5 Early surgical engraving from Woodall’s The Surgeon’s Mate showing typical surgical instruments used for trephination and the repair of skull defects in the 17th century.11
Over the years, a long list of foreign materials have been used to repair skull defects. In 1874, Ella reported a case of head injury in the South Seas in which the natives used coconut shells to repair the cranial defect.12 ▶ Table 58.1 lists some of the materials used to repair defects over the course of the last two centuries.
| Author | Year | Material |
| Jaksch | 1889 | Eagle bone |
| Grekoff | 1895 | Calf scapula |
| Henschen | 1916 | Buffalo horn |
| Rehn | 1912 | Ox horn |
| Seydel | 1889 | Tibia |
| Keen | 1905 | Harvested bone chips from nearby skull |
| Kappis | 1915 | Rib grafts (first use) |
| Brown | 1917 | In situ split rib grafts (first use) |
| Mauclaire | 1914 | Iliac crest bone |
| Roepke | 1912 | Bone from the scapula |
| Source: Adapted from Reeves DL. Cranioplasty. Springfield, IL: Charles C Thomas; 1950. | ||
58.2 Techniques of Cranioplasty
A cranioplasty is a procedure for repairing a defect of the calvaria. It can be accomplished in various ways. A successful cranioplasty is one in which the cranial defect is repaired and then heals and grows with the child in the anatomically and aesthetically most appropriate fashion. In the young infant (younger than 1 year), one can leave a cranial defect of up to 2 cm open; as long as the dura and pericranium are intact, bone will commonly fill the defect. In older children, spontaneous repair becomes less likely, and substitutes and replacements for the missing bone must be considered.
In the management of craniofacial defects, the location is important. Defects in the frontoglabellar region require much more attention to detail than a defect behind the hairline. Contours, healing scars, alignment of eyebrows, and orbital dystopia all are important factors to be considered. Cranial defects can result from trauma, be congenitally acquired, or arise from infectious processes. Each of these etiologies has distinctive implications in both the timing and type of cranioplasty repair.
58.2.1 Preparation of the Cranial Defect
The preparation of a cranial defect remains the same in all cases, no matter what the source of the defect. The surgical bed must be clean and free of debris of any kind. Both the surgical bed and the overlying surgical flap must be well vascularized. Without these conditions, neither the flap nor the implant will heal. Preoperative planning has to take account of the nature and course of the scar, particularly so in cases of previous trauma. In many cases, it is best to incorporate the previous scar into the repair. Because parallel scars can disrupt blood supply and cause a flap to slough off, parallel incisions should mostly be avoided. If possible, it is best to keep surgical incisions and scars in hair-bearing areas.
In the case of craniofacial reconstructions in the vicinity of the frontal sinuses, it is extremely important to cranialize the sinus and in some cases to obliterate it with a pericranium flap. The frontal sinus does not typically become developed until the age of 3 to 4 years. When the skin flap is elevated, the pericranium is brought up as a second layer, with its vascular pedicle kept intact. This vascularized pedicle flap can be easily rotated into a number of different positions to cover defects and the frontal sinus. Bone edges that are to be incorporated in the repair have to be “freshened up”—that is, cleaned and debrided of any scar tissue or debris. The edges of the cranioplasty should be lightly burred with good irrigation to provide a fresh vascularized edge. We have switched to the use of “resorbable” bone wax for bone edge bleeding. In our experience, the older formulas of bone wax inhibited solid bony unions by blocking good osseous integration. Meticulous hemostasis and the gentle handling of soft tissues are always obligatory.13–16
58.2.2 Use of Autologous Bone in Cranioplastic Reconstructions
Autologous bone is always considered first as the primary repair material in cranial defects. Autologous bone heals best, will grow with the child, and has the lowest incidence of infection and extrusion.
Essentially four types of autologous bone are available to the neurosurgeon for reconstruction: (1) split calvarial bone grafts, (2) costochrondral rib grafts, (3) iliac crest, and (4) fibula grafts.
In the management of open depressed skull fractures, it appears to be common practice around the world to discard the traumatized bone flap and at a later date repair the craniotomy defect with some form of artificial implant.16–22 For the last 27 years, the author has routinely removed the traumatized bone, cleaned and debrided it, and then placed it back (see below for technique). This technique has virtually eliminated the need for a secondary artificial cranioplasty, particularly in infants and children. Avoiding the placement of foreign material, such as methyl methacrylate, clearly reduces the rate of infection; in addition, we have found that such repairs deteriorate with time, and in infants and children, the skull can outgrow the plate, necessitating still more surgery.23–27 Other late-term complications include flap migration and sinkage plus painful symptoms associated with barometric and temperature changes, also referred to as the “syndrome of the trephined.”28
The neurosurgical practice of discarding the “contaminated” bone is actually a relatively recent practice introduced around the time of the First World War. The practice was fairly well entrenched by the time of the Second World War. A review of general neurosurgical textbooks shows that the practice is widespread and considered routine by general neurosurgeons. More recently, it has become a more standard practice among pediatric neurosurgeons to remove, clean, and replace the autologous bone flap and thereby avoid a later artificial cranioplasty.29,30
Replacing Autologous Bone: Surgical Technique
The original scar (if present, as in an open depressed fracture) is used to expose the traumatized bone. A standard craniotomy is then performed with a high-speed pneumatic or electric drill (e.g., Midas Rex; Medtronic, Minneapolis, MN) and a “footed” attachment (e.g., B-5R). The bone flap is removed in a “cookie” fashion, with a 2- to 3-mm bone margin added to the outer edge. The surgical wound is cleaned, debrided, and vigorously irrigated to remove any debris and foreign material. The flap is then soaked in a 10% povidone-iodine (Betadine) and saline solution for 15 minutes, and then the Betadine is allowed to dry. Before the bone flap is repositioned, it is again washed and soaked in physiologic saline solution to remove any excess Betadine solution. The use of undiluted Betadine is actually toxic to bone and is not recommended. The bone is never autoclaved, frozen, or irradiated because these techniques denature the bone protein matrix and provide an extremely poor biological matrix for repair. In those rare cases in which the bone flap is accidentally dropped on the operating room floor, this same technique has been used with no deleterious effects. To reiterate, bone wax (we now use only a bioresorbable wax) is used sparingly to stop bleeding. Many years of personal experience with craniofacial operations has revealed that bone wax, when placed into the diploë space, retards natural bone growth and osseous integration and can also act as a potential nidus of future infection. Our preferred technique is to place sterile sponges (Gelfoam; Pfizer, New York, NY) soaked in thrombin (or sometimes Avitene; Bristol Healthcare, New Dehli, India) against the bleeding bone with pressure. This material is removed once hemostasis has been obtained. To further enhance bone healing, we stabilize the bone flap with resorbable miniplates. We routinely administer antibiotics to these patients for a 48-hour period postoperatively; the antibiotics used are suited for skin organism coverage (e.g., oxacillin or nafcillin).
The rigid fixation of bone flaps is critical in the pediatric population. In the late 1980s, the use of metallic fixation plates became the technique of choice. Unfortunately, over time, we have learned of potential problems, with plates migrating and fixation screws backing out, among other issues. In children whose intracranial pressure may be increased (e.g., those with a craniofacial syndrome, such as Crouzon syndrome), the use of metallic plates is not the best choice. At later reoperations in several children, we found that the metallic plates had migrated intracranially, and some were actually within the dura or brain parenchyma.31–34 Similar problems have resulted from the use of wire in young children. As a result of these issues, our surgical team now uses only bioresorbable plates and sutures (e.g., Vicryl or Nurolon; Ethicon, Somerville, NJ) to stabilize the flaps. These plates are typically resorbed by hydrolysis over a period of 8 months to 1 year. Because of their higher profile, the family should be made aware of them; parents notice them right away, typically when first bathing their child. We have also had several cases in which sterile granulomas have developed over the plates. The granulomas are almost always sterile, and to date we have had no infections, nor have any required surgical intervention. The plate granulomas typically resolved over 2 to 3 months. If a granuloma is red and tender, then infection has to be considered, but in our experience to date we have not encountered an infected plate.31–34
Split-Thickness Calvarial Bone Grafts
In the growing child, the use of native materials for craniofacial and traumatic repairs remains the gold standard. The human skull, with its natural contours, provides the best source of bone for repairs.35–37 The skull has a natural mirror image that allows the surgeon to harvest calvarial bone, bone that often possesses a contour that closely matches the defect. In most children, by the age of 3 years the skull has become bilamellar and can be split along the diploë to obtain two pieces of bone, one placed in the defect and the other in the donor site. With a soft, malleable piece of metal, a template of the defect is designed and applied to the contralateral skull in various positions until an area is located that closely matches the defect to be repaired. The donor graft is always made 3 to 4 mm larger than the defect. This allows for the bite of the craniotomy drill and gives additional trimming room for positioning the donor graft. The flap is elevated with standard craniotomy techniques and copious irrigation so that the heat generated by the craniotome does not burn the bone. As discussed above, the use of wax, other than resorbable wax on bleeding bone edges, is discouraged (▶ Fig. 58.6 and ▶ Fig. 58.7).
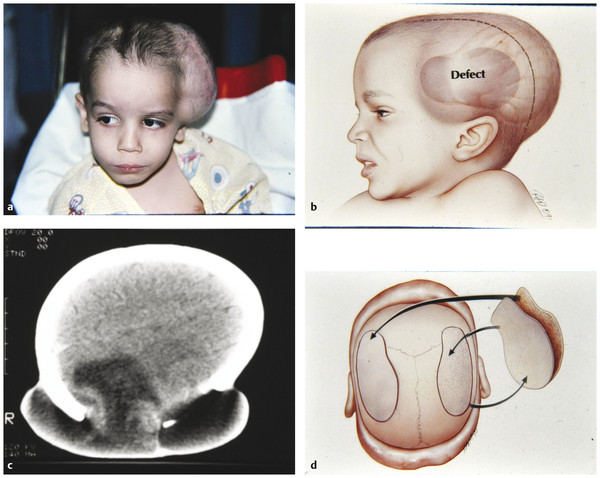
Fig. 58.6 (a) A 2-year-old boy who fell five stories and sustained a large parietal skull defect with a pseudomeningocele over the left parietotemporal region. (b) Artist‘s representation of the defect in the left lateral parietotemporal bone. An ideal case for harvesting a “mirror image.” (c) Axial computed tomographic (CT) scan showing the large skull defect and resultant pseudomeningocele, which will be repaired with a split-thickness calvarial bone graft from the opposite side. (d) Schematic showing the split technique, with harvesting of a “mirror image” piece of bone from the opposite side. The flap is elevated and split along the inner table, and the inner table goes to the graft site while the outer table goes to the defect site.
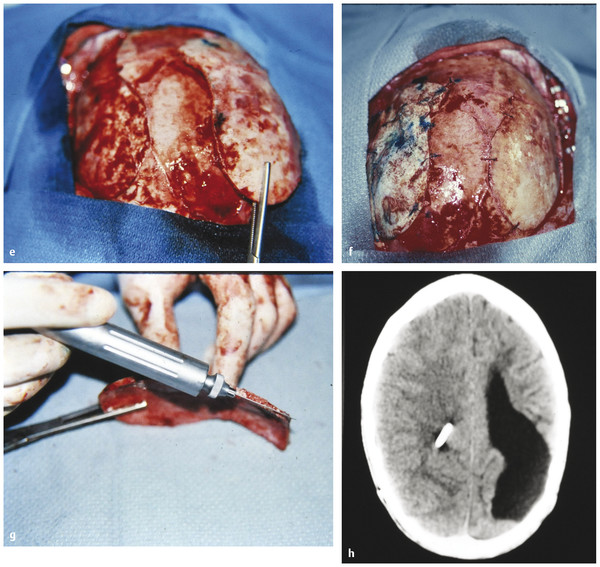
(e) The full-thickness bone flap from the donor site (right parietotemporal region) is being elevated here and held by the Kelly clamp. (f) Both units of bone have been placed into position and anchored. The inner table has gone to the donor site on the right and the outer table to the defect site on the left. (g) A technique to split a full-thickness bone graft by using an oscillating saw and following the bone marrow space in the bone, just between the inner and outer tables of the skull bone. (h) CT of the patient done 8 years after the calvarial reconstruction with the split grafts shows the grafts now well incorporated. Additionally, no problems developed with displacement or infection in either bone graft. This patient has now been followed for more than 20 years, and there have been no further issues with the grafts.
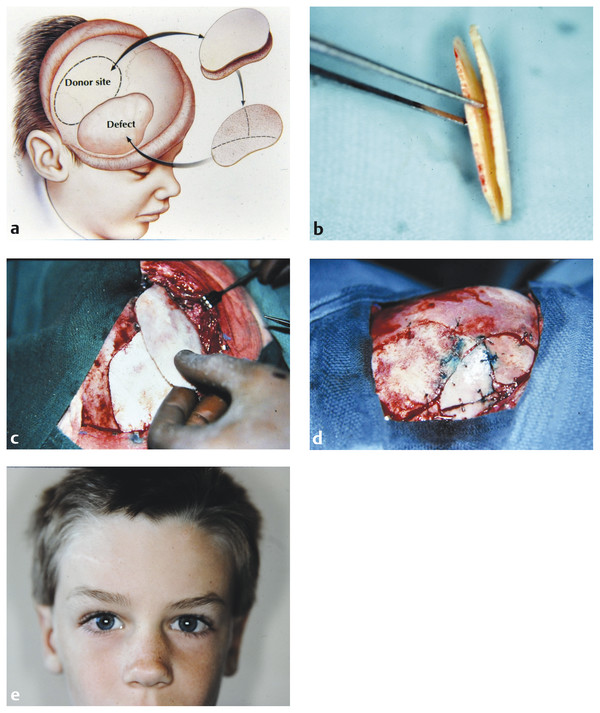
Fig. 58.7 (a) A 5-year-old boy who sustained a right fronto-orbital depressed skull fracture in a motor vehicle accident. He presented 2 years after the accident with a large right frontal skull defect. (b) After the bone flap is harvested, it is given to the plastic surgeon to create a split-thickness graft forming the two units of bone seen here. In this case, an oscillating saw was used with a “soft” flexible blade within the bone marrow. (c) The skull defect is exposed and debrided along the bone edges. Behind the defect, a craniotomy is marked matching the defect site. This unit of bone is elevated and split along the diploic space. One piece goes back to the donor site, and the other is cut and contoured to fill in the defect site. In this image, the donor site has been replaced, and the surgeon is marking out the cuts for the reconstruct of the forehead contours. (d) A view of the right side of the forehead showing the donor unit replaced posteriorly. Anteriorly, each of the bone units has been cut, contoured, and placed into position within the defect site. (e) The patient 3 years after surgery, during which time he maintained a symmetric forehead along with excellent orbital control. With now a 22-year follow-up, no relapse or loss of bone and no infection issues have occurred.
Once the bone flap has been elevated, there are a number of surgical techniques available for splitting the bone. In the very young child (younger than 2 years), a razor-sharp osteotome is used; it is handled much like a knife to “slice” the bone apart. We keep a special set of osteotomes that are used only for these procedures. The edges are routinely sharpened, and there can be no nicks or dings on the cutting edges. The osteotome set has to contain a number of different sizes and curves to be effective. Another option is the use of a No. 15 scalpel blade, again to “slice” the bone. The bone is held in the nondominant hand while cradled in a surgical towel. This is done to protect the hand in case the osteotome or scalpel should slip. The diploë does not develop until about 3 years of age, but there is usually some marrow space available, even in very young children. In older children, usually after the age of 3 to 4 years, the bone is thick enough to be split with fine, thin, high-speed tools such as the C-1 attachment for the Midas Rex. The splitting technique involves drilling a series of holes into the diploë space and then, in a side-to-side action, connecting the drilled holes. Depending on the diameter of the flap, curved osteotomes and reciprocating saws with flexible blades can also be helpful in splitting the bone. With some of the newer and thinner reciprocating/oscillating saw blades, we are now able to split bone in infants younger than 1 year of age. In the flap is very large, one can also cut the flap into two or four pieces, complete the splits, and then plate the units back together with miniplates (▶ Fig. 58.8 and ▶ Fig. 58.9).
Fig. 58.8 A split graft between the two tables of bone is made with a fine cutting tip (Midas Rex C-1 or X-1) placed into the bone marrow with a series of full penetrations. These “plunges” are then connected in a side-to-side motion. Copious irrigation is supplied to keep the bone from being burnt.
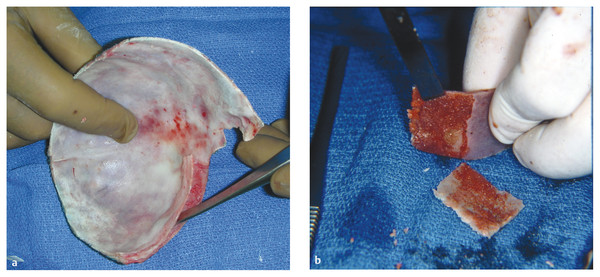
Fig. 58.9 (a) Technique of using a sharp osteotome like a “knife” and splitting along the marrow space. This is being done in a 6-month-old child with plagiocephaly for extra graft material. (b) In a very young child, the bone can be easily split with a fine sharp osteotome or a No. 15 scalpel blade. The instrument is used like a knife to split bone in the marrow space.
The thickest bone for harvesting is over the frontal and parietal boss regions, and the thinnest is over the temporal regions—considerations to be kept in mind when bone is harvested. It is always desirable to create large bicoronal flap exposures when the need for large grafts is expected. In those cases in which additional bone contouring is necessary, we use what is called a “wagon wheel” technique. A full-thickness skull bone is elevated with the pericranium left on. The flap is then split, with the inner table going to the donor site. The outer table, with the pericranium kept moist and intact, is then contoured with a series of cuts that look like a “wagon wheel.” A circle cut is made in the middle, and a series of “spokes” are made from the circle to the edge of the flap. The pericranium is not cut, and the bone cuts are made down to the thickness of an eggshell. With gentle finger pressure, the bone can be fractured to the desired shape (▶ Fig. 58.10). This technique is particularly useful for desired bone contours in the orbits (roof and floor) and around the orbital rim (▶ Fig. 58.10).
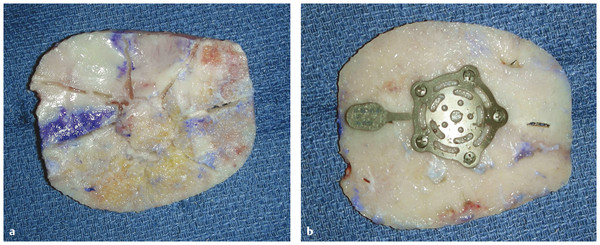
Fig. 58.10 (a) The “wagon wheel” technique for contouring bone. The bone is first split along the diploë, as described above. The pericranium has been left on the outer table. On the side opposite the pericranium, the “wagon wheel” cuts are made—a center circular cut and then a series of radiating cuts deep to the pericranium. The cuts are just made to the edge (i.e., an egg shell thickness).The pericranium holds the bone together, and with just gentle finger pressure the bone can be shaped in the desired contour. (b) With a fine bur or cutting tool, the radial cuts are made on the side opposite to the pericranium. The cuts are made in such a fashion that an “egg shell” thickness is left at the end of the cutting.
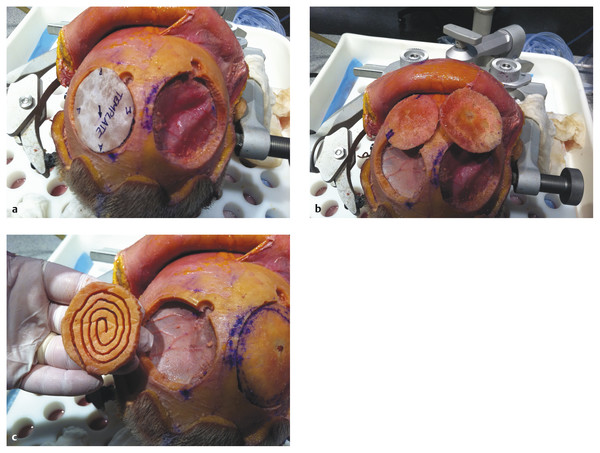
Fig. 58.11 (a) The “spiral” technique for contouring bone. A full-thickness piece of calvarial bone of the desired size is harvested from the opposite side. As illustrated here, it is harvested from the right side, with the template designed on the left. (b) A full-thickness bone graft that has been elevated and split shows both the inner and outer tables. The inner-table graft on the right will be placed back in the donor site. The outer-table graft on the left will be contoured with a “spiral” technique. (c) The outer-table bone graft has been cut with a high-speed drill starting at the outer edge and then carried in a circular fashion to the center. With just gentle finger pressure, this split bone graft can be contoured to fit just about any area with a contour, such as the forehead or orbital roof and floor.
Another technique for obtaining bone is the in situ outer-table craniotomy; it can be used in the older child and adolescent whose skull thickness is greater than 1 cm. The technique involves drilling a trough around the edges of the predesigned bone template. The trough is carried into the diploë but not through the inner table. With the use of very sharp curved and straight osteotomes placed within the diploë, the outer table of bone is lifted off, with the inner table left intact to serve as the repair material. A reciprocating/oscillating saw can also be helpful once the plane has been developed with the application of osteotomes. In another technique, a Gigli saw is placed in the diploë, and by following the diploë, one can elevate the outer table. This technique has been particularly popular with plastic surgeons. It is necessary, however, to keep in mind the risk that the osteotome and/or saw blade can plunge through the patient’s thin bone into the brain, so extreme caution needs to be exercised when these techniques are used (▶ Fig. 58.12). The use of split-thickness grafts has many advantages and remains the standard for craniofacial repairs. The infection rate is very low in these cases. The risk for rejection is virtually nonexistent. The natural bony union that results grows with the child, an important consideration in younger patients.
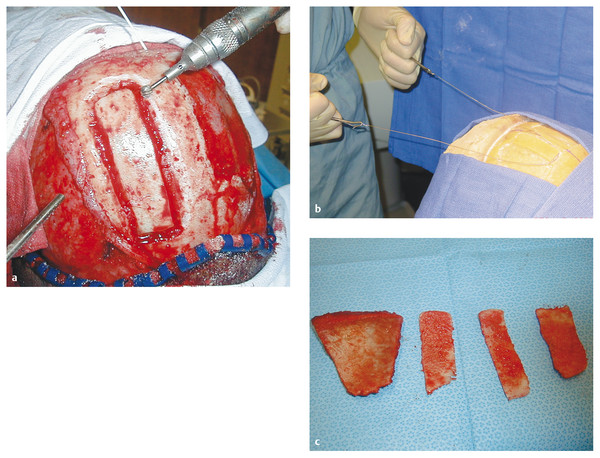
Fig. 58.12 (a) Technique for harvesting an outer-table bone graft. A trough is made in the skull bone to the level of the diploë with a round bur. (b) A Gigli saw is placed within the diploë, and the surgeon “travels” the saw within the diploë space. This technique requires some skill in using a Gigli saw, but it can successfully produce large pieces of graft bone of different contours and shapes. (c) Four split grafts obtained from a single patient by outer-table harvesting with the Gigli saw technique.
Rib Grafts
Rib grafts have long been popular with plastic surgeons and have been used in various types of cranioplasties.38–40 Furthermore, these grafts are a source of ample material that can be obtained easily and with low risk to the patient. An advantage of ribs is that they can be obtained from the patient in any of a number of surgical positions. On the anterior chest, the fourth through the sixth ribs are accessible; on the posterior chest, the eighth through the tenth ribs are accessible below the scapula; and in the lateral position with the patient’s arm abducted, the fourth through the eighth ribs are easily accessible.
The graft site is exposed and prepared in standard fashion with fresh bone margins. The area is measured and the graft size determined. The rib grafts are harvested by making a skin incision directly over the ribs selected. This incision is carried down to the rib periosteum with a monopolar cautery and a fine needle tip on a low-current setting. The periosteum is separated from each rib with a Key-type periosteal elevator. As the rib is elevated, the neurovascular bundle and underlying periosteum and pleura are left intact and gently stripped away with a pigtail rib separator. In determining the rib length that is to be removed, be sure to allow an additional 5 to 8 mm for the bending and contouring. Each end of each rib is cut, removed from the field, and split longitudinally with a sharp osteotome, yielding two pieces that can now be bent and contoured with a Tessier rib bender. Because ribs are malleable and fracture easily, the splitting must be done slowly and carefully. Rather than apply a mallet to the osteotome, it is better to use the osteotome like a knife blade and slowly work your way through the rib in a “knifelike” fashion. The ribs are then positioned at the recipient site and shaped to fit the size and contour of the defect. It is desirable to create a graft whose height and contour are slightly exaggerated because there is typically some collapse and resorption of the graft over time.
Because rib is the most malleable of the materials available, it is particularly applicable to reconstruction around the orbits and over the forehead. In very large cranial defects, the “wire link fence” technique of Munro and Guyuron39 can be useful. With a series of split ribs, the bone is woven together in a wire link fashion and then positioned as a craniotomy flap. The only problem with this technique is that over time the ribs can take on a “washboard” appearance, which is quite undesirable as far as aesthetics are concerned.
Some “pearls” to keep in mind in harvesting ribs and using them in reconstruction follow:
Pearls
Related posts:


Stay updated, free articles. Join our Telegram channel

Full access? Get Clinical Tree


