Fig. 1
An example of a microRNA designed against the human housekeeping gene GAPDH NM_002046.5 (NCBI), both flanks and loop have been modified and adapted from human miR155. (a) Indicates the folding structure of GAPDH obtained from the software, zoomed into the loop to be targeted. (b) Starting from the 5′ end the microRNA contains flank sequences, which will form part of the structure and cleavage sites recognized by Drosha. The 5′ flank is followed by the 22-nucleotide sequence that contains a seed sequences from nucleotides 2–8, and a mismatched loop. The antisense sequence is the reverse compliment of the sense sequence with nucleotides from positions 10–11 deleted to form an unpaired bulge. The sequence has a +G modification that should be added if cloning into a plasmid with a U6 promoter, and a tail of 6 Ts as the terminator. Panel (c) is an image of the folding structure of the designed microRNA
1.
Copy the whole sequence from the loop in Subheading 3.1, step 2, and paste it into a word document.
2.
Within this sequence look at the 5′ end for an A or a U to be the first base of your microRNA, this will improve thermodynamic stability, and allow for better AGO2 loading [23].
4.
Check that the sequence selected is unique to your target by searching the BLAST database (http://blast.be-md.ncbi.nlm.nih.gov/Blast.cgi).
5.
Check the GC content of the selected site; a 20–70 % range is preferable. The sequence selected for example shown in Fig. 1a has a GC content of 57.1 %. You can use a calculator available online or count the number of Gs and Cs and divide by the total number of nucleotides in the sequence.
6.
A basal UG motif immediately after the stem-loop at position 14 shows an enhancement in Dicer binding [23]; adding this to the design is left to the researchers’ discretion.
3.3 Backbone Design
1.
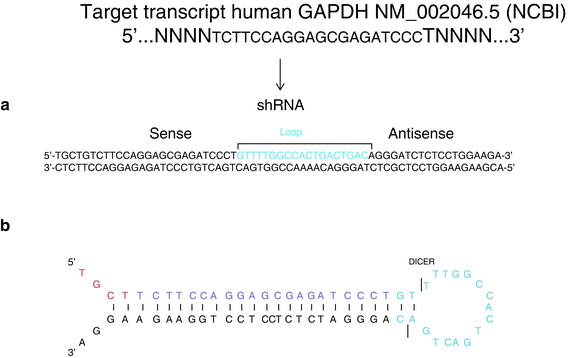
Either endogenous miR155 or miR30 (see Note 11 ) are commonly used as backbones to design the artificial microRNA and shRNA. For the microRNA design both the 3′ and 5′ flanks, as well as the loop region from the endogenous miRNA of choice, will be adapted as a backbone (Fig. 1). For the shRNA design only the loop region is adapted as the backbone (Fig. 2).


Fig. 2
An example of an shRNA designed to target the human housekeeping gene GAPDH NM_002046.5 (NCBI). The loop has been modified and adapted from hsa-miR155. In panel (a) starting from the 5′ end is a restriction site for cloning ; followed by the sense 22-nucleotide sequence, then a 19-nucleotide loop that contains the sites for Dicer cleavage, and finally the antisense 22-nucleotide sequences with bases in positions 10–11 deleted to form a bulge. The bottom strand is the reverse complementarity of the top strand. In panel (b) is an image of the folding structure of the shRNA
3.
The 5′ and 3′ flanks contain the structural cleavage areas for the Drosha-DGCR8 machinery to sit; they are 40 nt upstream, and downstream, of the pre-miRNA hairpin; these flanking sequences complement each other and leave single-stranded areas at the base of the stem loop that the microprocessor will recognize as substrate. Refer to refs.[18, 24–26].


Fig. 3
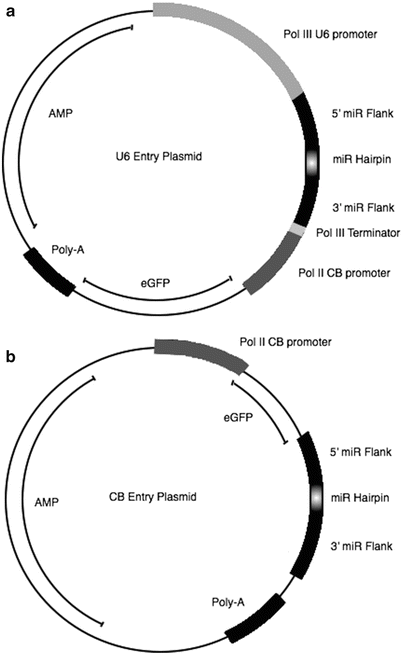
An example of the entry plasmid used for cloning a microRNA/ shRNA. (a) U6 entry plasmid contains a U6 promoter followed by either the miR155 endogenous flanks or the shRNA directly. An additional Chicken beta actin (CB-A) promoter driving the expression of a reporter gene (GFP) can be added. (b) CB entry plasmid contains a CB promoter driving GFP, followed by the miR155 endogenous flanks or the shRNA directly
4.
5.
Copy and paste the flank sequences into a word document.
3.4 Introduce the 20–22-Nucleotide Sequence into the Backbone
1.
Immediately after 5′ flank sequence, paste the 20–22-nucleotide sequence that is perfectly complementary to the target sequence, this stretch of nucleotides will also contain the seed located in positions 2–8.
2.
After the 22 nucleotides, paste the loop sequence adapted from the naturally occurring microRNA.
3.
After the loop, paste the reverse complement of the 22 nucleotides modified by having a deletion in positions 10–11 creating a bulge. The presence of the bulge will allow for the sense strand to be preferentially loaded into AGO2.
4.
Select the whole sequence described above and reverse complement it. This will be the bottom strand 3′–5′.
5.
If a pol III promoter such as U6 is being used add an additional +1G at the 3′ end of the U6 promoter sequence, before the 5′ flank sequence of the miRNA [30].
6.
After the 3′ flank sequence add the pol III terminator formed by 4–6 Ts (TTTTTT) and the restriction site of choice for cloning . This stretch of Ts will create an overhang at the 3′ end necessary for Dicer recognition [30].
7.
Proper controls should include a microRNA that targets an unrelated sequence to control for saturation of the RNAi machinery, promoter, or reporter toxicity.
3.5 shRNA Design (Fig. 2)
1.
In a word document paste the 22-nucleotide sequence complementary to the target selected.
2.
This sequence will then be followed by a 19-nucleotide loop adapted from an endogenous microRNA (human miR155 in this case).
3.
After the loop add the reverse complement of the 22 nucleotides.
4.
The end result will be a hairpin, where the conserved loop will contain the cleavage sites needed for Dicer to remove the loop and leave the dsRNA duplex.
5.
Select a restriction enzyme to use for cloning the shRNA to an expression vector.
6.
Decide whether to use a U6 or H1 promoter. When using a U6 promoter a +1-G must be added at the 3′ end of the promoter.
3.6 Cloning of the miRNA or shRNA
1.
Reconstitute the oligonucleotides with nuclease-free water to 100 μm concentration.
2.
Anneal the oligonucleotides: In a beaker bring water to boil at 95 °C, add the tubes containing the annealing reaction (Table 1). Keep at 95 °C for 5 min, then shut off the heat, and allow to cool to room temperature. Store at −20 °C.
Table 1
Annealing reaction
Component | Volume |
|---|---|
5′–3′ oligo | 2 μl |
3′–5′ oligo | 2 μl |
Annealing buffer | 196 μl |
3.
Check plasmid and oligonucleotides: The plasmid containing the promoter of choice, reporter, etc. must be digested with the enzyme selected for cloning to confirm the presence of the expected cut site and size of the band. Make a 1 % agarose gel to run the annealed oligonucleotides and the vector side by side to ensure a 1:1 ratio for an adequate ligation.
4.
Prepare the ligation mixture as described in Table 2 and ligate at 16 °C overnight.
Table 2
Ligation reaction
Vector | 1 μl |
Insert | 1 μl |
Quick T4 DNA ligase | 1 μl |
Buffer | 2 μl |
Nuclease-free water | 15 μl |
Volume reaction | 20 μl |
5.


Follow transformation protocol included with your selected super-competent cells. Plate the reactions and incubate overnight. The next day pick multiple colonies and grow individually in 5 ml of terrific broth media containing the antibiotic used for selection at 37 °C, shaking. Do not grow for more than 13 h.
Stay updated, free articles. Join our Telegram channel

Full access? Get Clinical Tree


