Performing a Cerebral Arteriogram
Key Points
New fellows in our room are often nonplussed as to why we only have two CDs for our music system. One of these is “The Greatest Hits of Marty Robbins” and we never play the other one. The point this detail makes is that neuroangiography is safest when practiced in a methodical, repetitive, consistent manner. Every angiogram is executed through the exact same steps, as much as possible. Certainly, there are many days when creativity, ingenuity, and improvisation are in great demand, but these moments are often best avoided and forgotten. The purpose of the music is not entertainment but providing a familiar ambiance. The priority in the room is safety.
Safe technique can only come about through absolutely consistent practice of safe habits. In most patients, most of the time, such scrupulousness is redundant, but these habits are not aimed at the majority of cases. They are aimed at those rare, unforeseen circumstances when they will make a big difference.
Review the Previous Studies
The importance of this preliminary step cannot be overemphasized. Relying on typed reports of what was seen on the previous studies, which side the findings were on, and the like, is a recipe for oversight, omission, or worse.
Examine and Talk to the Patient
In the course of obtaining consent from the patient, a focused neurologic examination by the neuroradiologist, documented in the patient’s chart, is a worthwhile expenditure of 5 or 10 minutes. This examination should dwell on the patient’s known or suspected neurologic deficits. It should also include a baseline evaluation of those functions most likely to deteriorate in the event of angiographic misadventure. Therefore, a quick evaluation of the patient’s mental status, memory, orientation, language, visual fields and lower cranial nerve function, motor power, gait, and gross coordination should be de rigueur during all consent interviews. An adverse event in the course of an angiographic examination is rare. However, calls to the nursing floor to evaluate a patient with minor complaints of headache or apparent change in mental state after an angiogram are common and can be dealt with quickly for having previously documented the baseline condition of the patient. Such complaints are usually trivial in nature. However, a complaint of headache and a focal neurologic deficit that may be new after a cerebral angiogram can evolve into a time-consuming process, which can be avoided.
Similarly, baseline evaluation and marking of the peripheral pulses, using a Doppler device if necessary, will help to avoid unnecessary consumption of time afterward. Prompt recognition of deterioration of a pulse can expedite a consultation with vascular surgery for suspected iliac or femoral artery dissection. On the other hand, a poor pulse obtained after an angiogram without a prior evaluation is an open-ended question.
Patients should remove all jewelry and dental prostheses before the case begins. Such devices, when left in place, have a way of projecting precisely on the area of abnormality, and their removal from the patient during the case, with a catheter already in the internal carotid or vertebral arteries, is not a benign or convenient interruption.
Plan the Angiographic Study
Many cervicocerebral angiographic studies have such a formulaic pattern that it is sometimes easy to fall into a groove and thus perform a study that does not adequately answer the question for a particular patient. Such omissions most commonly center on an oversight to study the aortic arch or to obtain images of the external carotid system when the question of a bypass procedure is being considered. Patients being studied for subclavian steal will require particular stratagems during their procedure to draw a distinction between the images obtained at rest and those obtained in a state of physiologic exertion.
Omission of an external carotid artery injection is a common oversight in cerebral angiographic studies. Most often, this shortfall only becomes apparent long after the study, when discussion of surgical options for an identified lesion
turns to the alternative of external-to-internal bypass procedures. To avoid the retrospective embarrassment of having one’s work so criticized, one should anticipate questions about the external carotid circulation where bypass procedures or the possibility of involvement of the external carotid artery with disease states might be considered:
turns to the alternative of external-to-internal bypass procedures. To avoid the retrospective embarrassment of having one’s work so criticized, one should anticipate questions about the external carotid circulation where bypass procedures or the possibility of involvement of the external carotid artery with disease states might be considered:
Occlusive diseases such as Moyamoya disease, intracranial or extracranial dissections.
Giant intracranial or otherwise inoperable aneurysms. A bypass procedure with subsequent surgical or endovascular occlusion of the parent vessel might be considered in certain difficult circumstances.
Serpentine or dysplastic aneurysms of the middle cerebral artery.
Cavernous aneurysms.
Brain arteriovenous malformations (AVM) when the AVM extends to the surface of the brain, and particularly when there has been prior infraction of the dura by a surgical procedure increasing the likelihood of dural–pial anastomoses.
Dural vascular disease as a possible cause of subarachnoid or intraparenchymal hemorrhage.
What Catheter Should I Use?
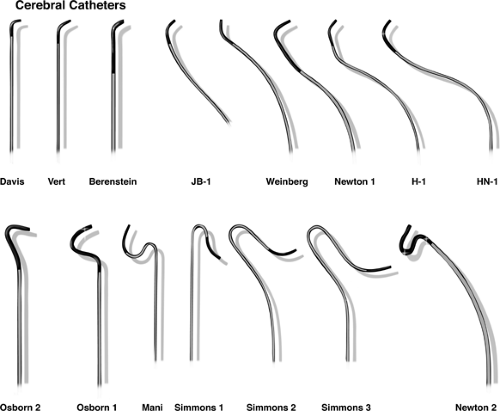
Use whatever catheter you have most experience and comfort with (Fig. 2-1). The calibration systems in use derive from mid-19th-century industrial standards and have not been coalesced into a modern or unified scheme, unfortunately. Catheter outer diameters (OD) are measured in the French system, inner diameters (ID) are measured in inches, percutaneous needles are measured in a Gauge system, and embolization coils are measured in millimeters. There is not an easy way to correlate all of these measurement systems except to work consistently with a proven set of instruments. Generally, the disparity of the systems of mensuration is of little significance, but it is possible for practical problems to arise. Therefore, testing the compatibility of devices before insertion into the patient is a good pragmatic solution.
Catheter tips are tapered or untapered. Untapered catheters can be inserted only through a sheath. Catheters of 4F or 5F size are the standard for diagnostic neuroangiography. A 5F cerebral catheter has an OD of 0.066 inches, with an ID up to 0.050 inches. Manufacturing techniques have
improved in recent years so that it is now possible to perform most endovascular procedures with a 5F or 6F introducer catheter. Interventional procedures requiring larger-caliber devices, such as carotid stenting, can be performed via a long 6F sheath used in place of a catheter.
improved in recent years so that it is now possible to perform most endovascular procedures with a 5F or 6F introducer catheter. Interventional procedures requiring larger-caliber devices, such as carotid stenting, can be performed via a long 6F sheath used in place of a catheter.
Table 2-1 Minimization of Contrast Load | ||
|---|---|---|
|
Contrast
Despite its relative expense, nonionic contrast is now the standard for cerebral angiography. Nonionic contrast agents are denominated according to the content of organic iodine per milliliter; for example, Omnipaque 300 contains 647 mg of iohexol per milliliter, equivalent to 300 mg of organic iodine per milliliter. The improved performance of modern image intensifiers in digital imaging allows one to consider use of a lower concentration of contrast for cerebral angiography. Nonionic 180 to 200 preparations provide adequate vessel opacification on modern machines, with the advantage of a lower iodine total dose and a lower osmolality challenge to the blood–brain barrier (Tables 2-1 and 2-2). Lower-strength contrast has the additional advantage of a lower viscosity compared with preparations of higher concentration. This is a factor for consideration in microcatheter injections either by hand or by power injector or with reference to inflation and deflation of angioplasty balloons.
Arterial Puncture and Sheath Placement
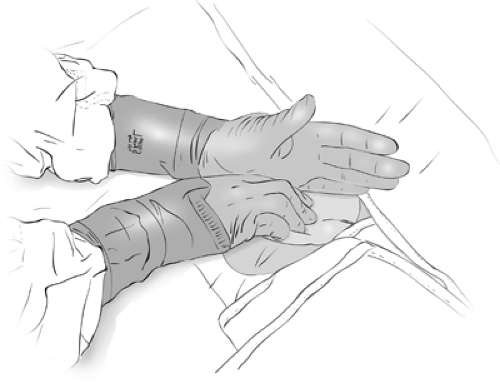
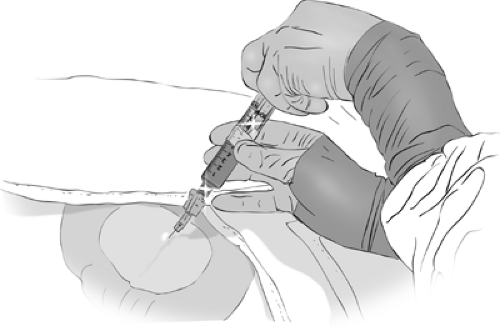
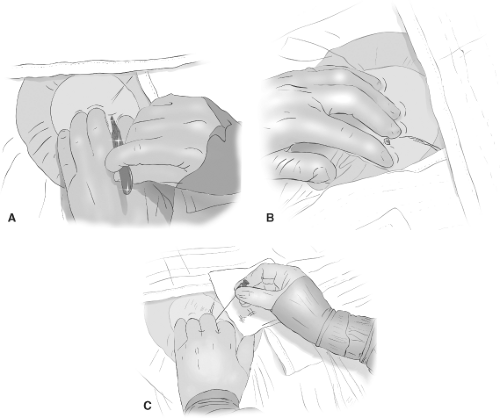
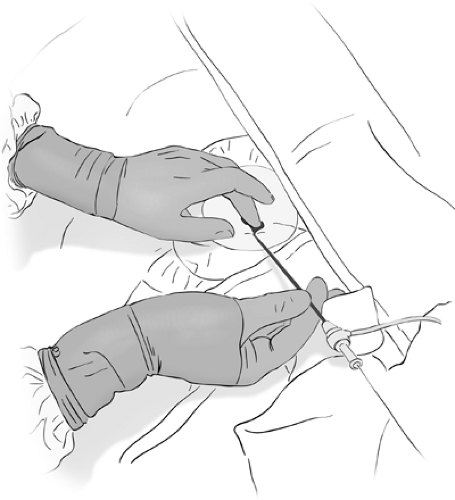
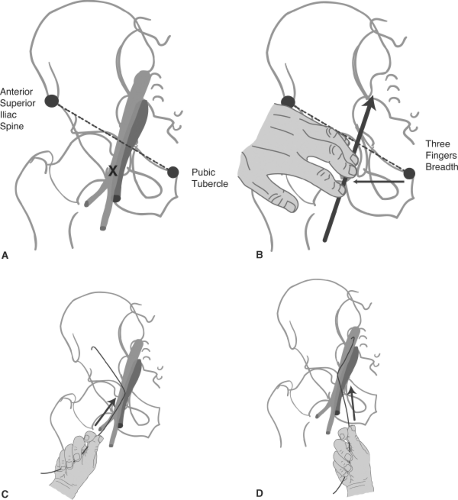
The arterial puncture must be made with a view to hemostasis after completion of the study. The most common error among beginners is to perform the puncture too high, above the inguinal ligament. Therefore, the angle of insertion of the arteriotomy needle is approximately 45 degrees to the skin in a line on a plane with the direction of the artery and in a site that allows compression against a bone afterward. The easiest site is at the common femoral artery on the right side (Figs. 2-2–2-8). The most critical procedure in gaining access to the artery is the passing of the wire, which runs the risk of intimal or medial dissection. Seldinger technique with a 0.035-inch wire used to be a standard approach in adults, but the popularity of micropuncture technique is a definite improvement from every point of view. Occasionally, a very scarred or copiously endowed groin will require the support of a stiff wire such as a Rosen or Amplatz, but these impasses can be negotiated with sequential dilations once the initial access is obtained.
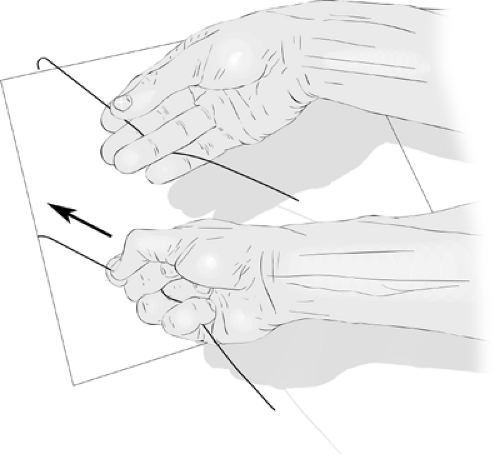
Wiping the wire clean of blood and clot between successive passes of the dilators, the arterial site is progressively dilated to allow smooth passage of the sheath dilator/obturator and finally of the sheath itself (Fig. 2-5). The sheath is hooked up to flush, the dilator is removed with the
wire, and the sheath is sutured or otherwise secured in position. While passing the sheath or dilator, a spinning motion of the advancing hand helps to twist the device into the artery smoothly and minimizes trauma to the arterial wall. Slight tension on the wire provided by an assistant helps this passage.
wire, and the sheath is sutured or otherwise secured in position. While passing the sheath or dilator, a spinning motion of the advancing hand helps to twist the device into the artery smoothly and minimizes trauma to the arterial wall. Slight tension on the wire provided by an assistant helps this passage.
Table 2-2 Contrast Agents Used in Cerebral Angiography | ||||||||||||||||||||||||||||||||||||||||||||||||||||||||||||||||||||||
|---|---|---|---|---|---|---|---|---|---|---|---|---|---|---|---|---|---|---|---|---|---|---|---|---|---|---|---|---|---|---|---|---|---|---|---|---|---|---|---|---|---|---|---|---|---|---|---|---|---|---|---|---|---|---|---|---|---|---|---|---|---|---|---|---|---|---|---|---|---|---|
| ||||||||||||||||||||||||||||||||||||||||||||||||||||||||||||||||||||||
Difficulty with passing a dilator or sheath over the wire should prompt a pause to evaluate the tip of the device lest it should have become damaged during the attempted insertion. Examine the tip carefully. It is common to find that the plastic sheath fitted over the dilator has developed a small tear or irregularity that would possibly lacerate the vessel wall if it were forced through the arterial puncture site.
Radial Artery Access
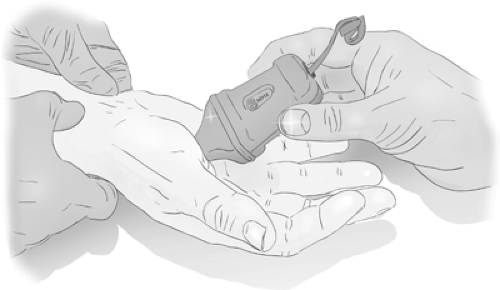
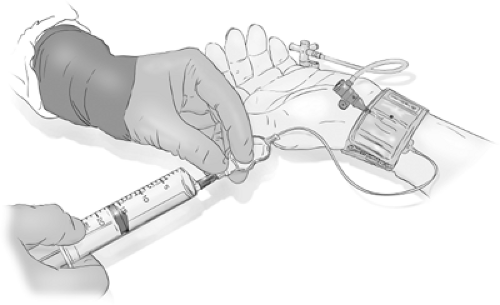
If all cerebral angiography could be performed via a transradial approach, the world would be a sunnier and happier place, just as it is for cardiologists. The radial artery has become the default site of access for 60% to 80% or more of cardiac catheterizations in sizes up to 7F, although 6F is considered the upper size of comfort range for most adults (3,4,5). The reasons for this are manifold. This route is safer with fewer hemorrhagic and other complications. Control of the artery afterward is much easier and interruption of anticoagulant or antiplatelet medication is less of an obstacle compared with a transfemoral route. One of the largest studies of the transradial approach in the cardiology world identified a 67% reduction in bleeding complications compared with the transfemoral approach (6,7), fewer delayed incidents of bleeding, and significantly fewer cases needing surgical repair of pseudoaneurysms. Patients find a transradial procedure much less intimidating and less invasive on their dignity, and mobilization afterward is not even a consideration (Figs. 2-9 and 2-10).
The radial artery approach has attracted some attention in the neuroangiography world, with universally favorable
reports, certainly compared with the older transbrachial or transaxillary options (8,9), but it is technically difficult to gain access to the carotid arteries or contralateral vertebral artery from this route. Authors who have used this technique a great deal find that customized 120-cm catheters of a Simmons-type curve are the most useful, but still awkward to use, requiring a wire technique doubled back off the coronary valve for reconstitution of the Simmons curve (10).
reports, certainly compared with the older transbrachial or transaxillary options (8,9), but it is technically difficult to gain access to the carotid arteries or contralateral vertebral artery from this route. Authors who have used this technique a great deal find that customized 120-cm catheters of a Simmons-type curve are the most useful, but still awkward to use, requiring a wire technique doubled back off the coronary valve for reconstitution of the Simmons curve (10).
The biggest concern with the transradial approach is injury to the radial artery and ischemic complications in the hand. The Allen test is recommended to screen for this possibility, but the predictive value of a negative (unfavorable) Allen test is questionable, so that even this test is not utilized universally in the cardiology world (6,11). Pulse oximetry is probably more sensitive and cases where cardiologists experienced in this technique back away from a transradial case are rare.
From a technical point of view, radial artery puncture is easy with a less than 5% failure rate of access (10,12).
For difficult arteries advancing the needle to the backwall and then withdrawing into the lumen is very helpful. A low-profile sheath, such as the Glide Sheath offered by Terumo with a prepackaged 0.021-inch wire, precludes even the need for a dermatotomy incision. Spasm of the radial artery is a significant phenomenon and an intra-arterial dose of calcium blocker, for example, verapamil 4 mg, or nitrates, is useful to suppress this phenomenon. Heparinization of the patient after sheath insertion, or more commonly in the cardiology field, use of bivalirudin, is virtually universally recommended. Some patients are exquisitely sensitive to the application of a flush line to the radial artery sheath, possibly due to a temperature sensitivity inducing distal spasm. Many cases are more easily conducted, therefore, without an active flush line on the radial sheath and instead a bolus of heparin is inserted into the dead space for the duration. Rarely, extreme tortuosity or dissection of the brachial artery may prevent retrograde navigation even after successful transradial access has been gained.
For difficult arteries advancing the needle to the backwall and then withdrawing into the lumen is very helpful. A low-profile sheath, such as the Glide Sheath offered by Terumo with a prepackaged 0.021-inch wire, precludes even the need for a dermatotomy incision. Spasm of the radial artery is a significant phenomenon and an intra-arterial dose of calcium blocker, for example, verapamil 4 mg, or nitrates, is useful to suppress this phenomenon. Heparinization of the patient after sheath insertion, or more commonly in the cardiology field, use of bivalirudin, is virtually universally recommended. Some patients are exquisitely sensitive to the application of a flush line to the radial artery sheath, possibly due to a temperature sensitivity inducing distal spasm. Many cases are more easily conducted, therefore, without an active flush line on the radial sheath and instead a bolus of heparin is inserted into the dead space for the duration. Rarely, extreme tortuosity or dissection of the brachial artery may prevent retrograde navigation even after successful transradial access has been gained.
Finally, the radial artery is easily compressed at the end of the case either by thumb, pressure dressing, or a wrist-bracelet device such as the Terumo band (Fig. 2-10). Patients can be mobilized immediately.
Aortic Arch Navigation
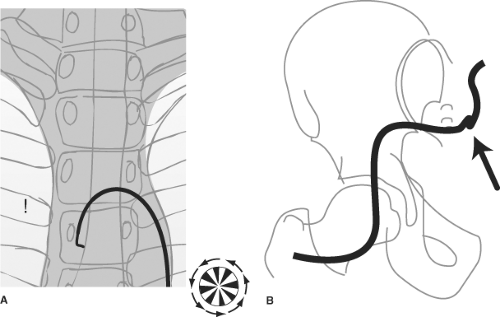
With the tip of wire leading, the catheter is advanced from the groin to the descending thoracic aorta. The wire is removed and wiped clean. In the majority of patients, a J-wire or any curved wire will advance all the way from the groin to the aortic arch without fluoroscopic monitoring in the pelvis and abdomen. If difficulties are anticipated, or if the patient has known atherosclerotic or aortic aneurysmal disease, then it is safer to monitor the progress of the wire. When particular difficulties are encountered in the iliac arteries or if they appear noticeably tortuous, it may be a good idea to insert a longer sheath to straighten out the vascular route between the groin and the aortic arch. Similarly, when navigating a catheter in the arch, one may notice an absence of corresponding motion between the catheter tip on the fluoroscopic image and one’s hands. This usually means that the catheter has become wrung, and most often, the site of kinking is at the groin or in the tortuous iliac arteries (Fig. 2-11). Great care is needed at this point to unwring the catheter slightly and to withdraw it partially from the body until the damaged section is out. Then, a wire can be passed to secure arterial access and a long sheath can be inserted.
After the catheter has been placed in the descending aorta and the wire removed, the catheter is aspirated vigorously to clear bubbles, clots, and thrombogenic debris collected as it traversed the subcutaneous tissues of the groin. The catheter is then placed on continuous heparinized flush or maintained on a meticulous hand-flush regimen for the duration of the case. For the first clearing of the catheter after insertion, a more forceful pursuit of surprisingly tenacious bubbles within the catheter is prudent. The hydrostatic pressure transmitted down the catheter from the aortic arch that allows backbleeding to occur is frequently not adequate to overcome the adhesive qualities of bubbles in the catheter. An assertive tapping of one’s finger on the catheter hub and particularly at junctions such as stopcocks will often evoke an otherwise undetected shower of bubbles from the catheter. This is most common after the initial insertion of a new catheter but can be seen with surprising frequency during the case after wire removal or other manipulations.
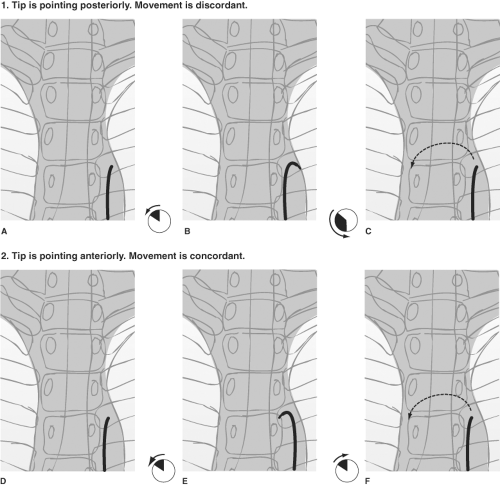
Once the catheter is positioned in the proximal descending aorta, the angiographer rotates it until the tip is facing anteriorly toward the image intensifier, and the catheter is advanced over the aortic arch (Figs. 2-12 and 2-13). A position facing anteriorly translates into an inferior direction as the catheter is advanced over the arch. The catheter responds
best to anticlockwise rotation by a delicate, smooth spinning with the left hand at the skin entrance, and with the right hand moving in synchrony at the catheter hub. The outwardly visible catheter should be kept straight to eliminate accumulation of countertorque outside the body and to prevent any inadvertent jumps of the wire inside the body when the catheter is advanced.
best to anticlockwise rotation by a delicate, smooth spinning with the left hand at the skin entrance, and with the right hand moving in synchrony at the catheter hub. The outwardly visible catheter should be kept straight to eliminate accumulation of countertorque outside the body and to prevent any inadvertent jumps of the wire inside the body when the catheter is advanced.
Having traversed the aortic arch with the catheter tip pointing down, the major vessels are selected by gently dragging the catheter back with the tip pointed up. With the tip of the catheter pointing toward the patient’s head, it is pulled back until a small flick indicates that the brachiocephalic artery is engaged (Fig. 2-14).
Catheter Flushing
Catheters can be flushed either by using a continuous irrigation system, several varieties of which are available, or by intermittently double flushing the catheter with syringes every 90 seconds. When using the double-flush syringe method, it is important that the entire length of the catheter be aspirated vigorously with the first syringe, the contents of which are then discarded, before clearing the catheter forward with fresh heparinized saline.
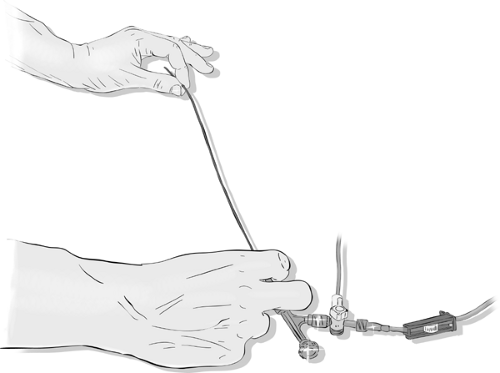
Using any of the systems for continuous irrigation with heparinized saline helps to free one’s mind and hands from the responsibility of keeping the catheter clear of blood and allows one to concentrate on other aspects of the study. However, if not thoroughly cleared of air bubbles before the procedure and vigilantly monitored during the procedure, the supposed safety of continuous irrigation may become an illusion. Misused or neglected continuous flush systems have the potential for great calamity. There are different systems of tubing and adapters available for providing a constant stream of heparinized flush (1,000 units per liter for pediatric cases, 3,000–6,000 units per liter for adults) using either a pressurized bag or an electronically driven pump. Depending on how these connect to the catheter, it may be possible using a hemostatic valve on a Y-adapter or manifold to continue the flush while the wire is being manipulated (Figs. 2-15–2-18). This system has theoretical advantages over a system where flow of flush must be interrupted to allow insertion of the wire.
There are hidden risks in the use of a continuous irrigation system. All systems of continuous irrigation carry a risk of complication if one fails to reset flow after each hand injection or run by neglecting to reopen the stopcock immediately. A generous rate of flow of flush (150–200 mL minimum per hour) is imperative, bearing in mind that a typical catheter may have a total volume of 4 to 5 mL. With blood refluxed back to the valve, it will take at least 60 drops or 240 microdrops in a drip-chamber system to clear the catheter thoroughly from the proximal to the distal end. This does not even make allowance for laminar flow with stasis of dependent blood in the catheter, meaning that a sluggish drip rate in the flush-bag into a catheter full of blood is not a guarantee against embolic complications.
When using a pressurized bag system, the rate of forward flow is very finely balanced between one that allows adequate irrigation and one that generates a turbulent jet in the chamber, allowing bubbles to enter the tubing. Furthermore, it is easy to overestimate the actual volume of saline being advanced per minute when using a microdrop system. When acquainting oneself with such a system, it is useful to prime the tubing with saline and allow it to run at what is perceived as an adequate rate. Then, attach a dry catheter to the system. The duration
of time before one sees saline emerge from the catheter tip is usually surprisingly long and represents the same time that stagnant blood will sit in the catheter after each wire exchange at that rate of flush. This exercise is left to the reader.
of time before one sees saline emerge from the catheter tip is usually surprisingly long and represents the same time that stagnant blood will sit in the catheter after each wire exchange at that rate of flush. This exercise is left to the reader.
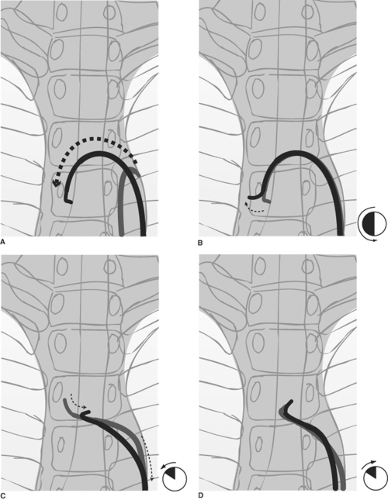 Figure 2-14. (A–D) Selecting the great vessels: Establishing a stable catheter address in the left common carotid artery. A: The catheter is advanced over the aortic arch by keeping the tip pointed inferiorly. This avoids trauma to the intima of the arch, and it prevents the catheter tip from becoming trapped by vessel ostia on the way over. B: A 180-degree spin of the catheter in the ascending arch places the tip in a vertical upright position. The catheter is gently pulled back. Usually, this motion will select the brachiocephalic artery with a discernible jump and straightening of the catheter, except in the most difficult circumstances. C: Pulling back from the brachiocephalic artery in a precisely vertical tip position will often cause the catheter to jump past the left common carotid artery and into the left subclavian artery. To avoid this problem, as one pulls back the catheter from the brachiocephalic artery, spin the catheter 15 to 30 degrees anticlockwise to make it point slightly anteriorly. This will select the anteriorly disposed left common carotid artery more effectively. D: To stabilize the catheter in this position while one prepares the wire, it is necessary to reverse the spin to the vertical position. Apply the same measure of clockwise spin to point the catheter directly into the artery and to maintain its purchase on this vessel.
Stay updated, free articles. Join our Telegram channel
Full access? Get Clinical Tree
 Get Clinical Tree app for offline access

|
