♦ Preoperative
Planning
- Localize the painful level in a patient with multiple compression fractures.
- Point tenderness on physical exam can be an important localizing sign
- Magnetic resonance imaging (MRI) demonstrates vertebral body edema related to acute/subacute unhealed fractures, provides evaluation of the spinal canal and cord, and helps address other causal pathologies of pain.
- In patients who cannot undergo MRI (e.g., those with a pacemaker), bone scan allows for the differentiation of healed and unhealed fractures and suggests the diagnosis of metastatic disease.
- Computed tomography (CT) is the test of choice for evaluation of the integrity of the posterior vertebral body cortex and can be very helpful in patients with cancer-related compression fractures.
Special Equipment
- Vertebroplasty or kyphoplasty kit: hammer, needle holder, needles, cannulas, inflatable balloon tamps (for kyphoplasty), cement injector system, polymethylmethacrylate cement
Operating Room Set-up
- Fluoroscopy suite with fluoroscopy table: preferably a biplane fluoroscopy unit, although may be performed with single-plane fluoroscopy or CT imaging
- Sterile side table with equipment
- In the majority of cases, can be performed with a combination of local analgesics and moderate sedation (e.g., intravenous midazolam and fentanyl)
- Intravenous antibiotic such as cefazolin (1 to 2 g) or clindamycin (600 mg)
♦ Intraoperative
Positioning
- Prone or oblique prone is ideal, with extension to promote kyphosis reduction
- The patient’s arms should be placed sufficiently toward the head to keep them out of the path of the fluoroscope.
Needle Placement
- End-on approach: rotate image intensifier ~20 degrees ipsilateral to the target pedicle so that the medial cortex of the pedicle is at the middle third of the vertebral body.
- Skin and periosteum are anesthetized with subcutaneous lidocaine or bupivacaine.
- A small incision is made in the skin, and an 11- or 13-gauge cannula with diamond-tip stylet is placed so that it is “end on” to the image intensifier and appears as a dot.
- Once in the pedicle, the needle is advanced either with a drilling motion and controlled forward pressure or by carefully tapping the needle handle with an orthopedic hammer.
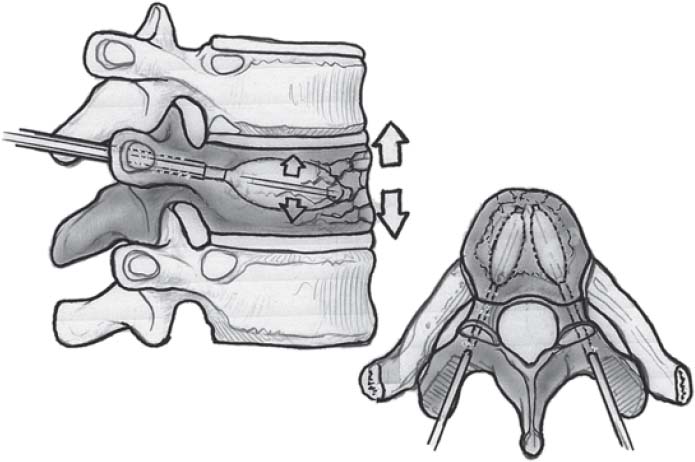
- Keep the needle trajectory lateral to the medial cortex and superior to the inferior cortex of the pedicle (to prevent entry into the spinal canal or neural foramen) (Fig. 192. 1)
- Once the needle has traversed the pedicle, the needle is advanced further using the lateral view to the anterior one third to one quarter of the vertebral body.
- Usually, needles are placed in both pedicles (Fig. 192. 1). However, a single needle may be used if a midline position is achieved by the needle tip.
- The anteroposterior approach is favored by some practitioners, following the same precautions with respect to the medial and inferior cortex of the pedicle.
Kyphoplasty Steps (General)
- An 11-gauge Jamshidi-type needle is placed to the posterior aspect of the vertebral.
- Body proper
- After removing the trocar, a Kirschner wire (K-wire) is placed for guidance.
- The 11-gauge cannula is removed, and a 9-gauge working cannula is placed over the K-wire.
- A drill is used to create a cavity for the balloon.
- In the One-step or Express systems (Kyphon Inc., Sunnyvale, CA), a cannula (of 9 gauge or 10/11 gauge, respectively) is placed to the anterior third of the vertebral body and then pulled back to the posterior aspect of the vertebral body.
- In either case, the balloon tamp is then inserted through the cannula and is slowly inflated with iodinated contrast using a locking syringe with digital manometer (Fig. 192. 1)
- Inflation continues until the system reaches maximum pressure or maximum balloon volume, the operator is satisfied that the kyphotic deformity is corrected, or the operator deems that further inflation poses a risk to the patient. The balloons are then deflated and removed.
< div class='tao-gold-member'> Only gold members can continue reading. Log In or Register to continue


