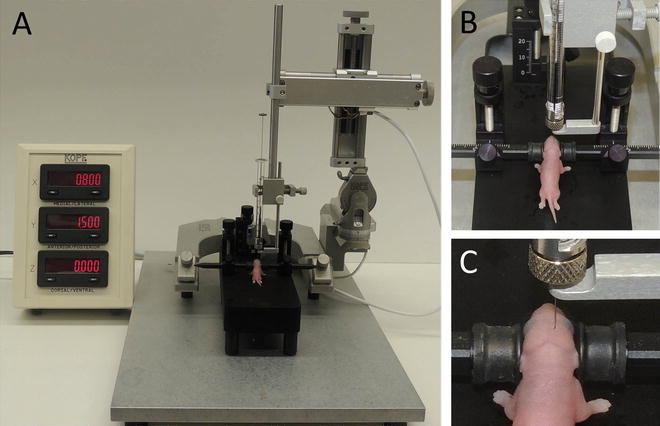
Fig. 1
Setup for free-hand intracerebroventricular injections. (a) Brace arms against the ice bucket for support and stability. Comfortably hold the syringe in one hand with the thumb positioned above the plunger. (a and b) The primary site for free-hand injection is located 2/5 of the way between the eye and the lambda suture (dotted line in c). Insert the needle perpendicular to the skull at the injection site
3.
Take one neonate from the warming pad and place it onto the cold metal block to induce hypothermic anesthesia. Wait 2–3 min for cessation of movement and respiration, indicating full anesthesia (see Note 11 ).
4.
Gently wipe skin overlying the skull with a cotton swab soaked in 70 % ethanol.
3.3 Free-Hand Intraventricular Injection of AAV
1.
2.
Hold the syringe so that the volume scale is visible. Make sure your thumb can comfortably reach the top of the plunger. Put your elbow on the bench table and lean your arm on the ice bucket to stabilize your injection hand.
3.
With your free hand, place the neonate on its side with its skull directly under the syringe. Rotate the head of the neonate until the injection site is perpendicular to the syringe.
7.
Remove your thumb from the plunger and hold the needle in place for a few seconds.
8.
Slowly withdraw the needle.
10.
Inject the contralateral ventricle using the same procedure.
3.4 Stereotaxic Injection of AAV
1.
Setup the stereotaxic stage with the neonatal frame and syringe holder. Insert the syringe fitted with a 32-gauge needle into the syringe holder (Fig. 2).


Fig. 2
Setup for stereotaxic intracerebroventricular injections. (a) Attach the neonatal adaptor to the stereotaxic frame with digital readout for coordinates. (b) Position the neonate between the ear bars with its head parallel to the stage and the injection site centered between the ear bars. Use the manipulator arm to position the needle above lambda, zero the coordinates, and then move the needle to the injection site. (c) The injection site is located 0.8 mm lateral to the sagittal suture, halfway between lambda and bregma
2.
Cool the neonatal frame to 4–8 °C by adding 100 % ethanol and dry ice to the reservoir at the front end of the block (see Note 17 ).
3.
Gently place the head of the neonate between the ear bars of the neonatal frame. Make sure the head is level in the Y-axis (front to back) by checking that the line between lambda and bregma is parallel to the stage. Make sure the head is leveled in the X-axis (side to side) by checking that an imagined line between the ears, or a line between the eyes, is parallel to the stage (see Note 18 ).
4.
Use the stereotaxic manipulator to position the injection needle above lambda and then zero the X and Y coordinates.
6.
Slowly lower the syringe until the needle penetrates the skin. Zero the Z coordinate with the needle at the surface of the skull and the bevel of the needle at the surface of the skin (see Note 20 ).
8.
9.
Leave the needle in place for 30 s after completing the infusion. Then slowly withdraw the needle over 1–2 min (see Note 16 ).
10.
Repeat for the contralateral hemisphere, using negative X coordinates (X = −0.8 mm) for the injection site.
3.5 Postinjection Care and Clean-Up
1.
Place the injected pup on a warming pad until its body temperature and skin color return to normal and the pup starts moving again.
2.
Once all of the pups have been injected, disinfect the injection needle and syringe with 2 % bleach followed by repeated rinses in deionized water. Clean the working area with 2 % bleach followed by 70 % ethanol.
3.
Collect all disposable items including pipette tips, tubes, mask, and gloves in a plastic biohazard bag. Dispose as required by local law (i.e., autoclave or incinerate).
4.
Return the injected neonates to their biological mother or foster mother once they have fully recovered (see Note 22 ).
5.
Label the cage as a biohazard and quarantine in an institutionally approved area.
6.
After 3 days, transfer the mother and neonates to a clean cage before returning them to the animal colony (see Note 23 ).
7.
Get Clinical Tree app for offline access

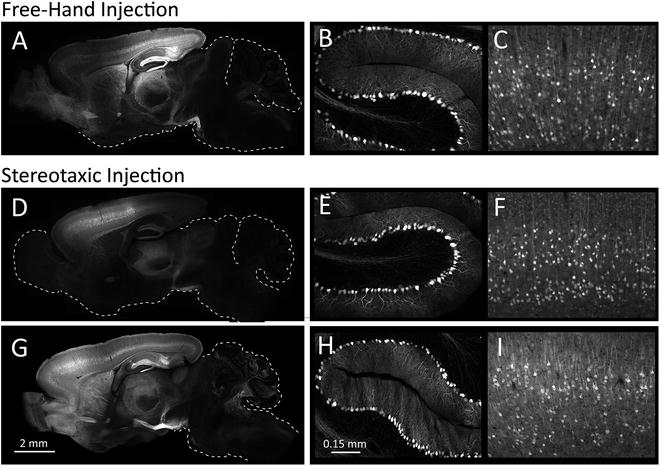
At an appropriate experimental endpoint, collect mouse brains for analysis of viral transduction efficiency. If fluorescent reporters are included in the viral construct, transduction can be directly visualized within brain sections using the appropriate filter on a fluorescence microscope (Fig. 3).


Fig. 3


Neonatal AAV injection produces widespread neuronal transduction. The pattern of viral transduction pattern was analyzed 3–4 weeks after injection using the free-hand technique (a–c) or stereotaxic manipulator (single injection: d–f, dual injection: g–i). The injected AAV8 encodes a chicken β-actin (CBA) promoter controlling expression of yellow fluorescent protein (YFP). Native YFP fluorescence was visualized in sagittal brain sections to examine the spread of viral transduction (a, d, g). These images illustrate the bias toward maximal transduction of caudal cortex by free-hand injection and toward rostral cortex by single site stereotaxic injection. A more uniform distribution of virus can be achieved through injection into two locations within each ventricle (g). Although maximal transduction occurs within the forebrain, neurons are labeled throughout the brain by both free-hand and stereotaxic approaches even though cells may not be visualized when the exposure time is limited by the cortical signal. In areas such as the cerebellum where the density of transduced cells is lower than the cortex, higher magnification images clearly reveal YFP expression within individual Purkinje neurons (b, e, h). Overall, transduction efficiency in Purkinje cells is similar to that of layer V cortical pyramidal neurons (c, f, i)
Stay updated, free articles. Join our Telegram channel

Full access? Get Clinical Tree


