Methods in Forensic Neuropathology
Juan C. Troncoso
David Fowler
Ana Rubio
GATHERING OF EVIDENCE, DOCUMENTATION, AND CHAIN OF CUSTODY IN FORENSIC AUTOPSIES
Approaching the Death Scene
Preparation for any procedure is important. This principle applies to the examination of the death scene. The forensic investigator or forensic pathologist must recognize that the death scene is usually the jurisdiction of the responding law enforcement agency. In most cases, the body itself is considered the jurisdiction of the death investigator. This process works well as long as there is a collegial and trusting relationship among the various respondents.
Many tasks must be accomplished at the death scene. Depending on local statutes, protocols, and resources, these tasks may be assigned differently fromjurisdiction to jurisdiction. In large jurisdictions, many expertly trained personnel who can assume the various responsibilities are often available. In smaller jurisdictions, however, the detective, for example, may also fulfill the duties of a crime scene technician and play other roles as well. The same is true for the death investigator. The only issue of importance is that all these tasksmustbe accomplished.
Once death investigators are familiar with their responsibilities in a particular jurisdiction, they can prepare a tool kit for the appropriate tasks. A minimum kit should include protective equipment for personnel, materials for transporting the body and collecting evidence, and a means to document the scene both photographically and in writing. Because each task is dependent on the jurisdiction, it is not possible to describe the kit fully here.
No two death scenes are the same. In some cases, the body may be found at the scene of the death or crime; in other circumstances the death may occur in a hospital, several hours or days after the event that started the process. Examining the scene of the incident will in many cases provide essential information to understanding the mechanism of death.
In all cases, a primary event begins the death process. The body passes through a set of pathophysiologic events (mechanism of death) that are usually predictable, given the original insult, and finally dies. Examination of the scene often provides information that may explain, or corroborate, the autopsy findings. In all cases, the scene and witness information should be consistent with the observed findings at autopsy. If they are not, then an explanation must be found to reconcile the differences.
In gathering this information, the scene often provides a timeline for the sequence of events and gives clues to the changing pathophysiology of the deceased in the agonal phase. At all times, we are acutely aware that the autopsy documents the observable anatomic deviation from normality and is not an efficient tool for detecting functional changes in physiology. The scene may provide some information to fill the missing pieces; this is akin to a physician taking a history from a living patient, which is a critical part of the physical examination. The same is true for the death investigator, who should not ignore the scene as a potential source of information.
Arrival at the Death Scene
At a minimum, some of the procedures that may have to be undertaken by the death investigator are as follows.
Professional identification will be required to approach the area and enter the scene. The vehicle should be parked in a safe area that does not obstructmovement of other vehicles. The death investigator should report to the officer controlling the scene, produce identification, and log in on the control sheet. If necessary, the death investigator should explain his or her role in the investigation and determine how safe it is to enter the scene. Necessary protective equipment should be prepared and donned. Information is next gathered from all possible sources; all information and observations should be noted. The validity and weight of the information and observations will be determined later.
Entering the Death Scene
For this discussion, it is presumed that the deceased is still at the scene and that the scene often involves a crime. Presuming the worst case scenario and gathering all information immediately usually yields the best results in the long term. It is often very difficult to go back and reconstruct the scene once it has been cleaned up.
The police control the scene and will have created a secure area around it to limit access. They will do their initial processing before they allow other individuals to enter the scene. Taking of photographs, collection of trace evidence, and other specialized examinations may initially restrict access to the scene. The death investigator will be given access once the crime scene processing has progressed to a point at which additional persons are not likely to compromise the gathering of trace evidence or disrupt the scene. The time spent waiting to enter the controlled area around the body should be used to gather basic information on the death from police, paramedics, family, and any available witnesses. If possible, information should include the following:
How the body was discovered
Events surrounding the death
Medical history
Social and mental history
Finally, before entering the scene, the lead investigator should brief all participants to ensure they are clear about their respective responsibilities. The tasks that must be completed by a respondent (detective, crime scene technician, death investigator, and any others) include the following:
Pronouncement of death
Photography of body and scene
Brief external examination of body
Preservation of evidence on body and at scene
Identification of deceased
Documentation of postmortem changes
Exchange of information with other respondents
Notification of next of kin
Transportation of body
For the death investigator, observations at the scene should be focused on the context of the body in the scene. A preliminary examination of the body will assist in directing the procedures for other investigators. Detailed examination of the body in a controlled environment will be done later. Any item that is of evidentiary value and likely to be lost, contaminated, displaced, or otherwise tampered with during transport to the mortuary facility should be documented at the scene and processed according to local procedures.
The body should not have been examined by police before arrival of the death investigators. Obviously the body may have been examined and handled to some degree by first responders during attempted resuscitation and pronouncement of death. Once the person is pronounced dead, all activity at the body should stop until the death investigator arrives to take jurisdiction.
Documentation of the Death Scene
Documentation of the position of the body, clothing position, changes after death, medical intervention, and blood or body parts remote from the body and their relative positions, are the basics needed for documentation. The primary responsibility of the death investigator is to document the scene relative to the body. The use of digital photography provides an easy way to communicate and store this information. The photographs should be supplemented by written notes and diagrams. Contact information of the other agency personnel is also important so that all who are involved in investigating the case from their own perspective and focused on their own responsibilities can share appropriate data.
Custody of the Body
In most cases, the death investigator will now have assumed custody of the body. The body should be handled in a careful and dignified manner. It is appropriate to place the body in an unused, clean, and impervious transport pouch to protect it, prevent contamination of the evidence, and prevent personnel in the transport chain fromcoming into contact with biohazardmaterials.
If the body is to be transported by anyone other than the death investigator at the scene, a chain of custody record is required. This should be filled out and signed as the body is passed fromperson to person in the chain andat themortuary facility.
METHODS FOR REMOVAL OF THE BRAIN AND SPINAL CORD
Removal of the brain is an integral part of every forensic autopsy, with rare exceptions. Even most partial autopsies include examination of the brain. In the standard procedure, the skull is opened after the thoracoabdominal organs are removed, and the blood is allowed to drain. In this section, we describe and illustrate methods for the removal of the brain and spinal cord in both adults and children.
Adult Brain Removal
Steps for removing the adult brain are as follows:
The head is elevated by placing a head block under the back of the head (e-Fig. 1.1).
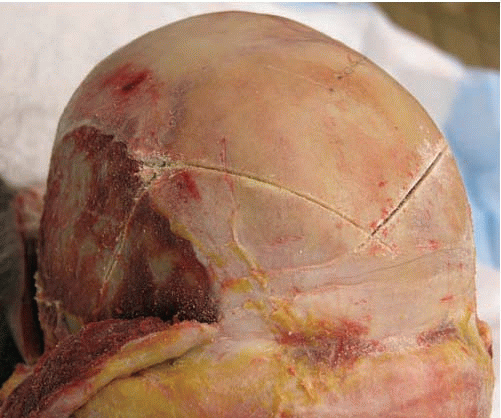
When necessary, the hair is arranged along the scalp incision line. The coronal incision goes from the back of one ear lobe to the other, advancing through the uppermost part of the head over the convexity.
Once the incision is made, the scalp is reflected forward, close to the supraorbital ridge, and backward to the nuchal prominence. The initial reflection is initiated with the fingers, and the scalp tissues are separated from the skull with the scalpel.
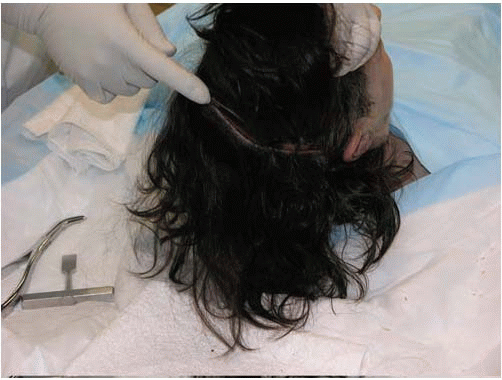
The reflection of the scalp is facilitated by rolling the tissue forward or backward with the help of a dry towel. The top of the scalp is exposed and the galea is visualized (e-Fig. 1.2).
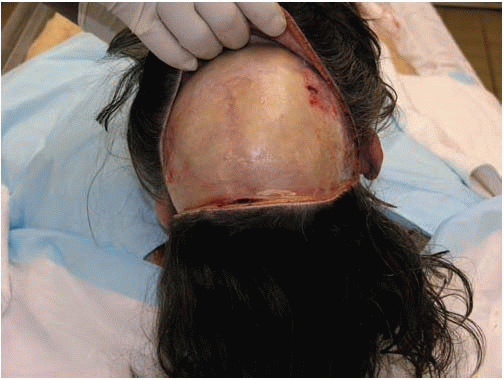
The lateral surfaces of the skull are partially covered by the temporalis muscle, a fan-shaped muscle over the galea.
The temporalis muscle is cut from the uppermost part of the skull attachment and retracted forward bilaterally before incision of the skull.
Once the temporalis muscles are retracted, the scalp, galea, temporalis muscle, and bone are examined for signs of impact and injuries (e-Fig. 1.3).
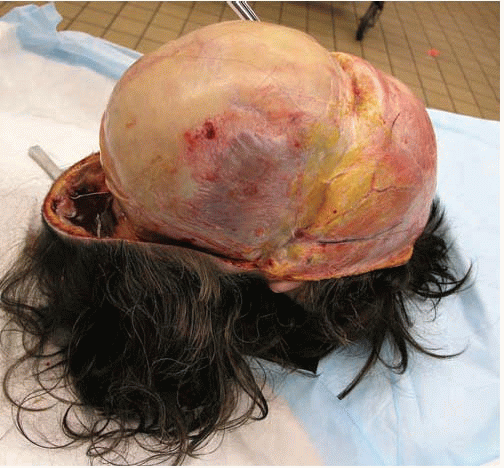
With the vibrating saw, the skull cap is incised. To facilitate the repositioning of the skull after autopsy, it is convenient to cut the skull cap with a V-shaped incision in the midline of the frontal skull (e-Fig. 1.4).
The anterior cut is followed by a posterior horizontal cut. The oscillating saw should be prevented from entering the intracranial cavity and artifactually altering the intracranial contents.
With the T-bar, the skull cap is opened on one side (e-Fig. 1.5).
The contralateral side is pried opened with the T-bar (e-Fig. 1.6).
The skull cap is removed. Sometimes the dura is firmly attached to the bone and cannot be separated from the skull cap with ease. In those cases, the dura can be cut with scissors horizontally and the top left attached to the bone to be separated later.
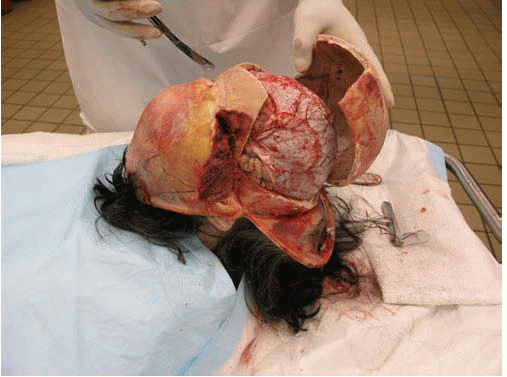
The top of the brain (in this case covered with dura) is exposed.
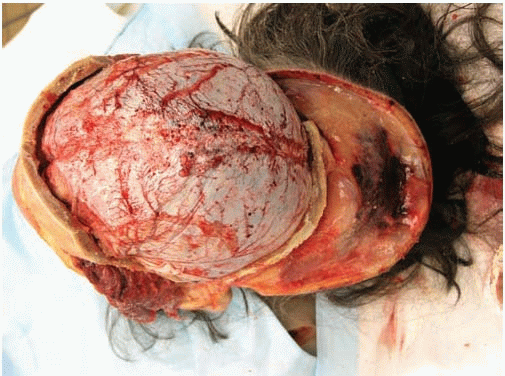
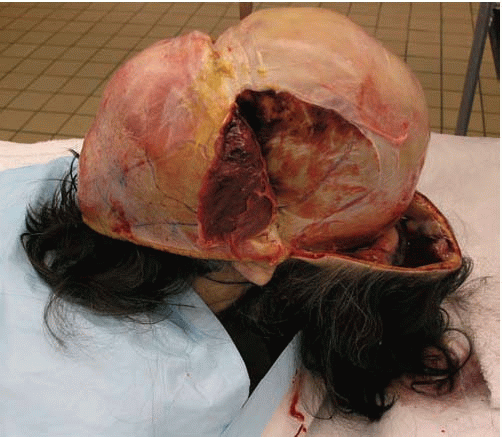
If the dura is removed with the brain, one hand holds the dura with dura strippers and the other hand starts severing the attachments at the base of the brain. Minimal space is necessary to allow the scalpel to penetrate the intracranial cavity to perform the cutting (e-Fig. 1.7).
Without placing excessive pressure on the structures of the posterior fossa, the tentorium is sectioned and the posterior fossa structures are released.
While the brain is held with one hand, the distal medulla/upper cervical cord and vertebral arteries are sectioned as distally as possible.
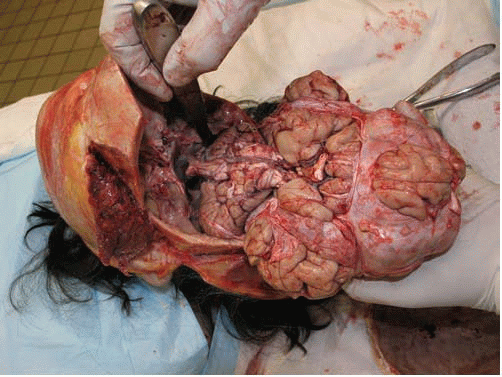
The brain is extracted from the cranium (e-Fig. 1.8).
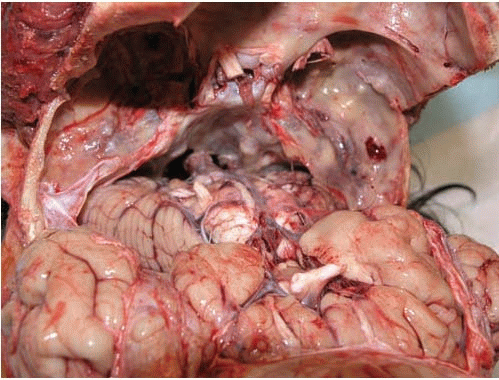
The base of the brain can be examined (e-Fig. 1.9).
Standard Removal of the Adult Spinal Cord
In selected cases, the spinal cord is also examined. The procedure is most commonly performed by an anterior approach after removal of the thoracoabdominal organs and extraction of the brain. Steps for this procedure are as follows:
A head block is placed under the shoulders/upper back and the anterior surface of the spinal column is positioned for optimal sectioning.
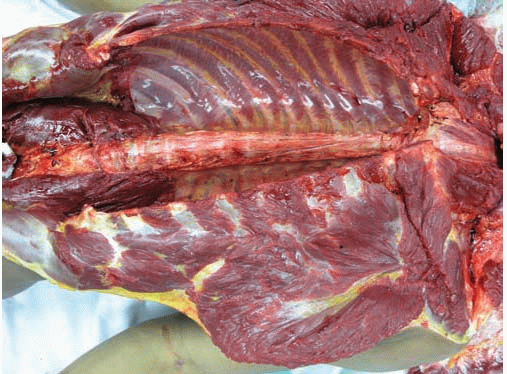
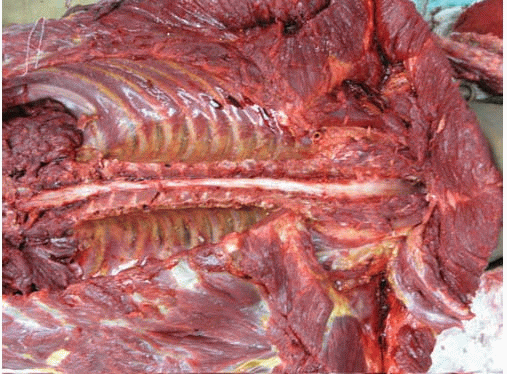
The psoas muscles are sectioned and retracted to the sides (e-Fig. 1.10).
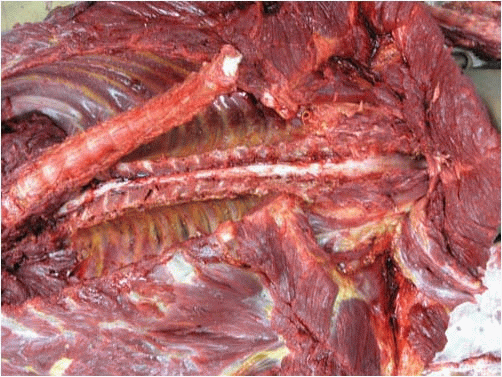
Parallel sections through the vertebral pedicles are created with the vibrating saw from the cervical to the lumbosacral spine. The cuts are made through each pedicle on both sides until the vertebral bones are separated into anterior (formed by vertebral bodies) and posterior (formed by transverse and spinous processes) fragments; cutting into the dura or spinal cord should be avoided (e-Fig. 1.11).
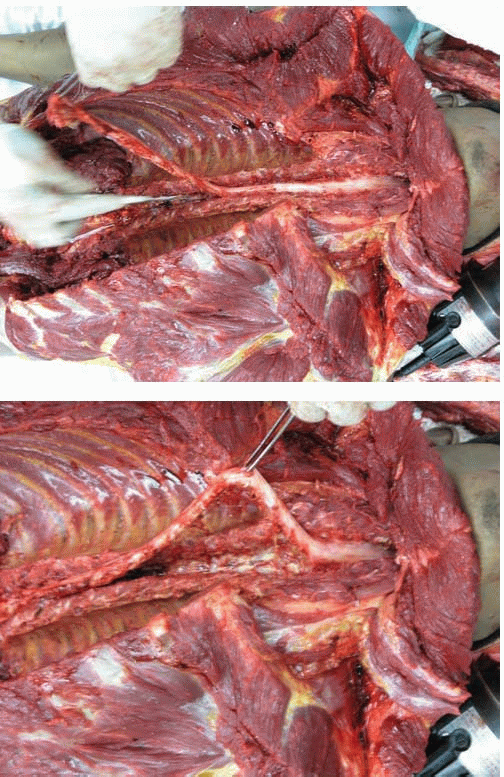
The distal lumbar column is cut horizontally to free the lower aspect of the bone flap.
The upper cervical column is cut horizontally to free the superior aspect of the bone flap.
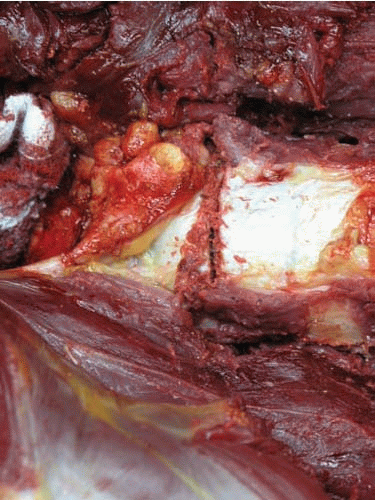
The anterior bone flap (bodies of the vertebrae) is removed, and the anterior epidural space of the spinal cord is visualized.
The distal cord is sectioned at the level of the cauda equina, the spinal dura is held with tweezers, and the nerve roots, lateral and posterior soft tissue attachments are freed. Holding the spinal cord itself should be avoided, because it can be easily deformed (e-Fig. 1.12).
The dura of the cord is held, and the cord is freed rostrally all the way to the upper cervical level. The most rostral aspect of the spinal cord had already been cut horizontally when the brain was removed (Adult Brain Removal, step 16) (e-Fig. 1.13).
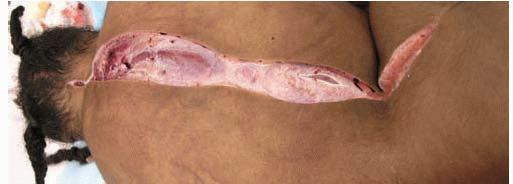
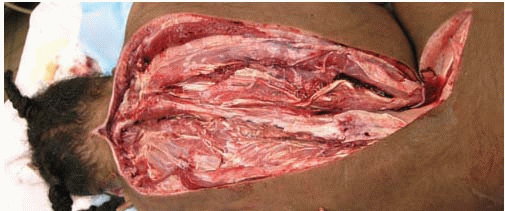
The removed spinal cord, enveloped in the dura, can be fixed for subsequent neuropathologic examination (e-Fig. 1.14). The dura can be opened with scissors through a sagittal cut on the anterior and posterior aspects, and the external aspect of the spinal cord can be examined.
Removal of the Pediatric Brain in Continuity with the Spinal Cord: Posterior Approach to Spinal Cord Removal
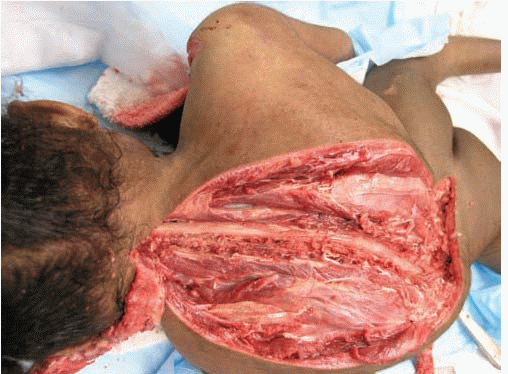
This technique allows removal of the intracranial contents in continuity with the intraspinal contents, with the least artifactual distortion of the brainstem and cervical spinal cord. If performed carefully, the technique is reliable and fairly simple in children and is the method of choice when lesions to the distal brainstem or proximal cervical spinal cord are suspected. In addition, the midline incision of the posterior torso can be extended laterally, and the soft tissues of the back can be thoroughly visualized, allowing the inspection of injuries to the back. Steps for this procedure are as follows:
After removing the thoracoabdominal organ block, the body is placed prone, and the torso raised by using a head block (e-Fig. 1.15).
A longitudinal midline incision is made, following the crests of the spinous processes. The current example, with severe scoliosis, required careful palpation before sectioning.
The incision is widened, and the soft tissues and muscles of the back are separated from the spine.
With the vibrating saw, two parasagittal sections of the posterior laminae are created from the cervical to the lumbosacral region, and the posterior bone flap is removed.
The posterior epidural space is examined, and the exposed duracovered spinal cord is freed by cutting its lateral attachments. To prevent distortion of the cord, the spinal cord is raised by holding the durawith tweezers, avoiding the spinal cord.
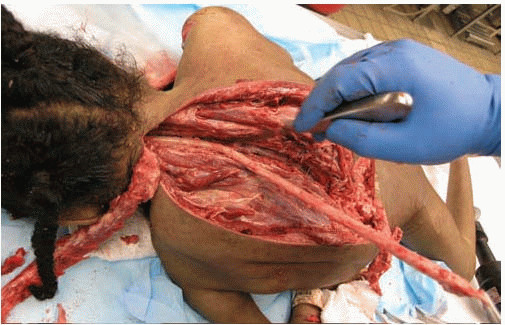
The cervical cord is released as high as possible; if necessary, the mid-longitudinal section of the back is continued to the top of the head, to where the scalp is sectioned coronally. Thus the back of the head and neck are fully exposed (see steps 17, 18, and 19) (e-Fig. 1.16), and a bone window can be made by removal of a fragment of the occipital bone. If the occipital bone is not removed, it is key to section the entire dura circumferentially below the foramen magnum. If the dura is not completely free at this level, pulling the spinal cord with remaining dura upwards from the foramen magnum (step 16) will pull the cord unevenly and can produce artifactual distortions of the spinal cord.Related posts:

Stay updated, free articles. Join our Telegram channel

Full access? Get Clinical Tree


