Fig. 5.1
Extended endoscopic approaches allow access from the anterior skull base anteriorly to the foramen magnum and upper cervical spine inferiorly (Courtesy of Dr. Luigi Cavallo)
5.2 Comparison of Endoscopic and Microsurgical Approaches for Pituitary Lesions
Despite early skepticism regarding the application of endoscopic techniques to the resection of sellar lesions, numerous studies have shown equivalent rates of tumor excision and incidence of complications with endoscopic pituitary approaches compared with microsurgical approaches [8–10]. In addition to similar effectiveness rates, endoscopic techniques may offer some distinct technical advantages over microsurgical techniques. Well-recognized drawbacks of the microsurgical approach include a narrower surgical field that is limited by the width of the nasal speculum, reduced illumination near the surgical target, and limited ability to visualize specific anatomic landmarks such as the carotid protuberances that define the limits of the sella [2, 11]. Pure endoscopic techniques allow improved panoramic visualization and illumination, obviating the need for a nasal speculum. From this widened surgical field, modified endoscopic transsphenoidal procedures have been developed to access lesions arising or extending outside of the sella, including the cavernous sinus, suprasellar, planum sphenoidale/olfactory groove, and retroclival lesions in which prior exposure via a microsurgical transsphenoidal approach was accompanied by formidable challenges. Improved instrument mobility and two-handed surgical dissection facilitated by endoscopic approaches are other major benefits of this technique.
Potential disadvantages associated with the endoscopic technique include a loss of binocular three-dimensional vision, a steep initial learning curve, and potential injury to the nasal mucosa that is not under direct visualization upon insertion or withdrawal of instruments from the surgical field. Endoscopic techniques are, by necessity, limited by the projection of a three-dimensional image onto a two-dimensional screen, whereas three-dimensional visualization is readily available with the operating microscope. This shortcoming can be partially corrected for by the use of large high-resolution (HD) video monitors and the reliance on tactile or haptic feedback to help gauge surgical depth. Also, the use of a two-surgeon, three-handed technique that allows dynamic movement of the endoscope and comparison between that movement and the motion of the surgical instruments can partially help offset the loss of depth perception. Newer three-dimensional visualization systems are rapidly improving and may one day all but obviate this shortcoming associated with endoscopic surgery [12].
5.3 Equipment and Surgical Instrumentation
The continued development and refinement of endoscopic equipment and surgical instrumentation have greatly contributed to the advancement of endoscopic surgery as a viable procedure for transsphenoidal approaches to the sella. Basic components of the endoscopic setup include the rigid-lens endoscope, a high-definition camera, a fiberoptic cable and light source, a large high-definition video monitor, and a video recording system. The most commonly used endoscope is 4 mm in diameter with a length of 18 or 30 cm (Fig. 5.2). Variations in lens angulation are available for specific steps of the operation, including a 0-degree scope, a 30-degree scope, and a 45-degree scope. Larger-angle scopes ranging between 70 and 120 degrees are available but are rarely required for a majority of endoscopic skull base operations.


Fig. 5.2
A modern glass-rod lens endoscope used for endoscopic transsphenoidal neurosurgery (Courtesy of Karl Storz, Inc.)
In general, endoscopic instruments are long, rotating tools with a single straight shaft equipped with angled tips. The angled tips on the working ends of many surgical instruments permit a wider range of motion than standard instruments. Compared to the microsurgical technique, in which bayoneted instruments are typically employed to avoid interference with the light source, the use of straight-shaft instruments is preferred with endoscopy. The endoscope may be introduced into the nostrils along with a sheath, which is connected to an irrigation system that allows cleaning of the lens without repeated removal and reentry of the telescope. An endoscope holder may be used during the sellar phase of the procedure to stabilize the view of the surgical field, but its use limits the dynamic movement that helps to compensate for loss of depth perception. The use of neuro-navigation systems, although not required, can be helpful in patients with recurrent lesions or abnormal sellar or paranasal sinus anatomy and for extended endonasal approaches.
5.4 Preoperative Assessment of Neuroimaging
Preoperative imaging is imperative for assessing the relevant anatomy that will be encountered during the surgical approach. Magnetic resonance imaging (MRI) of the head with and without gadolinium contrast and computed tomography (CT) imaging of the head will show the degree of pneumatization of the sphenoid sinuses and the anatomy of the sphenoid septations. Identification of the target lesion, normal pituitary gland, stalk, optic chiasm and optic nerves, and the course of the internal carotid arteries should also be assessed, often relying on sagittal and coronal images as the most useful planes to assess relevant neuroanatomic relationships.
The anatomy of the sella turcica, sphenoid sinus, and adjacent anterior and central skull base structures is highly variable. Preoperative imaging, specifically midsagittal MR images with contrast, must be assessed to identify the morphology of the sellar floor and the configuration of sphenoid sinus septations (Fig. 5.3). The sellar angle, defined as the angle between lines drawn tangential to the sellar floor originating at the tuberculum sellae point and the sellar-clival point, can be used to classify the different sellar floor morphologies (Fig. 5.4) [13]. Prominent sellar floors (sellar angle <90 degrees) and curved sellar floors (sellar angle between 90 and 150 degrees) can usually be easily identified during surgery using identifiable anatomic landmarks. On the other hand, flat sellar floors (sellar angle >150 degrees) or conchal (no sellar floor) sphenoid phenotypes occur in 11 % and 1 % of patients, respectively, and are more difficult to identify intraoperatively. Neuro-navigation systems are recommended in patients with these anatomic subtypes (Figs. 5.5 and 5.6) [13]. Additionally, neuro-navigation systems are recommended for patients who exhibit complex sphenoid sinus configurations (29 % of patients) consisting of two asymmetric septa, three or more septa, or horizontal septa and patients who have undergone previous transsphenoidal surgery [13].
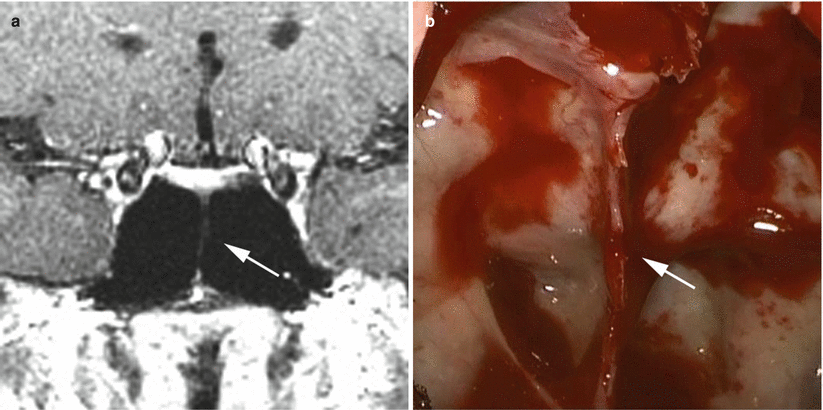
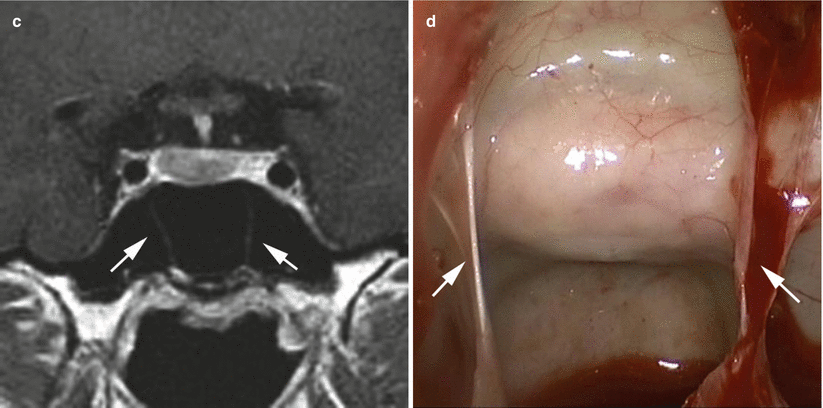
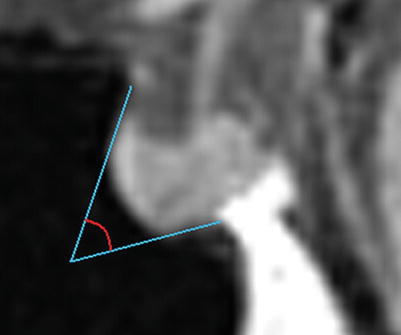
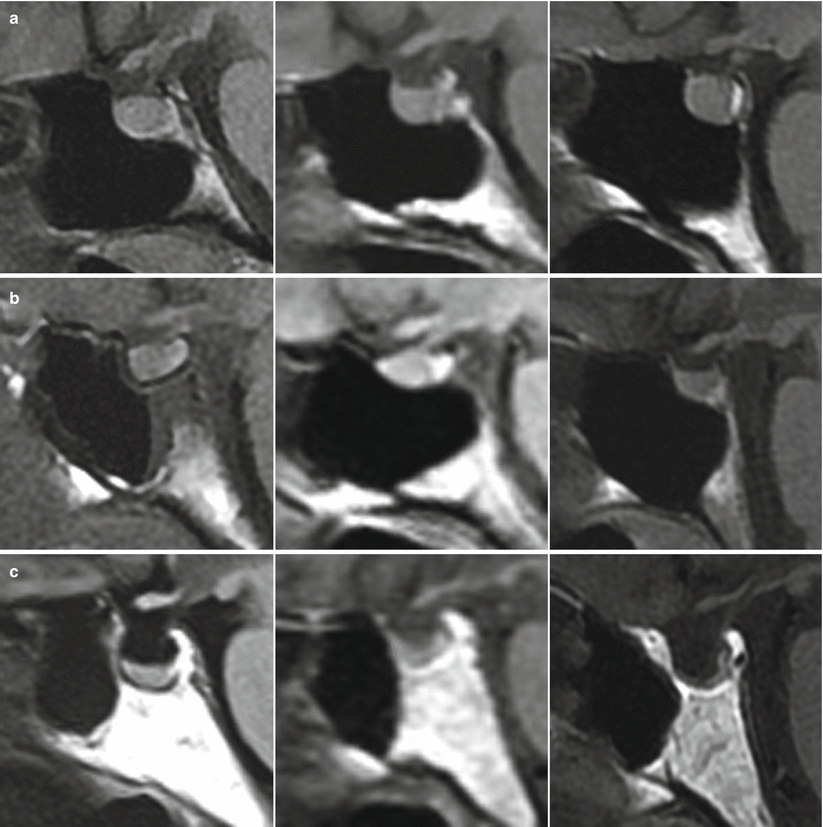
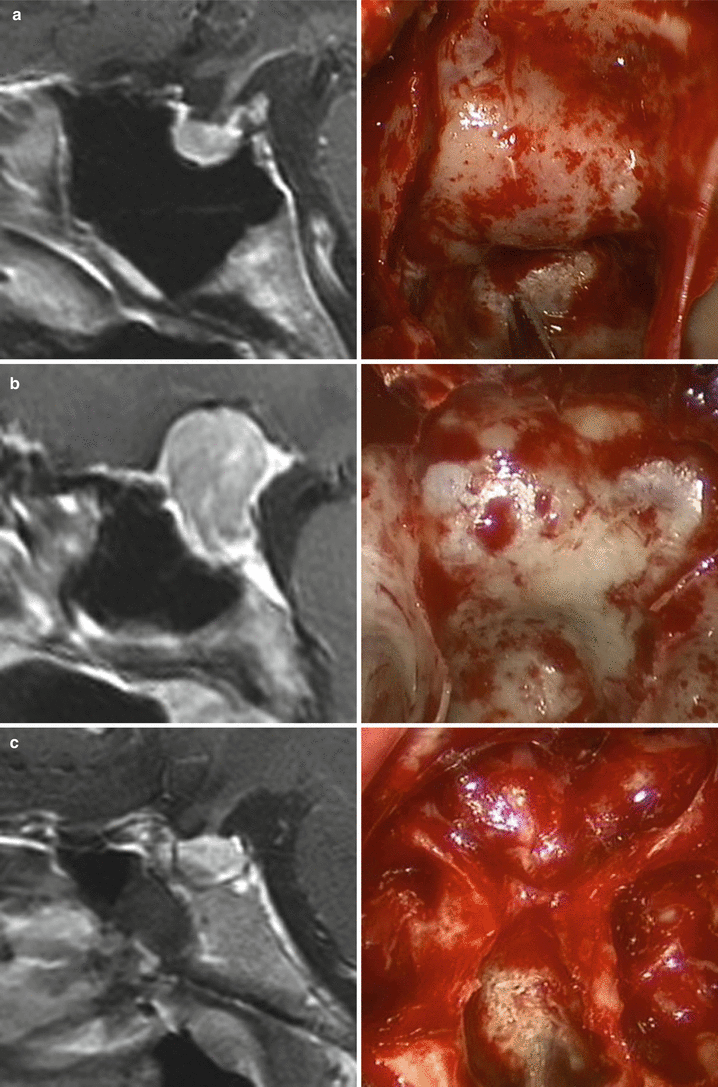


Fig. 5.3
Correlation of coronal MR imaging and intraoperative endoscopic views of vertical sphenoid septations in patients with simple sphenoid sinus morphology. The presence of one midline septum (a, b, white arrows) can be used to identify the anatomic midline. The presence of two symmetric septa (c, d, white arrows) can be used to approximate the lateral boundaries of the sella (From Zada et al. [13]; with permission)

Fig. 5.4
The sellar angle, defined as the angle formed from lines drawn tangentially to the sella originating at the tuberculum sellae and the sellar-clival junction (From Zada et al. [13]; with permission)

Fig. 5.5
Variations in sellar phenotypes on MRI. (a) Prominent sellar floor. (b) Curved sellar floor. (c) Flat sellar floor or conchal sphenoid phenotype (From Zada et al. [13]; with permission)

Fig. 5.6
Sagittal MRI and corresponding intraoperative endoscopic images of the sellar floor. (a) Prominent sella phenotype that is easily identifiable intraoperatively. (b) Curved sella phenotype. (c) Flat sella phenotype that is very difficult to differentiate from the clivus, making neuro-navigation extremely important (From Zada et al. [13]; with permission)
5.5 Surgical Technique
The endoscopic transsphenoidal approach to pituitary pathology has been continuously refined since it was first described [2, 22]. Although many variations to the procedure exist, the following represents the authors’ preferred surgical technique utilized for this approach [14].
5.5.1 Preparation and Positioning
The video monitor is positioned behind the patient’s head and in the direct line of sight of the surgeon who, in most cases, stands on the patient’s right side. The anesthesiologist is positioned on the patient’s left side. The head of the bed is turned approximately 120 degrees away from the anesthesiologist, and the patient is placed in a semirecumbent position with the thorax elevated to 15 degrees in order to optimize venous outflow. The head is positioned with a slight degree of rotation, approximately 10 degrees toward the surgeon, with the midline of the patient’s head parallel to the lateral walls of the operating room and the bridge of the patient’s nose parallel to the floor. The degree of flexion/extension of the patient’s head is dependent on the location of the lesion. Lesions located primarily in the clivus or sphenoid sinus often require slight flexion of the head in order to permit working space for the endoscope. Lesions located more anteriorly, such as those based in the planum sphenoidale, require the head to be in a neutral or slightly hyperextended position. As with any operation, all endoscopic equipment and instrumentation should be checked prior to the operation to ensure proper function. The surgeon must also communicate with the anesthesia team to discuss administration of appropriate medications, especially with regard to hormone replacement and antibiotics. Routine use of an intraoperative checklist prior to commencement of the surgery may help ensure that all necessary laboratory and equipment components of the operation are functional [15].
Following intubation, the endotracheal and orogastric tubes are positioned at the left side of the patient’s mouth and taped downward so as to keep the upper lip free. All lines and monitoring devices are preferentially positioned on the patient’s left side. These maneuvers free the patient’s right side for the surgeon. The nasal cavity is then prepared by administration of a nasal decongestant (e.g., oxymetazoline), followed by intranasal cleansing with an aqueous antiseptic such as chloroxylenol USP 3 % (Techni-Care Solution) or iodine solution. Finally, the nasal region is prepped externally and draped. The abdomen or lateral thigh is also prepared under sterile conditions in the event that autologous fat and/or fascial graft harvesting is required during the reconstruction phase.
5.5.1.1 Nasal Stage
The nasal stage of the operation begins with the surgeon using a short (18-cm) 0-degree endoscope. Upon introduction of the endoscope, the floor of the nasal cavity, inferior turbinate (laterally), nasal septum (medially), and the choana (posteriorly) should be identified (Fig. 5.7). The surgeon should assess for anatomic variations, including a deviated septum or septal perforation, septal spurs, polyps, or synechiae. Once the choana is identified, maneuvering the endoscope superiorly allows identification of the middle turbinate, which arises from the ethmoid region superiorly. A blunt instrument such as a Freer dissector is used to gently displace the middle turbinate laterally while attempting to preserve the integrity of the overlying mucosa and minimize bleeding. Subsequent packing with lidocaine/epinephrine pledgets placed between the middle turbinate and nasal septum helps to maintain the developed working space between the middle turbinate and nasal septum and to promote hemostasis. Following sufficient lateral displacement of the middle turbinate, the endoscope is advanced and angled slightly superiorly in order to identify the superior turbinate posteriorly. In rare cases, resection of the middle turbinate helps to widen the surgical corridor; this maneuver is typically reserved for extended skull base operations or patients with acromegaly and enlarged turbinates.
The next landmark that should be identified and posterior the sphenoid ostium, which is usually located just medial to the inferior aspect of the superior turbinate, approximately 1.5 cm superior to the superior edge of the choana. The sphenoid ostium is occasionally concealed by mucosa or a thin layer of bone, in which case attempting to first identify the ostium on the opposite side may be of benefit. Use of neuro-navigation may also be helpful in confirming the trajectory into the sphenoid sinus, after which a small dissector instrument can be used to probe gently for the ostium and enter the sinus. If a pedicled nasoseptal flap is being prepared, this should be performed at this point. Once the ostium is identified, its mucosal edges are coagulated using mild monopolar cautery, which can be extended down the medial and inferior surfaces of the sphenoid rostrum (Fig. 5.7). Avoidance of inferolateral cauterization and dissection helps to prevent arterial bleeding from septal branches of the sphenopalatine artery.
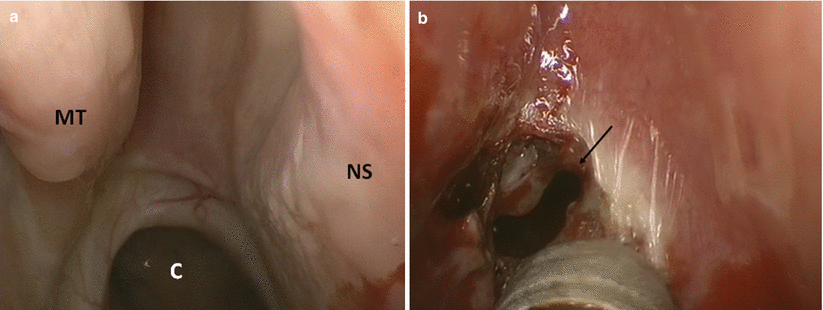

Fig. 5.7
The nasal stage. (a) Upon entering the nares, the choana (C) is immediately visualized, with the middle turbinate (MT) identified laterally and the nasal septum (NS) medially. (b) The sphenoid ostium (black arrow) is identified and coagulated in preparation for gaining access to the sphenoid sinus
Local anesthesia (lidocaine 1 % with epinephrine 1:100,000) is then injected medially into the posterior nasal septum using a spinal needle with the tip bent to 20 degrees. An anterior sphenoidotomy is initialized using a mushroom (Stammberger) punch to widen the aperture of the sphenoid ostium and begin to remove the sphenoid rostrum in a direction inferior and medial to the ostium. This maneuver is almost always performed on both sides of the nasal cavity, although the approach may be entirely from one side, depending on the size and location of the target lesion and the requirement for using instruments through both nostrils.
Stay updated, free articles. Join our Telegram channel

Full access? Get Clinical Tree


