35 Transmaxillary Endoscopic Approach to Contralateral Parasellar Lesions
Luiz Felipe de Alencastro, Luiz Carlos de Alencastro, Carolina Martins, Ademir Lodetti, Alberto Carlos Capel Cardoso, Mario Faria, Kohei Inoue, Shigeyuki Osawa, and Albert L. Rhoton, Jr.
 Introduction
From Bozzini’s invention of the endoscope in the 18th century, to the neurosurgical application of endoscopic concepts by Guiot in the beginning of the 20th century, and to the use of the endoscope in endonasal surgery by Jankowski in the early 1990s, great technological and technical advances in endoscopic surgery have been observed1
Increasing effort has been focused on refining the anatomical, diagnostic, and surgical techniques, the indications for surgery, and the technologies used to resect tumors from the anterior skull base and their extensions. The pioneer work of Cushing has been furthered with the introduction of modern technology as well.1,2
Based on observations of the anatomy of the air cavities, it was recognized that craniectomies to access anterior base structures may be performed from alternative directions so as to facilitate the removal of the full extent of the tumor.
This chapter introduces the concept of radial endoscopic accesses to the skull base, focusing on a transmaxillary endoscopic approach to the contralateral structures that are involved with tumor, precluding in some cases the need for traditional extensive craniofacial approaches (Fig. 35.1).
As the sphenoid rostrum is opened bilaterally, simultaneous access through the nose and maxilla is obtained, offering surgeons the opportunity to dissect from different surgical routes at the same time and facilitating two-surgeon, four-hand techniques (Fig. 35.2).
Extensive knowledge of the anatomy is crucial to enable recognition of the anatomical landmarks in preoperative imaging studies, which is a fundamental prerequisite for performing surgery.
 Technique Description
The transmaxillary endoscopic approach to contralateral parasellar lesions (TEACPS) technique is a multistep procedure to expose the parasellar structures from the side opposite the maxillary entrance. The cooperation of the neurosurgeon and the ear, nose, and throat (ENT) surgeon working together facilitates this approach and increases its safety. The technique entails the following steps:
1. Endonasal inspection
2. Preparation of the septal pediculated mucosal flap
3. Posterior nasal septostomy and anterior sphenoidal wall resection
4. Middle turbinectomy and maxillary medial wall initial resection
5. Opening of the anterior wall of the maxilla
6. Identification of maxillary sinus landmarks
7. Combined work through the maxillary sinus and nasal cavity
 Step 1: Endonasal Inspection
This step entails identifying the anatomical landmarks in the nasal cavity. The major landmark is the nasal septum, extending from the nasal spine anteriorly to the rostrum of the sphenoid bone posteriorly.3 The surgeon must inspect both nasal cavities; anatomical abnormalities, such as nasal septum deviation or spurs, must be corrected before continuing with the procedure. These corrections may be made either prior to or during the TEACPS surgery (Fig. 35.3).
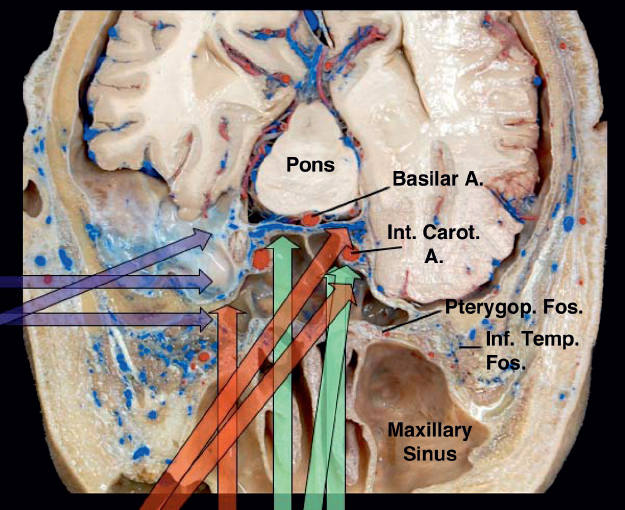
Fig. 35.1 Cranial base, axial superior view. General view of the radial endoscopic accesses to the skull base. The green arrows represent the endonasal approaches, the red arrows represent the transmaxillary approaches, and the purple arrows represent the subtemporal approaches. Note the multiple possibilities of combination of these approaches. A.: artery; Inf. Temp. Fos.: infratemporal fossa; Int. Carot. A.: internal carotid artery; Pterygop. Fos.: pterygopalatine fossa.
Special attention must be given to the nasal septum regarding closure at the end of the procedure. Covering the bone defect with pediculated septal mucosal flap is a reliable technique to avoid cerebrospinal fluid (CSF) fistulas. Usually this flap is racquet-shaped, with variable width and length, pediculated in the lateroposterior aspect of the nasal cavity, where the sphenopalatine artery enters from the pterygopalatine fossa through the sphenopalatine ostium. Once created, the mucosal flap can be moved to the pharynx to keep the surgical pathway clear4 (Figs. 35.4 and 35.5).
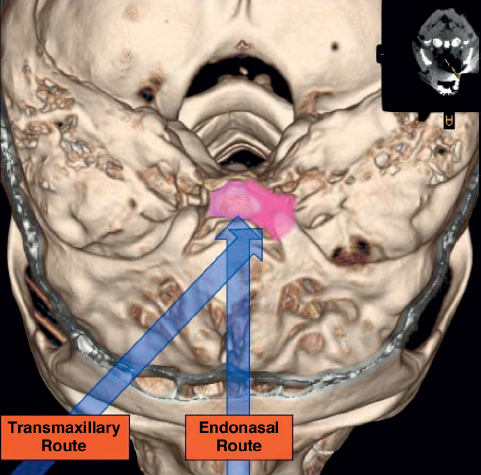
Fig. 35.2 Three-dimensional (3D) computed tomography (CT) scan of the cranial base. The arrows represent the different angles of approach from the endonasal and maxillary routes.
Another important landmark in the nasal cavity is the middle turbinate. Right after entering the nasal cavity, the surgeon must identify the head of the inferior and middle turbinates. The middle turbinate can be followed posteriorly from its head through its tail, ending just above the laterosuperior aspect of the choana. The sphenopalatine artery can be found a few millimeters superior, posterior, and lateral to the end of the middle turbinate tail. This is a useful landmark to help avoid major bleeding during this approach and preserve the vessels that irrigate the mucosal flap3 (Fig. 35.6).
The middle turbinate also helps guide the surgeon to the sphenoid ostium, which is a notable landmark. From the end of the middle turbinate tail, the surgeon can move medially and then superiorly in the sphenoid rostrum until the sphenoidal ostium is found, usually 1.5 cm above the plane of the middle turbinate tail.5
 Step 2: Preparation of the Septal Pediculated Mucosal Flap
Most skull base defects created during endoscopic endonasal surgery can be repaired with a pediculated septal mucosal flap, decreasing the incidence of CSF fistulas.4,6
The inferior incision of the mucosa should start by following a line inferior to the axis of the middle turbinate tail directly to the inferior border of the nasal septum, crossing just above the superior margin of the choana, beginning the incision at the most lateral point of this border, thus preserving vascularization of the flap. Once in the nasal septum, the incision line may go downward and follow the junction of the nasal septum and the nasal cavity floor. The incision progresses as anterior as necessary to the border of the mucosal/skin interface in the nasal cavity. The size of the flap is dependent on the predicted skull base defect.
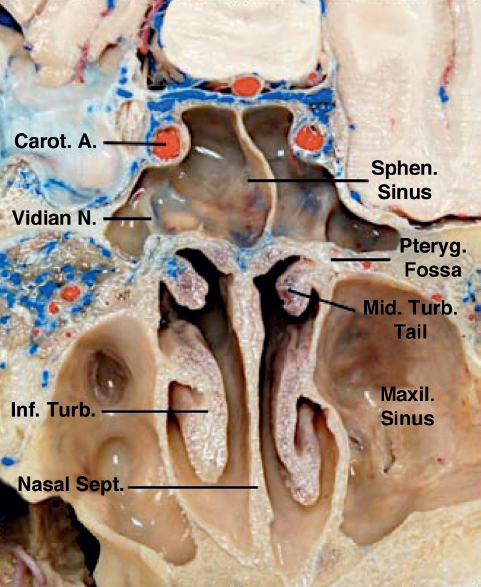
Fig. 35.3 Skull base, superior view. Entering through the nasal cavity, several structures can be identified as landmarks for safe navigation. The nasal septum in the midline is the first anatomical repair to be observed. Moving backward in a parallel trajectory to the nasal septum, the nasal choana and nasopharynx are identified. The middle turbinate is easy to identify and facilitates navigating in the nasal cavity. It is positioned in the lateral wall of the nasal cavity. Following the tail of the middle turbinate backward will lead to the most anteroinferior segment of the sphenoid rostrum. Just posterior, superior, and lateral to the end of the tail is the sphenopalatine foramen, a communication between the nasal cavity and the pterygopalatine fossa. Carot. A.: carotid artery; Inf.: inferior; Maxil.: maxillary; Mid.: middle; N.: nerve; Pteryg.: pterygoid; Sept.: septum; Sphen.: sphenoidal; Turb.: turbinate.
After this anterior trajectory, the incision line must be directed upward in the nasal septum up to 1 to 2 cm of the junction of the nasal septum and the roof of the nasal cavity to prevent olfactory mucosa damage. The extension of the superior incision follows the septum posteriorly, turns laterally over the sphenoid rostrum, and progresses as laterally as possible, ending a few millimeters above the initial incision.
Once the incision is completed, the flap will have a racquet-like shape, being narrower in its posterolateral area. Then the surgeon dissects the nasal mucosa from the bony and cartilaginous structures of the septum and sphenoidal rostrum. The dissected flap is reflected downward to the pharynx to keep the surgical route clear.
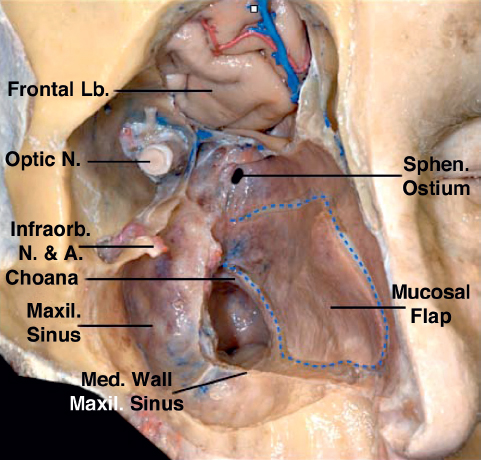
Fig. 35.4 Face, anterolateral view. Creating a septal pediculated mucosal flap is an extremely important initial step in endonasal cranial base approaches. The flap has a racquet-like shape, being pediculated posterolaterally. Terminal branches of the sphenopalatine artery irrigate the flap. A.: artery; Infraorb.: infraorbital; Lb.: lobe; Maxil.: maxillary; Med.: medial; N.: nerve; Sphen.: sphenoidal.
It is recommended that the mucosal flap in the nasal cavity be created on the side opposite the maxillary opening, to avoid damaging the flap pedicle vessels during the opening of the medial wall of the maxillary sinus (Figs. 35.4 and 35.5).
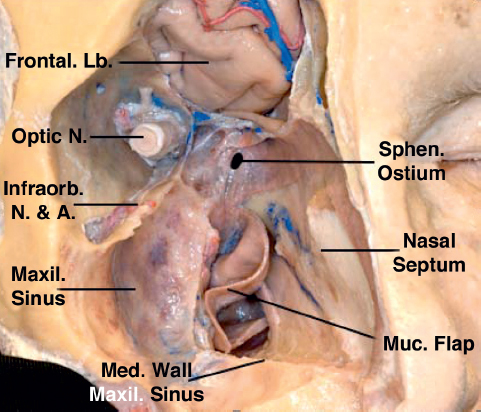
Fig. 35.5 After the dissection of the mucosal flap, it can be moved to the pharynx through the choana to keep the surgical route unobstructed. A.: artery; Lb.: lobe; Maxil.: maxillary; Med.: medial; Muc.: mucosal; N.: nerve; Sphen.: sphenoidal.
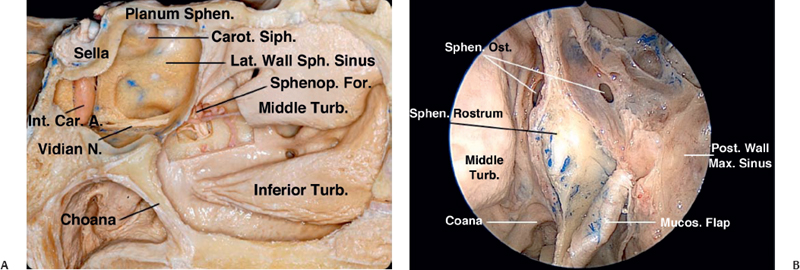
Fig. 35.6 (A) Nasal cavity, endoscopic view. The posterior segment of the nasal septum was resected. The mucosal flap is rotated downward to the pharynx. Both sphenoidal ostia are identified in the uppermost segment of the anterior wall of the sphenoid sinus. The tail of the middle turbinate of the contralateral nasal cavity is seen, ending just above the choana and hiding the sphenopalatine foramen. (B) Nasal cavity, sagittal view. The posterior segment of the middle turbinate tail was resected and the sphenopalatine foramen was enlarged, exposing the sphenopalatine artery and sphenopalatine ganglion. From the sphenopalatine ganglion, the vidian nerve can be followed backward in the floor of the sphenoid sinus, reaching the foramen lacerum. Carot.: carotid; Int. Car. A.: internal carotid artery; Lat.: lateral; Mucos: mucosal; N.: nerve; Ost.: ostium; Siph.: siphon; Sphen.: sphenoid; Sphenop.: sphenopalatine; Turb.: turbinate.
 Step 3: Posterior Nasal Septostomy and Anterior Sphenoidal Wall Resection
After creating the mucosal flap, the posterior 2 cm of the bony nasal septum are resected to expose the rostrum of the sphenoid sinus. In creating this opening, it is extremely important to produce a wide exposure of the anterior wall of the sphenoid sinus. The surgeon must have access to the junction between the anterior wall of the sphenoid sinus and the roof of the nasal cavity above, resecting additionally the posterior ethmoid cells. The exposure must proceed downward to the junction of the anterior wall of the sphenoid sinus and the floor of the sphenoid sinus. At this point, the vomer should be removed as well at the junction of this bone with the sphenoid spine, at the anteroinferior part of the sphenoid rostrum (Fig. 35.7).
Resection of the posterior part of the nasal septum is essential to gain additional space for maneuvering surgical tools.
The next step is opening the anterior wall of the sphenoid sinus. This can be done from the ostia and then progressing both downward and upward. Alternatively, the anterior wall of the sphenoid sinus can be drilled off.
The opening of the anterior wall of the sphenoid sinus should progress to the sphenoidal plane. The anterior wall should be removed as far laterally as the orbital medial wall. Specific attention must be given to the lateral border of this resection to avoid damaging the medial wall of the orbit, which is thin and can be mistaken for lateral ethmoid air cells.
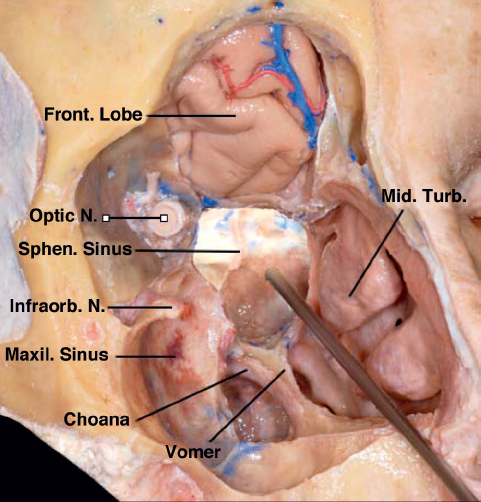
Fig. 35.7 Facial oblique view. The orbit and maxillary sinus walls were removed. The frontal lobe is exposed by removal of the floor of the anterior cranial base. Most of the nasal septum was resected, exposing the structures in the contralateral nasal cavity. The endoscope is introduced in the nasal cavity, crossing its extension and entering the sphenoid sinus. The sphenoid rostrum was widely resected. It is possible to observe the relationship of the surrounding structures with the sphenoid sinus. Front. Lobe: frontal lobe; Infraorbit. N.: infraorbital nerve; Maxil. Sinus: maxillary sinus; Mid. Turb.: middle turbinate; Optic N.: optic nerve; Sphen. Sinus: sphenoidal sinus.
Related posts:
 Anesthesia in Endoscopic Skull Base and Brain Surgery
The Endonasal Transplanum-Transtuberculum Endoscopic Approach in Pituitary Adenomas
Endoscopic Transnasal Craniectomy and the Resection of Extensive Craniopharyngiomas
External Versus Endoscopic Approaches for Skull Base Malignancies
Combined Cranio-Endoscopic Approach
Endoscopic Transethmoid-Pterygoid-Sphenoid Approach
Anesthesia in Endoscopic Skull Base and Brain Surgery
The Endonasal Transplanum-Transtuberculum Endoscopic Approach in Pituitary Adenomas
Endoscopic Transnasal Craniectomy and the Resection of Extensive Craniopharyngiomas
External Versus Endoscopic Approaches for Skull Base Malignancies
Combined Cranio-Endoscopic Approach
Endoscopic Transethmoid-Pterygoid-Sphenoid Approach


