and Colin L. W. Driscoll2
(1)
Department of Otolaryngology – Head and Neck Surgery, Stanford University, Stanford, CA, USA
(2)
Department of Otorhinolaryngology, Mayo Medical School, Rochester, MN, USA
Concept
Most hearing loss is due to cochlear dysfunction. A cochlear implant performs the function of the cochlea by converting sound energy to electricity and stimulating the auditory nerve in a tonotopic manner.
Conditions treated
Sensorineural hearing loss due to cochlear dysfunction
Sensorineural hearing loss due to Auditory Neuropathy/Auditory Dys-synchrony assuming an auditory nerve is present.
Risks
Loss of residual hearing.
Dizziness.
Facial nerve injury.
Meningitis.
Infection of the implant.
CSF leak.
Although not a surgical complication, device failure can occur.
Benefits
At this time, cochlear implantation is the only medical treatment available to restore sensorineural hearing.
Additional notes
The decision of when cochlear implantation may permit better auditory performance compared to hearing aids is important to make on an individual patient basis. However, cochlear implant technology continues to improve regularly, and the latest guidelines should be followed for optimal outcomes.
1.
The cochlea. The traveling wave originates with vibrations of the stapes within the oval window (OW). It travels up the cochlear duct through scala vestibuli (SV). The sensory hair cells sit within scala media (SM). A cochlear implant electrode should be placed within scala tympani (ST), the portion of the cochlear duct in continuity with the round window (RW). The modiolus is the central core of the cochlea and is where the auditory nerve travels.
2.
Cross section of the cochlear duct showing scala vestibuli (SV), scala media (SM), and scala tympani (ST). The organ of Corti contains one row of inner hair cells (arrowhead), three rows of outer hair cells (arrow), and the supporting cells (SC), all of which sit on top of the basilar membrane (BM). The basilar membrane is attached to the osseous spiral lamina (OSL) medially and the spiral ligament (SL) laterally. The tectorial membrane (TM) produces deflections of the hair cell stereocilia, resulting in sound transduction. The auditory nerve (AN) carries the electrical signals to the brain.
3.
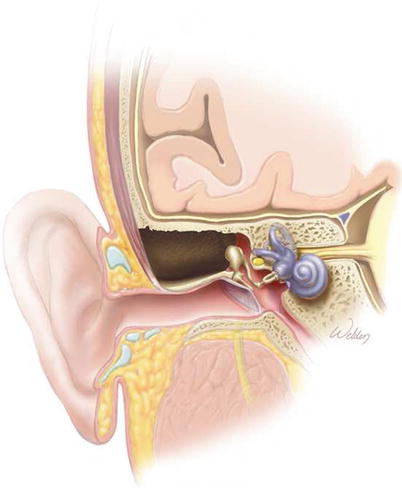
Schematic of the steps in cochlear implantation. Coronal view of a normal temporal bone.
4.
A simple mastoidectomy has been performed.
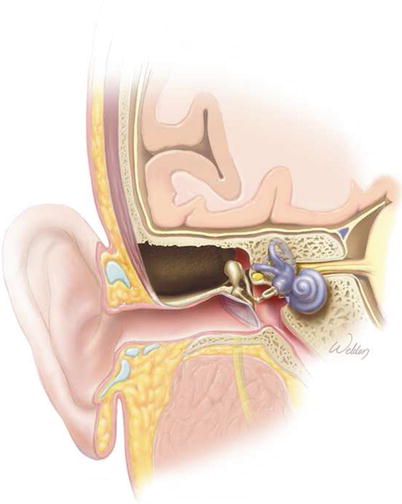
5.
A facial recess approach has been performed.
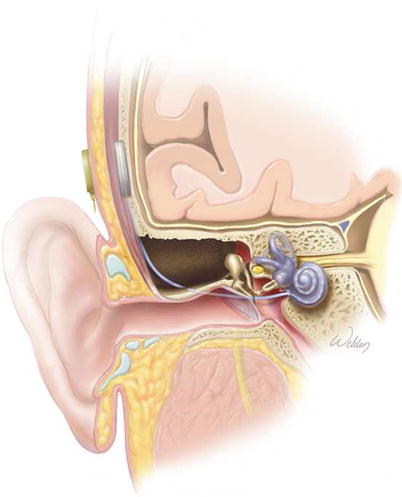
6.
A cochlear implant has been placed. Note the electrode passing through the facial recess and entering the cochlea at the round window.
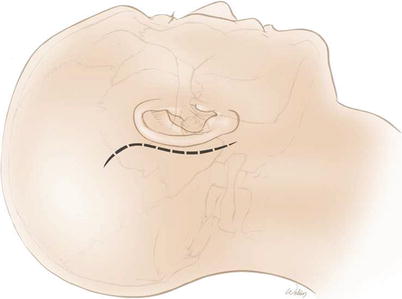
7.
The surgical technique of cochlear implantation. An S-shaped postauricular incision is made. This type of incision has a lower risk of skin flap necrosis than the older C-shaped incision.
8.
The incision can be carried straight down through the soft tissues to the skull. Alternatively, the incision through the subcutaneous tissues and the temporalis muscle can be staggered slightly from the skin incision to create flaps. While the theory is that the flaps will help reduce the risk of bacteria penetrating through the incision and colonizing the implant, we’ve not seen this be an issue in practice. In fact, the additional dead space created by the flaps may permit fluid accumulation and make it easier for bacteria to begin growing in the area of the implant.
In young children with growing heads, an incision that extends into the hair-bearing region will tend to develop a wide scar and potentially significant area of alopecia. We try to make our incisions <5 cm long. Naturally, this does make recessing the device more difficult, and care needs to be taken to make sure the device is placed far enough away from the ear so that it does not bump the external behind-the-ear component.
9.
A simple mastoidectomy is then performed with identification of the sigmoid sinus, tegmen, and mastoid antrum. The short process of the incus should be identified, particularly where it attaches to the incudal buttress. Most importantly, the ear canal needs to be thinned. There should be no air cells left along its course because a thick ear canal will block the view of the round window through the facial recess. A larger cutting burr (5–6 mm) is used for most of the mastoidectomy, and a 4 mm diamond burr is used to thin the ear canal and begin to expose a few of the air cells within the facial recess.
10.
The facial recess approach is performed using a 2 mm diamond burr. A constant flow of water should be maintained to minimize heat transfer to the facial nerve. Note that this opening is in the shape of a triangle. The shaft of the drill should parallel the ear canal, and not be back over the sigmoid sinus. This allows the facial recess to follow the correct pathway and open into the middle ear space medial to the tympanic membrane. The boundaries are the facial nerve medially, the chorda tympani nerve and tympanic annulus laterally, and the incudal buttress superiorly. The incudal buttress should be left in place in order to maintain the ability of the ossicular chain to transmit sound vibrations to the cochlea. This is important if one desires to preserve as much acoustical hearing as possible.
11.
After the middle ear space has been entered through the facial recess, the 2 mm diamond bit can be brought through the facial recess and “back ended” on the bone in front of the facial nerve to enhance visualization. The drill speed should be slowed and the facial nerve monitored carefully during this procedure. This may well be the only time during otologic/neurotologic surgery where the interface between the drill burr and the bone is not visible.
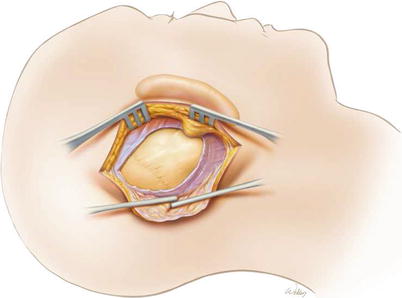
12.
A completed facial recess. The microscope needs to be oriented so that the surgeon is looking down parallel to and just behind the ear canal. The incudal–stapedial joint, stapedial tendon, and the round window niche should be visible. If the undersurface of the tympanic membrane or the long process of the malleus is visible, the orientation angle of the microscope is too shallow. If the round window niche is not visible, it means that either the ear canal has not been thinned enough or that there is too much bone on top of the facial nerve.
13.
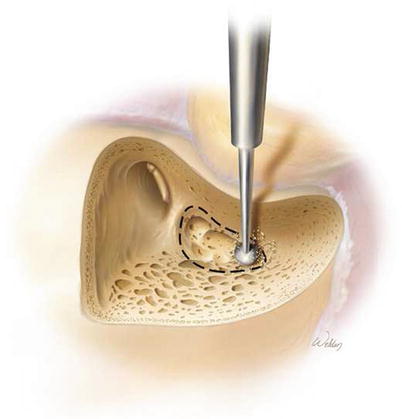
The templates for the device should be used to locate the appropriate location for the device and bone well if one is planned. A subperiosteal pocket the size of the implant should be developed. If a well is to be used, it can be drilled to the depth of the template if the skull is thick enough. Alternatively, for children with thin skulls, the well can be drilled down to the dura circumferentially using a bony “island” technique (shown in the illustration). The island of bone in the center should be thinned to the inner cortex of the skull. Over the next year, the well will reossify with a step depression. The use of the newer implants with thinner external devices has reduced the need to drill the well down to dura.
The implant can be sutured down to holes made through the skull if desired, although we have largely abandoned this step. The thinner implants available today permit the option of not drilling a well, but we feel a trough should always be drilled to protect the electrode array. If no well is drilled, it is critical to create a tight periosteal pocket and insert the device sufficiently to limit the risk of anterior device migration.
14.
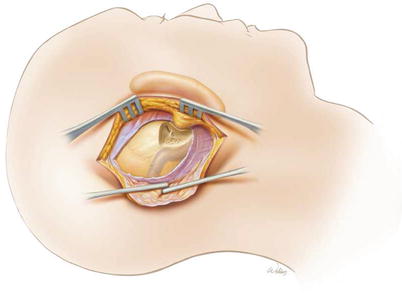
The lip of bone overhanging the round window membrane creates the round window niche. This lip should be removed so that the full circumference of the round window membrane can be seen. This is done using a 1 mm diamond burr at a slow speed. Care must be taken that the shaft of the drill does not contact the facial nerve. It is safest to begin bone removal posteriorly since this locates the drill further away from the membrane. When removing the bone more anteriorly, the membrane becomes increasingly at risk. An inadvertent opening along the superior part of the membrane is not catastrophic, but the electrode should not be inserted in this location because of the proximity of the basilar membrane.
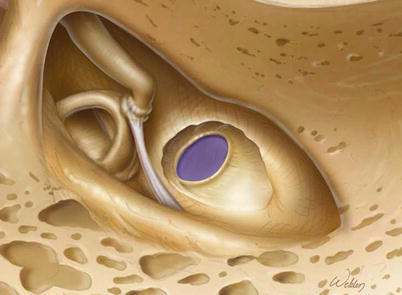
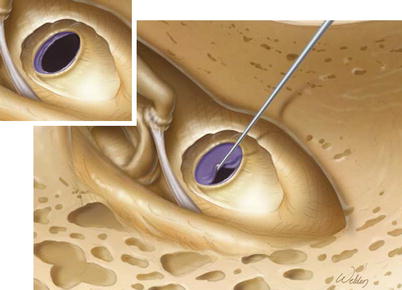
15.
There are two ways of opening the cochlea. For a true round window insertion, a small angled pick or other sharp instrument (i.e., an angiocatheter needle or ophthalmologic knife) can be used to open the round window membrane directly. The instrument should not penetrate beyond the round window membrane to limit the risk of injuring the basilar membrane. Currently, we use this approach for the vast majority of cochlear implants because they are thin and flexible enough to allow full insertion through the round window.