But the expression of a well-made man appears not only in his face, It is in his limbs and joints also, it is curiously in the joints of his hips and wrists. It is in his walk, the carriage of his neck, the flex of his waist, and knees… To see him pass conveys as much as the best poem, perhaps more.
I. INSPECTION OF THE BODY CONTOURS, POSTURES, AND GAIT
A. Initial inspection
1. The motor examination begins the instant you meet the patient (Pt). Study every activity: How the Pt sits, stands, walks, and gestures; the postures; and the general activity level. Unobtrusive observation of the Pt’s spontaneous activity often discloses more than formal tests, particularly in infants or people with mental disorders.
2. For the formal examination, the Pt undresses and stands under an overhead light. Underclothes remain in place, in deference to modesty, but at some time you must look under them. If you leave one-third of the body covered, you can do only two-thirds of an examination. Before the cock crows, one of you will violate this commandment: thou shalt undress every Pt. Your own anxieties about viewing nudity may exceed those of the Pt about being viewed nude. After all, the Pt came to you expecting an examination.
3. Next, ponder, yes ponder, the Pt’s somatotype or body build. Compare the Pt’s contours and proportions with those of a standard healthy person of like age and sex and with those of family members. From abnormalities in the Pt’s Gestalt, sometimes from just a glance at the silhouette, the examiner (Ex) can diagnose an immense number of syndromes, such as arachnodactyly, achondroplastic dwarfism, and Down syndrome.
4. Next, scrutinize the size and contours of the Pt’s muscles, looking for atrophy or hypertrophy, body asymmetry, joint malalignments, fasciculations, tremors, and involuntary movements. Proceed in an orderly, rostrocaudal, face–neck–shoulder–arm–forearm–hand–chest–abdomen–thigh–leg–foot–toe sequence and continually compare right and left sides.
B. Station and gait testing
1. Next, observe the Pt’s station, the steadiness and verticality of the standing posture. Then test the gait by asking the Pt to walk freely across the room. Look for unsteadiness, a broad-based gait, and lack of arm swinging. Ask the Pt to walk on the toes, heels, and in tandem (from heel to toe along a straight line). Request a deep knee bend. Ask a child to hop on each foot and to run. Watching the Pt walk is the single most important part of the entire neurologic examination. An essay at the end of Chapter 8 details gait analysis, after you have a better concept of what to look for.
2. Now, rehearse the five steps of Section VI A of the Standard Neurologic Examination (NE). Yes, we will ask you to demonstrate them by and by.
II. PRINCIPLES OF STRENGTH TESTING
A. The matching principle
Select those movements that just about match your arm and hand strength. Even if an iron bar loses much of its strength, it may remain too strong for your hands to bend. Conversely, wet tissue paper offers too little resistance. To gauge strength accurately, select movements that are neither too strong for you to possibly overcome nor too weak for you to judge their resistance.
B. The length–strength principle
Under the conditions of clinical testing, the muscles are strongest when acting from their shortest position and have little or no strength when acting from their longest position.
1. To understand the length–strength law, work through Figs. 7-1A to 7-1B to test biceps and triceps strength. You must do the exercises the text calls for. You will find yourself hesitant and clumsy at first—that is why you have to practice, to get a “feel” or sympathy for the task. In all strength tests, the participants should exert maximum power, but they should pull to a peak in a slow crescendo, without jerking.

FIGURE 7-1. Relation of length to strength of muscles. The examiner pulls or pushes on the patient’s wrist with one hand while stabilizing the patient’s elbow or shoulder with the other hand. (A) Position of examiner’s hands to test biceps strength. The examiner pulls with the right hand, exactly matching strength with the patient’s biceps. The left hand braces the patient. The left insert shows the biceps flexed, at its shortest and therefore strongest position. The right insert shows the biceps in its longest therefore weakest position. (B) Position to test triceps strength. The examiner presses just above the patient’s elbow with the right hand and presses in the opposite direction with the left. The inserts show the length of the triceps with the arm extended or flexed. You must actually do these tests on another person with the arms extended and flexed to appreciate the great difference in strength in the two positions.
2. The biceps pull test, biceps against biceps, perfectly exemplifies the matching principle, when the Pt and Ex match muscle to muscle.
3. Relate the strength of the biceps and triceps muscles to their length: these muscles are strongest when acting from their  shortest/
 intermediate/
 longest position. (
 shortest)
4. Now test the flexor and extensor strength of your partner’s neck. In testing these movements, place one hand on the Pt’s forehead or occiput and the other on the front or back of the Pt’s chest to provide bracing and counterpressure.
5. To test the strength of the neck flexors, start with your partner’s head strongly extended. Then you resist the neck flexion with your hands. Next test the neck flexor strength when your partner starts with the head tightly flexed, chin on chest. Then you try to extend it. The neck flexors are strongest with the neck  flexed/
 extended, in which position the flexor muscles are
  shortest/
 longest. (
 flexed;
  shortest)
6. Next compare the maximum strength of the neck extensors with that of the neck flexors. One action, extension or flexion, by far exceeds the strength of the other. Determine which.
7. To see whether we have discovered a general length–strength law, test the quadriceps femoris and hamstring muscles with the knee fully flexed and then fully extended. With the knee fully extended, the quadriceps femoris muscle is  strongest/
 weakest and
  shortest/
 longest. (
 strongest;
  shortest (thus confirming the length–strength law))
8. In general, to test muscles of weak or modest strength more accurately, start with the Pt in a position of strength, for example, neck flexed. But to test very strong muscles, place them at a disadvantage to bring them within your range of strength. Thus, to reduce the strength of the normally powerful triceps muscle to bring it within the testing range, test the Pt with the elbow  fully bent/
 fully extended. Explain.
_________
_________ fully bent) (With the elbow bent, the triceps is longest and therefore weakest.)
9. With the elbow extended, the triceps is far too strong for the Ex to overcome. It can lose considerable strength and still offer strong resistance.
C. The antigravity muscle principle: how to remember the strongest sets of muscles
1. Muscles work in opposing, agonist–antagonist pairs (Berrymann Reese, 2012). One of the opposing pairs is immensely stronger than the other, for example, neck extension is far stronger than flexion. Without a general law to recall the strongest of opposing sets of muscles, you face the oppressive task of memorizing each set individually. If we look at a quadruped, or better, at a man in quadrupedal position, the solution leaps out at us (Fig. 7-2). The immensely powerful muscles all belong to the postural antigravity system of a quadruped.
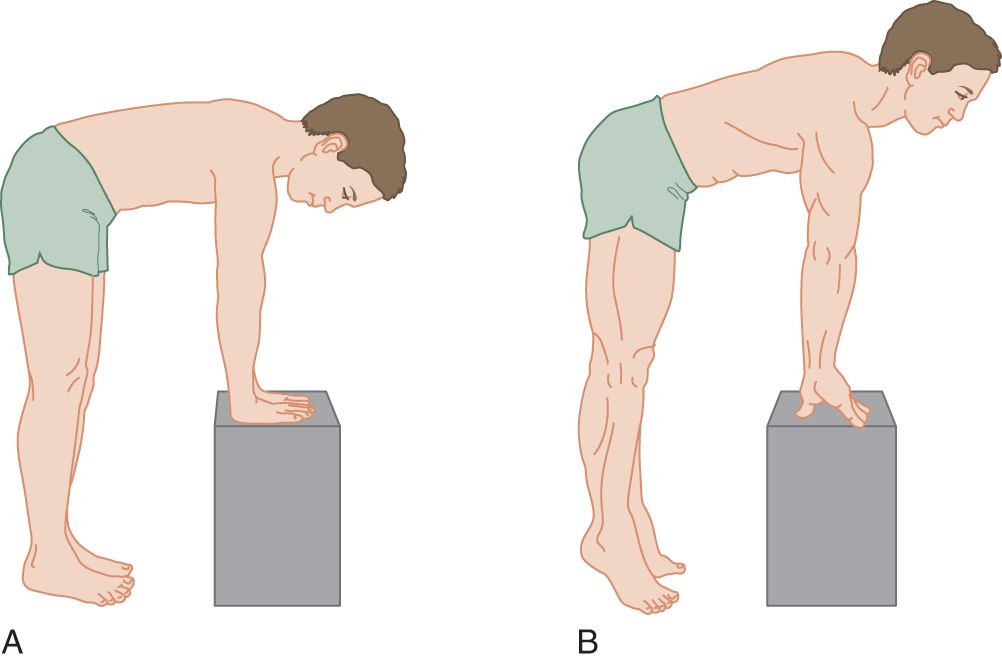
FIGURE 7-2. Man in quadruped posture. (A) Relaxed. (B) Rising on fingers and toes.
2. Stand up and assume the postures shown in Figs. 7-2A and 7-2B. Of particular importance, assume the posture shown in Fig. 7-2B. Notice then how the triceps muscle locks the upper extremities against collapse from the pull of gravity and how the quadriceps femoris similarly locks the lower extremities. The neck extensors erect the head. Buttocks and back extensors erect the trunk, holding it from collapse by gravity when the person stands or, equally important, when leaping or locomoting. When a person leaps or locomotes, the hands and feet lever downward. The muscles that support or lock the standing posture against collapse by the pull of gravity and that leap against gravity and propel or locomote constitute the antigravity muscle system. Invariably, the strength of these antigravity muscles greatly exceeds that of their antagonists.
3. Using the principle of the superior strength of the antigravity locking, locomoting, and leaping muscles, predict the strongest of these opposing movements: wrist  extension/
 flexion; trunk
  extension/
 flexion; foot
  dorsiflexion/
 plantar flexion; toe
  extension/
 flexion. (
 flexion;
  extension;
  plantar flexion;
  flexion)
4. Confusion may arise when applying the antigravity theory to some actions such as arm abduction. When abducting, the arm acts against the pull of gravity, but the abductor muscles do not support the standing skeleton against collapse by gravity when the animal stands, leaps, or locomotes; hence, the arm elevators and abductors are not postural antigravity muscles and, quite to the contrary, their opponents are. Consider the examples of postural antigravity muscles the pectoral and latissimus dorsi muscles. The pectoral muscles prevent the forelimbs from straddling out when the animal stands. (Imagine the leverage acting to spread a giraffe’s legs.) The latissimus dorsi muscles pull the forelimbs backward, thrusting the shoulders forward and upward, that is, against gravity, when the quadruped leaps or locomotes. Consequently, the strength of these adductor and flexor muscles acting at the shoulder far exceeds their opponents, the abductor-extensor muscles. Applying this consideration to the hip, which would be stronger?  hip abductors/
 hip adductors. Explain. (
 hip adductors)
_________
_________
5. The antigravity theory predicts not only the strongest muscles but also how much stronger they are (Thijs, 1998). Your arm and hand strength cannot even begin to overcome the antigravity muscles when set in their strongest positions, with fingers, feet, and toes flexed (Fig. 12-13). But your arm and hand strength just about equals or barely overcomes the nonantigravity muscles when set in their strongest position, with the head flexed, jaw open, arms abducted, hips flexed, and wrists and feet dorsiflexed.
6. As a final bonus, the antigravity theory explains the very important posture called decerebrate rigidity, seen in the comatose Pt, when the Pt assumes the position dictated by contraction of the entire system of antigravity muscles (Fig. 12-13).
D. The engagement principle
This is the most commonly neglected technique. For all strength testing and the entire NE, the Ex must engage the Pt’s competitive spirit to get maximum effort (Chapter 1, Section IX C 4; DeMyer, 1998). Challenge the Pt to a game: “I am trying to test how strong you are. Do your best on each test. Do not let me win.”
III. TECHNIQUE OF TESTING FOR MUSCULAR WEAKNESS
A. The rostrocaudal sequence
1. Test the muscles in the natural rostrocaudal order because it requires no memorization. After testing cranial nerve (CrN) muscles, simply continue in the neck-shoulder–arm–forearm–hand–chest–abdomen–thigh–leg–foot–toe sequence and continually compare right and left sides.
2. Before testing strength, the Ex has an opportunity to test for range of motion of the joints, if the history suggests a need to do so. To test range of motion, ask the Pt to move the joint actively through its full range of motion, and then you attempt to passively manipulate the joint. If range of motion is impaired, then manual muscle testing needs to be appropriately limited and taken into account to avoid exacerbating a preexisting joint/skeletal derangement.
B. Testing for weakness of neck flexors and extensors
1. Neck extensors are far too strong for the Ex’s arm and hand strength.
2. In what position does the Ex ask the Pt to place the head to bring the strength of the relatively weak neck flexors up into the best range to test?
_________
C. Testing for weakness of shoulder girdle muscles
1. The trapezius was tested with the cranial nerves.
2. Test shoulder and arm movements by having the Pt extend the arms forward, to the sides, and then over the head. Inspect from front and back. Have the Pt stand directly under an overhead light that will cast a shadow of the scapular border. Look for scapular movement, in particular winging of the dorsal border away from the rib cage. Have the Pt lean forward against a wall with the arms extended to exaggerate scapular winging.
3. After testing free movement of arm abduction and elevation, test the strength of these movements. Have your Pt (or partner) hold the arms straight out to the sides (abducted). Push down on the arms as the Pt resists. Where do you push? That depends. If you are a strong man and the Pt a woman, push down proximally at the elbows to reduce your leverage. If you are a woman and the Pt a man, push down distally on the forearms or wrists to increase your leverage. Select a point where your strength in pushing down about equals that of the standard person of the height, weight, age, and sex of your Pt. Here you must build your own catalog of experience. Work through Table 7-1.
TABLE 7-1 • Method of Testing Shoulder Girdle Strength
Action | Commands and maneuvers |
Arm elevation | Request the patient to hold the arms straight out to the sides. Press down on both arms at a point where you expect your strength to approximate the patient’s. |
Arm adduction downward | With the arms extended to the sides, the patient resists your efforts to elevate them. |
Arm adduction across the chest (pectoralis muscles) | With the arms extended straight in front, the patient crosses the wrists. You try to pull them apart. |
Scapular adduction | With the hands on the hips, the patient forces the elbows backward as hard as possible. Standing behind the patient, the examiner tries to push them forward. |
Scapular winging | Have the patient try a push-up or lean forward against a wall, supporting the body with outstretched arms. |
4. Arm abduction is complex, requiring supraspinatus action to initiate the act, deltoid action to carry the arm to shoulder height, and scapular rotation to continue the elevation to the vertical position. The serratus anterior and trapezius muscles hold the scapula in place against the chest wall. Serratus anterior paralysis (long thoracic nerve) results in winging of the scapula away from the chest wall.
5. Test for latissimus dorsi strength by starting with the Pt’s arms extended to the sides. The Ex applies upward pressure on the elbows. This is a very strong muscle, but it is easily felt and seen. Also, to test for the action of the muscle, the Ex may palpate it while the Pt makes a strong voluntary cough. This test is helpful in Pts with hysterical paralysis of the arm because the action is automatic.
D. Testing for weakness of upper arm muscles: flexion and extension of the elbow
1. Elbow flexors: The Pt tightly flexes the forearm. Brace one hand against the Pt’s shoulder. With the other hand, grasp the Pt’s wrist and attempt to straighten the Pt’s forearm. This matches your biceps against the Pt’s. When an average person competes with another average person of the same age and sex, the battle is a deadlock and, hence, ideal for testing (Fig. 7-1A).
2. Elbow extensors: If you give the matter no thought, you might try to test the triceps with the elbow locked in extension. But the triceps, an antigravity muscle, is tremendously strong, and with an average person against another average person, the locked-out elbow wins easily. Conversely, if the Pt’s locked-arm yields, the Pt’s triceps is significantly weak. For a subtler test, start with the Pt’s elbow flexed, as in testing the elbow flexors, but this time grasp the wrist and oppose extension of the forearm by the Pt. This maneuver puts the triceps at a disadvantage, and average person against average person; the Ex will win, but barely. Because this test pits nearly equal strengths, it discloses slight loss of triceps power better than the arm-extended position.
E. Testing for weakness of forearm muscles: wrist flexion and extension
1. Wrist flexors: The Pt makes a fist and holds the wrist flexed against your efforts to extend it. By hooking your fingers around the Pt’s fist and flexing your own wrist, you can pit your own wrist flexion against the Pt’s. Brace the Pt’s wrist with your other hand. Other forms of manual opposition will not overcome the wrist flexors, because they are very strong antigravity muscles. (Visualize a quadruped leaping [Fig. 7-2B].)
2. Wrist extensors: For support, rest the Pt’s forearm flat on his thigh or a tabletop. The Pt then holds the wrist forcefully cocked-up (dorsiflexed) as you try to press it down with the butt of your palm on the Pt’s knuckles. With the Pt’s wrist in extension, the relatively weak wrist extensors just about match your arm and hand strength.
F. Testing for weakness of finger muscles
1. Carefully inspect and palpate the thenar and hypothenar eminences for size and asymmetry. Look for atrophy of interosseous muscles. Elderly people show obvious interosseous atrophy.
2. Abduction–adduction of the fingers: Test by carefully figuring out how to match your strength against the Pt’s.
a. Start with the first dorsal interosseous muscle. Palpate it in your own hand as the mass of soft tissue alongside the second metacarpal bone, in the web between your thumb and index finger. The first dorsal interosseous muscle moves the index finger away from the middle finger and toward the thumb. Palpate your own muscle during that action.
b. To test a Pt’s dorsal interosseous muscle, press the terminal phalanx of your right index finger alongside the resisting terminal phalanx of the Pt’s right index finger, matching muscle to muscle, which is an ideal test (Fig. 7-3).
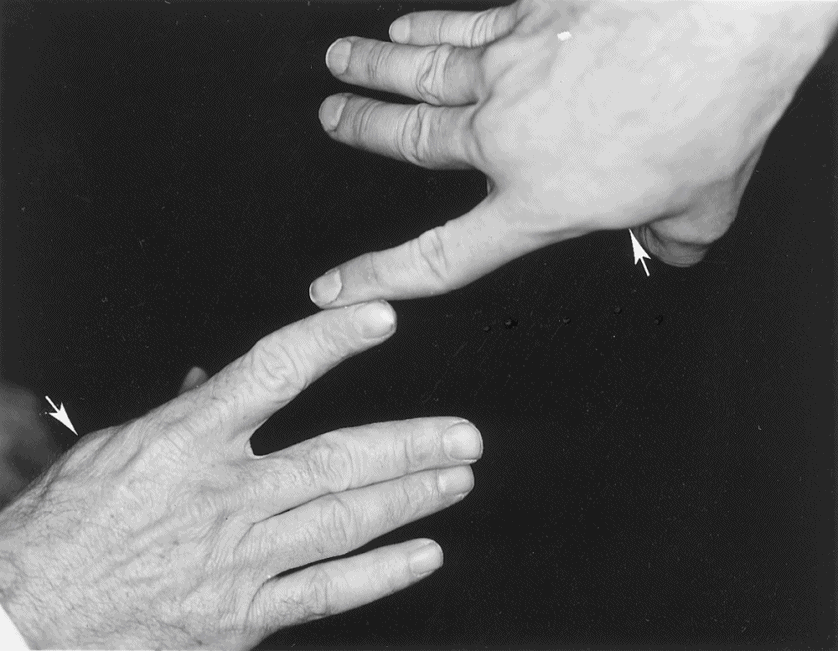
FIGURE 7-3. Method of matching the examiner’s finger strength against the patient’s. Notice the bulging first dorsal interosseous muscle in the examiner and the patient (arrows).
c. Work through the fingers, learning how to match your finger abductors and adductors against the Pt’s.
3. Finger extension: The Pt holds out the hands with palms down and fingers hyperextended. Simply turn your hand over so that the dorsum of your fingernail presses against the dorsum of the Pt’s. Then you can carefully match the extensor strength of each of your own fingers against the Pt’s.
4. Finger flexion: Strength of the grip as a whole.
a. Ask the Pt to squeeze your fingers: Grasp the Pt’s wrist with one hand to steady the arm and offer two fingers of your other hand for the Pt to grasp. To add an element of fun and competition to the test, particularly with a child, and to keep the Pt working at top strength, say, “Do not let my fingers get away,” as you try to extract your fingers from the Pt’s grasp.
b. Try this experiment: Grip a pencil as tightly as possible in your fist. Notice that your wrist automatically dorsiflexes slightly. Have your partner try to pull the pencil out of your grip when your hand is in the normal position it automatically assumes when you tighten your grip. Then hold your wrist flexed as strongly as possible and dorsiflexed as strongly as possible, and ask your partner to pull the pencil out of your grip in each instance. Finger flexion is strongest when the wrist is  strongly flexed/
 partly dorsiflexed/
 completely dorsiflexed. (
 partly dorsiflexed)
c. This experiment shows that partial dorsiflexion of the wrist allows the strongest grip: Partial dorsiflexion is the functional position of the hand, the position to select when putting a cast on the forearm or wrist to treat a fracture or when splinting the wrist to maintain optimum hand position while the Pt recovers from paralysis. This so-called functional position of the hand is the position of complete shortening of the finger flexor muscles and therefore the position that allows them to exert the strongest grip. Further flexion of the wrist merely slackens the flexor tendons of the fingers without further shortening of the finger flexor muscles. Hence, this action of the hand does not contradict the law that the muscles are strongest from their shortest position. Now if you understand all of this, state into which position you would try to force an assailant’s wrist to cause him to drop a knife? Explain.
_________
_________
G. Testing for abdominal muscle weakness
1. Position: With the Pt supine (face up), ask for a sit-up or for the Pt to elevate the legs or the head. At the same time, watch the umbilicus as the abdominal muscles contract.
2. Try this experiment: While lying supine, stick your index finger in your own umbilicus to palpate it during the foregoing actions. If the muscles of all four quadrants have equal strength, the umbilicus will remain centered. When the Pt attempts to raise the head or legs, what would happen to the position of the umbilicus if the lower abdominal muscles were weak and the upper muscles were intact? The umbilicus would migrate  upward/
 downward. (
 upward (the intact muscles pull the umbilicus in their direction))
a. In general, if some abdominal muscles are weak, the umbilicus will migrate  toward/
 away from the pull of the intact muscles during strong abdominal contraction. (
 toward)
b. The umbilical migration test aids greatly in localizing the level of spinal cord lesions. The umbilicus corresponds to the X thoracic segment of the spinal cord (Fig. 2-10). Spinal cord transection at the T10 level or below paralyzes all muscles caudal to that level. Because of paralysis of the lower abdominal muscles, when a Pt with a T10-level cord lesion contracts the abdominal muscles, the umbilicus migrates  upward/
 downward (Beevor sign). Beevor sign is also found in Pts with fascioscapulohumeral muscular dystrophy, more frequently in typical presentations, but not as frequently described in other neuromuscular disorders (see Eger et al, 2010). (
 upward)
H. Testing for weakness of the large back muscles
The average Pt’s back is far too strong for the Ex to test by manual opposition. Two tests can be done:
1. With the Pt prone, ask the Pt to arch the back and rock on the stomach. Inspect and palpate the paraspinal muscles.
2. Have the Pt bend forward at the waist and straighten up. If the Pt is unable to complete this range of motion then resistance testing of strength while you try to oppose the Pt’s straightening up from a bent waist should not be performed as it could exacerbate underlying back sprain or spasm.
I. Testing for weakness of the hip girdle
1. Hip flexion: With the patient sitting, ask the Pt to lift a knee off of the table surface and to hold the thigh in a flexed position. With the butt of your palm, try to push the knee back down. The flexors are relatively weak, nonantigravity muscles. Give them the advantage of a flexed position.
2. Thigh abduction and adduction: With the Pt sitting, have the Pt hold the legs abducted as you try to press them together with your hands on the lateral sides of the knees. Then have the Pt try to hold the legs adducted (squeezed together) as you place your hands on the medial sides of the knees to try to pull the knees apart. It is inconvenient for the Ex to try to test adductor strength when starting with the Pt’s legs apart.
3. Hip extension: With the Pt prone, have the Pt lift the knee from the table surface and hold it up. Place your hand on the popliteal space and try to press the knee back down.
J. Testing for weakness of the thigh muscles
1. Knee extensors
a. The deep knee bend has already tested the quadriceps, an immensely powerful antigravity muscle that ordinarily is too strong to test by manual opposition if it acts from the strongest position. To test the quadriceps, place it at a mechanical disadvantage, starting with the knee  flexed/
 intermediate/
 straight. (
 flexed)
b. With the Pt prone, have the Pt try to touch the heel to the buttock to induce extreme flexion of the knee. Grasp the Pt’s ankle and oppose extension. Compare the extensor strength of the two legs.
2. Knee flexors (hamstrings): The Pt holds the knee at an angle of 90°, while you try to straighten it by grasping the Pt’s ankle.
K. Testing for weakness of ankle and toe movements
1. Have the Pt dorsiflex, invert, and evert the feet. Inspect, palpate the leg, and check for the strength of these movements by manual opposition.
2. Plantar flexion of the foot is ordinarily too strong to test by manual opposition. Because the Pt walked on the balls of the feet during the gait examination, you already know that the plantar flexors can lift the entire body weight of the Pt.
3. The Pt holds the toes flexed or extended as the Ex attempts to press them back to the neutral position. Which action of the big toe is strongest,  extension/
 flexion? Explain. (
 flexion)
_________
_________
L. Screening tests for muscle weakness during the routine physical examination versus a complete examination
1. Testing for weakness of every muscle in every Pt would be a waste of time. For the screening NE, sample a few selected movements, as outlined in Section VI, step C of the Standard NE. Rehearse it.
2. Patients with neurologic symptoms and signs require a much more extensive examination. From the history and initial appraisal, the Ex selects the critical muscles for testing and the conditions under which to do the tests. For example, if the Pt complains of weakness after exertion, have the Pt climb stairs before testing. If the Pt’s muscles “freeze up” when cold, put the arm in ice water and ask the Pt to make repetitive contractions. If the muscles cramp when the Pt writes, have the Pt write. Always reproduce any conditions that trigger symptoms.
3. The diagnosis of specific nerve injuries and entrapment neuropathies requires detailed testing of individual muscles and comparison with charts of segmental versus peripheral nerve innervation patterns (Table 2-1 and Figs. 2-10 and 2-11). Of the guides to muscle testing, the little pamphlet entitled Aids to the Examination of the Peripheral Nervous System (O’brien, 2010) fits easily in your bag (see also Jenkins, 2008). For entrapment or focal neuropathies see Arnold and Elsheikh (2012) and Stewart (2000).
M. Recording the strength examination
1. Table 2-1 lists muscles or movements usually tested. The Ex may use a word scale such as paralysis, severe weakness, moderate weakness, minimal weakness, and normal or what has become more popular is a numerical scale from 0 to 5 (Table 7-2).
TABLE 7-2 • Numerical Scale to Record Muscle Strength (British Medical Research Council)
Score | Description |
5 | Normal strength |
4 | Moves joint through full range against resistance greater than gravity but examiner can overcome the action (make a percentage estimate of strength to compensate for broad range of this number) |
3 | Moves part full range against gravity but not against any resistance |
2 | Moves part only when positioned to eliminate gravity |
1 | Only a flicker of contraction of muscle but cannot move joint |
0 | Complete paralysis |
2. To address reproducibility and improve sensitivity of manual muscle testing, instruments are available that measure static and dynamic muscle contraction (El Mhandi and Bethoux, 2013) as well as portable, inexpensive and less time-consuming devices such as a hand-held myometer or dynamometer (Berrymann Reese, 2012; Lanska, 2000 and Vanpee et al, 2014). Hand held devices are practical for a clinical setting and allow an objective quantification of strength, yet require experience and practice and are still limited by intraexaminer reliability (Goonetilleke, Madarres-Sadeghi, Guiloff, 1994; Schrama et al, 2014), but remember the principle of full engagement, which states that the Pt’s effort is also a limiting factor in accuracy (Daum et al, 2014; Kendall, et al, 2005).
3. Record in the Pt’s chart the movements or muscles actually tested. If the Pt displays weakness on a later visit, the record will provide reliable documentation for comparison.
N. Review
Rehearse Section VI A, B, and C of the Standard NE. Do you remember the steps? No? That is the reason to rehearse them now.
BIBLIOGRAPHY · The Strength Examination
Arnold WD, Elsheikh BH. Entrapment neuropathies. Neurol Clin. 2013;31:405–424.
Berrymann Reese N. Muscle and sensory testing, 3rd ed. St. Louis, Saunders; 2012.
Daum C, Hubschmid M, Aybek S. The value of ‘positive’ clinical signs for weakness, sensory and gait disorders in conversion disorder: a systematic and narrative review. J Neurol Neurosurg Psychiatry. 2014;85:180–190.
DeMyer W. Pointers and pitfalls in the neurologic examination. Semin Neurol. 1998;18:161–168.
Eger K, Jordan B, Haberman S, Zierz S. Beevor’s sign in fascioscapulohumeral dystrophy: an old sign with new implications. J Neurol. 2010;257:436–438.
El Mhandi L, Bethoux F. Isokinetic testing in patients with neuromuscular disease: a focused review. Am J Phys Med Rehabil. 2013;92:163–178.
Goonetilleke A, Madarres-Sadeghi H, Guiloff RJ. Accuracy, reproducibility, and variability of hand-held dynamometry in motor neuron disease. J Neurol Neurosurg Psychiatry. 1994;57:326–332.
Kendall FP, McCreary EK, Provance PG, Rodgers MM, Romani WA. Muscles Testing and Function with Posture and Pain. 5th ed. Baltimore, MD: Lippincott Williams & Wilkins; 2005.
O’Brien M. Aids to the Examination of the Peripheral Nervous System. 5th ed. Philadelphia, PA: Elsevier Health Sciences; 2010.
Jenkins DB. Hollinshead’s Functional Anatomy of the Limbs and Back. 9th ed. Philadelphia, PA: W.B. Saunders; 2008.
Lanska DJ. William Hammond, the dynamometer, and the dynamograph. Arch Neurol. 2000;57:1649–1653.
Schrama PPM, Stennedberg MS, Lucas C, van Trijffel E. Intraexaminer reliability of hand-held dynamometer in the upper extremity: a systematic review. Arch Phys Med Rehabil. 2014;95:2444–2469.
Stewart JD. Focal Peripheral neuropathies. 3rd ed. Baltimore, MD: Lippincott Williams & Wilkins; 2000.
Thijs RD, Notermans NC, Wokke JHJ, et al. Distribution of muscle weakness of central and peripheral origin. J Neurol Neurosurg Psychiatry. 1998;65:794–796.
Vanpee G, Hermans G, Segers J, Gosselink R. Assessment of limb muscle strength in critically ill patients: a systematic review. Crit Care Med. 2014;42:701–711.
IV. RESULTS OF DIRECT PERCUSSION OF MUSCLE
It will not surprise the cognoscente in physical diagnosis that percussion belongs in the sequence of inspection, palpation, and strength testing of muscle.
A. Self-demonstration of percussion irritability of muscle
1. Bare your biceps muscle and strike its belly a sharp blow with the point of your reflex hammer (tomahawk type). You will see a faint dimple at the percussion site. Strike a crisp blow and jerk the hammer out of the way because this finding is very transient.
2. The contraction of muscle fibers in response to a direct blow demonstrates the intrinsic irritability of the muscle fibers themselves. It is not a reflex and not dependent on innervation (Brody and Rozear, 1970). In fact, percussion irritability remains, and may even increase, after denervation of the muscle, because the denervated muscle fibers become hyperirritable (Cannon law of hypersensitivity of denervated structures, Walter Cannon, 1871–1945). Prominent or exaggerated responses are also reported in neuropathies associated with conduction block, but attributed to hyperexcitability of those distal axons and their spontaneous depolarizations precipitated by muscle percussion, especially over their innervation zone (Magistris and Kohle, 1996).
B. Percussion myoedema
Sometimes a nonpropagating, palpable hump, called myoedema (or muscle mound), appears at the percussion site; reaches its maximal size in seconds and then over seconds gradually resolves. Attributed to release and “slow” reuptake of calcium by the sarcoplasmic reticulum it is electrically silent if recorded by electromyography. Myoedema can be found in some normal people, but usually in debilitation (eg, malnutrition) or dysmetabolic states such as hypothyroidism or uremia.
Prominent myoedema can also be elicited in various myopathies including: limb-girdle muscle dystrophy type 2A and 2B, inflammatory myopathies, tubular aggregate myopathy (Mahjneh et al, 2007) and rippling muscle disease (RMD). RMD demonstrates prominent percussion contraction, at times resembling myotonia and often a self-propagating rolling or rippling of muscles induced by passive stretch and the derivation of its descriptive name (Sundblom et al, 2010). RMD is attributed to a caveolin-3 mutation (at times RMD has an autoimmune etiology associated with myasthenia gravis) and caveolin-3 is associated with muscle T-tubules that could provide an explanation for the muscle percussion manifestations.
C. Percussion myotonia
Myotonia can be considered a symptom and a sign of a neuromuscular disorder and those afflicted describe muscle stiffness or after a voluntary contraction the inability to relax the muscle. To demonstrate the usual technique to elicit this finding requires you to place your hand, palm up, on the table. Crisply percuss your thenar eminence with the point of your percussion hammer. Normally the thumb bounces up a little due to percussion irritability, but if your thumb slowly rises up from your palm and holds up, you have got problems. You have percussion myotonia.
D. Muscle contraction myotonia
1. Ask the Pt to make a tight fist, hold it for 10 seconds, and flip the fingers open as quickly as possible on command. The myotonic Pt cannot flip the fingers open rapidly, and the wrist involuntarily flexes because of sustained “after contraction” or delayed relaxation of the flexors.
2. Ask the Pt to close the eyelids as tightly as possible for 5 seconds. When the Pt attempts to open the eyelids, the myotonia keeps them closed. When accompanied by paradoxical eye closure myotonia and a specific repetitive nerve stimulation test (short-exercise test), was more common with the nondystrophic myotonic disorders associated with sodium channelopathies (Trivedi et al, 2013).
3. Classification of myotonic disorders makes use of the presence or absence of myotonic discharges on EMG (Heatwole et al, 2013; Dubowitz et al, 2012; Karpati et al, 2010). Those with both can be divided into the dystrophic type that includes myotonic dystrophy type 1 and 2 (type 1 a manifestation of a CTG repeat on chromosome 19q13.3 and in type 2 a CCTG repeat on chromosome 3q21; the abnormal messenger RNA that results from these nucleotide repeats interferes with normal chloride channel conductance of muscle membrane) or a nondystrophic type. The nondystrophic types (Statland et al, 2014) include myotonia congenita disorders (chloride channelopathies), paramyotonia congenita, acetazolamide-responsive myotonia and hyperkalemic periodic paralysis with myotonia (all three sodium channelopathies). Myotonic discharges identified on EMG, but not associated with clinical myotonia include various myopathies (eg, myotubular myopathy, acid maltase deficiency) as well as those secondary to medication (eg, clofibrate, penicillamine).
E. Summary of muscle responses to percussion
1. List the three muscular responses to direct percussion: percussion _________
2. Normal persons show percussion _________
3. Some normal persons show percussion _________
4. No normal persons show percussion _________
5. Apart from the myotonic myopathies, percussion of most myopathic muscles, as in Duchenne muscular dystrophy, after disease has impaired the contractile properties of muscle, demonstrates little or no contraction. Percussion irritability of muscle is reduced or absent in those myopathies that do not have myotonia, but increases in muscle after denervation.
BIBLIOGRAPHY · Muscle Diseases (Myopathies)
Brody JA, Rozear MP. Contraction response to muscle percussion: physiology and clinical significance. Arch Neurol. 1970;23:259–265.
Darras BT, Jones HR, Ryan MM, DeVivo DC. Neuromuscular Disorders of Infancy, Childhood, and Adolescence. A Clinician’s Approach. 2nd ed. London: Academic Press; 2014.
Dubowitz V, Sewry CA, Oldfors A. Muscle Biopsy: A practical approach. 4th ed. London: Saunders Ltd.; 2013.
Harper PS. Myotonic Dystrophy: The facts. 2nd ed. Oxford: Oxford Univ. Press; 2009.
Heatwole CR, Statland JM, Logigian EL. The diagnosis and treatment of myotonic disorders. Muscle Nerve. 2013;47:632–648.
Karpati G, Hilton-Jones D, Bushby K, Griggs RC. Disorders of Voluntary Muscle. 8th ed. New York, NY: Cambridge Univ. Press; 2010.
Magistris MR, Kohler A. Contraction response to muscle percussion is increased in peripheral nerve conduction block. Neurology. 1996;47:1243–1246.
Mahjneh I, Lamminen A, Tuominen H. Episodic muscle pain, stiffness, and weakness associated with tubular aggregates and myoedema. Eur J Neurol. 2007;14:569–571.
Statland J, Phillips L, Trivedi JR. Muscle channelopathies. Neurol Clin. 2014;32:801–815.
Sundblom J, Stålberg E, Österdahle M, et al. Bedside diagnosis of rippling muscle disease in cav3 p.a46t mutation carriers. Muscle Nerve. 2010;41:751–757.
Trivedi JR, Bundy B, Statland J, et al. Nondystrophic myotonia: prospective study of objective and patient reported outcomes. Brain. 2013;136:2189–2200.
V. EXAMINATION OF MUSCLE STRETCH REFLEXES
A. Physiology of the muscle stretch reflexes
1. Evolution has perfected muscle fibers as contractile engines. Whatever the stimulus—a nerve impulse, chemical agent, electricity, or mechanical deformation, such as by percussion—the fiber responds by contracting.
2. Stretch of the entire muscle causes reflex contraction of the entire muscle, as contrasted to percussion irritability of individual muscle fibers. The stretch-sensitive receptors for the muscle stretch reflexes (MSRs) are the muscle spindles, which consist of small bags of small muscle fibers (Banks and Barker, 2004).
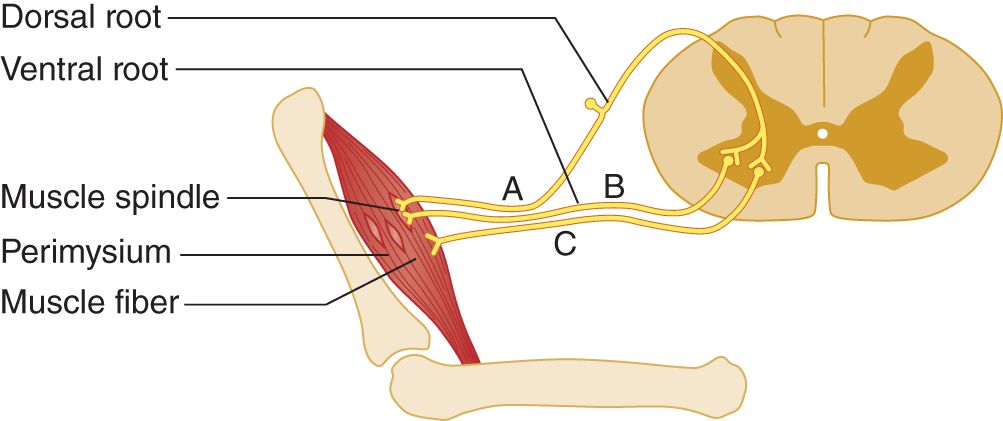
FIGURE 7-4. Muscle spindle innervation. The muscle spindles are tiny bags of specialized muscle fibers, located in the equatorial plane of the muscle. They have afferent (A) and efferent (B) axons. The regular muscle fibers receive only efferent axons (C).
3. Effects of stretch on the muscle spindles
a. The muscle fibers of the spindle originate and insert into the perimysial connective tissue, which ultimately is continuous with the tendons. If the joint shown in Fig. 7-4 extends, the tendon pulls on the perimysium and stretches the muscle spindles. Flexion of the joint causes relaxation of the muscle spindles.
b. To reset themselves to remain sensitive to stretch throughout the entire range of muscle length, the muscle spindles must readjust their length whenever the muscle length changes.
c. Flexion of a part momentarily relaxes the spindle tension. The muscle fibers of the spindles respond by contracting slightly to maintain their original tension.
d. During extension of the part, the spindles adjust to maintain their original tension by lengthening slightly.
4. Innervation of the muscle spindles
a. Each muscle spindle has its own afferent and efferent axons that maintain its constant tension; see afferent axon A and efferent axon B in Fig. 7-4. The regular muscle fibers, outside the spindle, have only efferent axons, depicted by axon C.
b. In response to stretch, the spindles send an afferent volley into the neuraxis by axon A. In response to slow stretch, the spindles signal intermittently and asynchronously. The spindles quickly adapt to the new length and resume a baseline level of activity.
c. If the stretch is rapid, essentially instantaneous, all spindles of the muscle, numbering hundreds, synchronously send a strong afferent volley into the central nervous system (CNS). The strong afferent volley stimulates the lower motor neurons (LMNs) of the regular muscle fibers. The resultant discharge of the LMNs causes a clinically evident muscular contraction, the muscle stretch reflex. Axon C in Fig. 7-4 is the efferent axon.
d. The event that initiates the MSR is stretch of the  muscle spindles/
 regular muscle fibers, but the resultant twitch of the entire muscle is the result of contraction of the
  muscles spindles/
 regular muscle fibers. (
 muscle spindles;
  regular muscle fibers)
5. When the MSR acts, the muscular contraction pulls the two ends of the muscles closer together. The tension on the muscle spindles is momentarily  reduced/
 increased. Hence, the spindles cease firing abruptly, and the MSR ends abruptly. (
 reduced)
6. When the muscle comes to rest at a new length, what adjustment takes place in the tension of the muscle spindles? (They reset their tension to their baseline level.)
_________
7. Explain why only a quick stretch elicits an MSR.
_________
_________
8. Muscle fibers contract in response to stimulation of the muscle membrane by direct percussion. This phenomenon is called _________
9. In contrast to percussion irritability, reflex irritability of muscle depends on a strong volley of afferent impulses initiated by the stretch of the specialized stretch receptors called _________
10. After interruption of all efferent axons to a muscle, what would be lost, percussion irritability or the MSRs? Explain. (Denervation of a muscle abolishes the MSRs, which depend on the integrity of the reflex arc (Fig. 7-4). Percussion irritability depends on the intrinsic property of muscle fibers. It remains or increases after denervation (Cannon law of hypersensitivity of denervated end organs).)
_________
_________
11. To elicit an MSR and avoid percussion irritability, the Ex stretches the muscles by percussing tendons, not the muscles directly. Direct percussion of the muscle not only causes direct contraction of the muscle fibers but also stretches spindles. The muscle twitches in either case, but clinically the Ex cannot distinguish the cause. The tap on the tendon can elicit contraction only by stretching the muscle spindles.
Postural and movement control are facilitated by the combined activity and contributions of muscle spindles, provide information related to the length and contraction velocity of muscle fibers and Golgi tendon organs that provide information on muscle tendon stretch (Prowske and Gandevia, 2012; Kistemaker et al, 2013).
BIBLIOGRAPHY · Physiology of Muscle Stretch Reflexes
Banks RW, Barker D. The muscle spindle. In: Engel AG, Franzini-Armstrong C, eds. Myology. 3rd ed. New York, NY: McGraw-Hill; 2004, 489–509.
Kistemaker DA, Knoek Van Soest AJ, Wong JD, et al. Control of position and movement is simplified by combined muscle spindle and Golgi tendon organ feedback. J Neurophysiol. 2013;109:1126–1139.
Prowske U, Gandevia C. The proprioceptive senses: their roles in signaling body shape, body position and movement, and muscle force. Physiol Rev. 2012;92:1651–1697.
B. Technique for eliciting muscle stretch reflexes
1. Holding the percussion hammer and delivering the blow
a. A percussion hammer permits you to strike a rapid blow, producing the instantaneous stretch of the muscle spindles necessary to elicit an MSR. To deliver a crisp stimulus, you must learn how to swing a hammer, not peck with it. The same technique applies whether you use the Taylor “tomahawk” hammer pictured in this text or the long Tromner or Babinski/Rabiner hammer (Lanska, 1999; Pinto, 2003). The Taylor may be preferred because hammers with longer handles cannot readily be used on tiny babies in bassinets or threaded easily between the wiring and tubing of a Pt in intensive care. The hammer handle should have convex sides to accommodate the tip of the thumb and forefinger, thus allowing the Ex to hold it loosely to deliver a brisk blow. Hammers with round or octagonal handles may fly out of your hand unless you grip them too tightly, which means you will have to peck rather than percuss. However, the choice of reflex hammer is a matter of preference, and none is clearly superior to any other (McGee, 2001).
b. Hammer pecking is the wrong way to elicit MSRs. Consider first the wrong technique, hammer pecking. The novice grips the hammer tightly with all of the fingers and pecks at the target without using wrist action. Recall how a baby holds a rattle tightly in its fist and bangs or pecks, using all arm action and no wrist action. Grip the handle of your reflex hammer tightly and peck the tabletop in this incorrect manner. (Go ahead, do it. If you know what is wrong, you will appreciate what is right. Pecking is the most common error students make.)
c. Hammer swinging is the right way to elicit MSRs. Dangle the hammer handle loosely between the thumb and forefinger, allowing it to swing like a pendulum. Think of the hammer handle as a bird: hold it too tightly and you crush it to death; hold it too loosely and it flies away. Figure 7-5 shows how a loose wrist and loose finger grip impart the maximal terminal velocity to the hammer head by literally throwing it without actually releasing it.
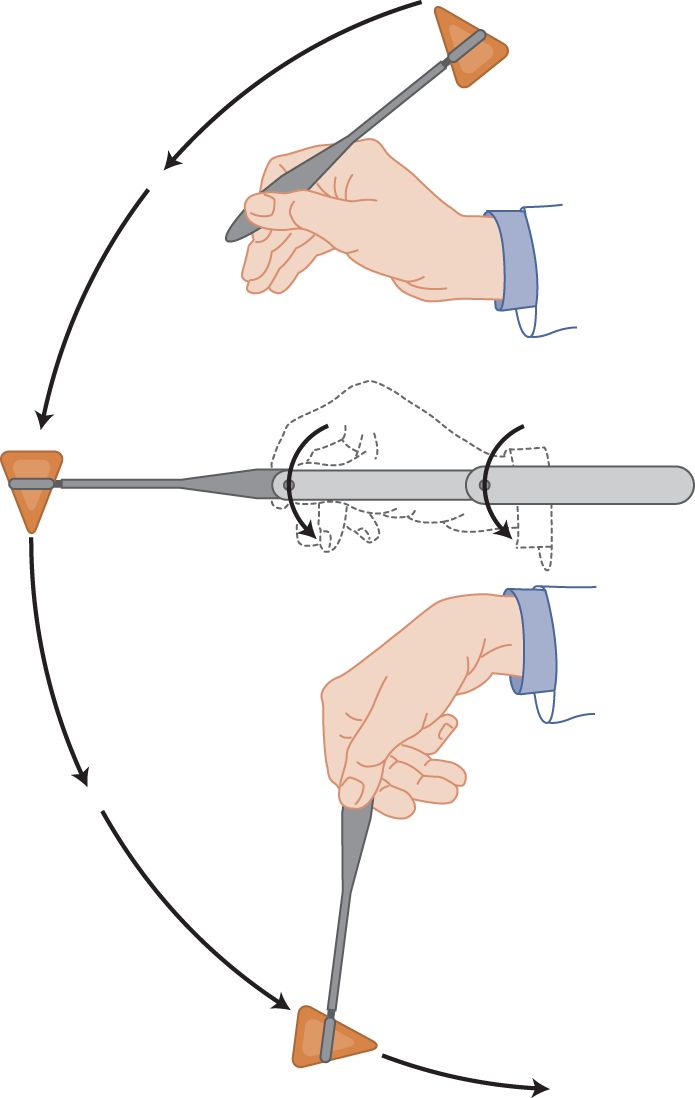
FIGURE 7-5. Technique for striking a crisp blow with a reflex hammer. Notice the loose, double pivot action at the wrist and fingers.
i. Simultaneous extension of the elbow added to the wrist swing adds further velocity to the tip of the hammer, thus delivering the crisp blow that instantaneously and simultaneously stretches all spindles to successfully elicit the MSR.
ii. Practice by holding your wrist a foot above a hard tabletop. Starting with the handle of the hammer lying back across the web between your thumb and forefinger (Fig. 7-5), whiplash the hammer head against the tabletop. If the velocity of the hammer head is great enough and the wrist and grip loose enough, the hammer head bounces all the way back up and falls backward across the crevice between your thumb and forefinger, thus returning to the starting position shown in Fig. 7-5. Practice until you can get this limp-wrist, whiplash feeling of literally throwing or swinging the hammer tip, but without actually releasing the handle. As a loose-wrist hammer swinger, you will proudly elicit MSRs when your tight-fisted colleagues, with their incorrect hammer-pecking style, fail.
2. Eliciting the MSRs in the NE
a. Have the Pt sit or recline. The Pt places the part to be tested at rest, with the muscles relaxed. Usually the best position is intermediate between full extension and full flexion. The response of the muscle and the mechanics of the tap with the hammer will depend on the joint angle (Lin et al, 1997). About 90° for the elbow, knee, and ankle joints is a standard angle.
b. Work through Figs. 7-6 to 7-18, testing the reflexes on yourself where possible and on a partner. Do the reflexes in pairs, directly comparing right and left sides.
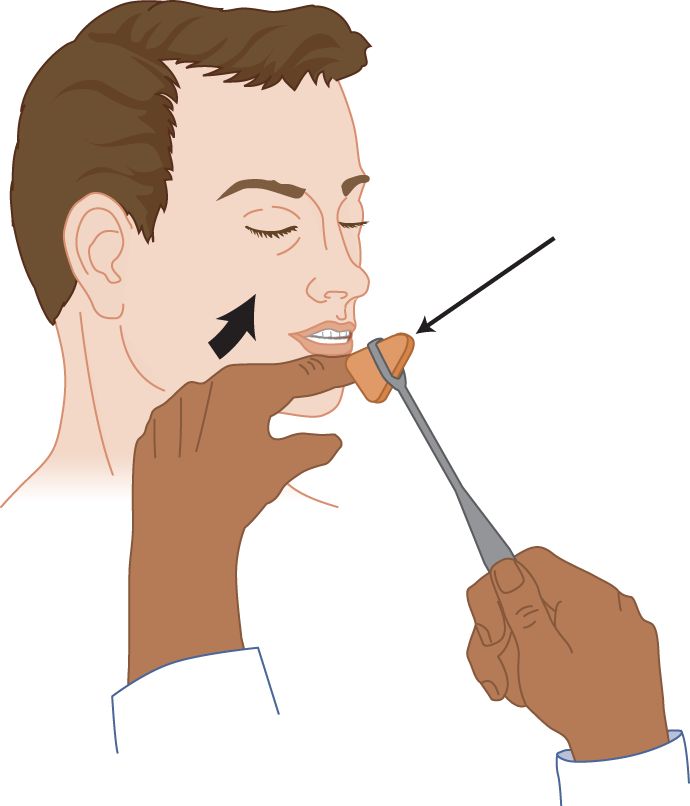
FIGURE 7-6. Jaw reflex. With the patient’s jaw sagging loosely open, the examiner rests a finger across the tip and strikes it a crisp blow. In Figs. 7-6 to 7-18, the thin arrow shows the direction of the percussion hammer blow, and the thick arrow shows the response.
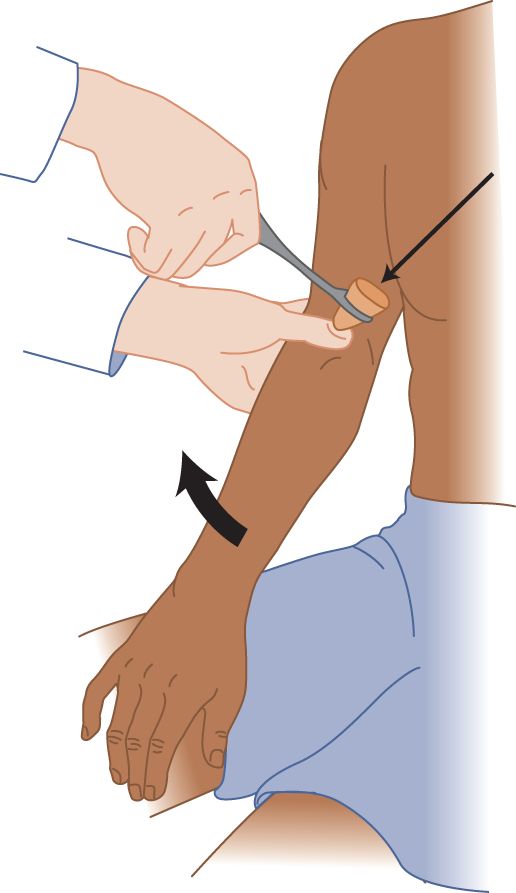
FIGURE 7-7. Biceps reflex. The examiner’s thumb places slight tension on the patient’s biceps tendon and the bicipital aponeurosis. The examiner strikes his thumbnail a crisp blow.
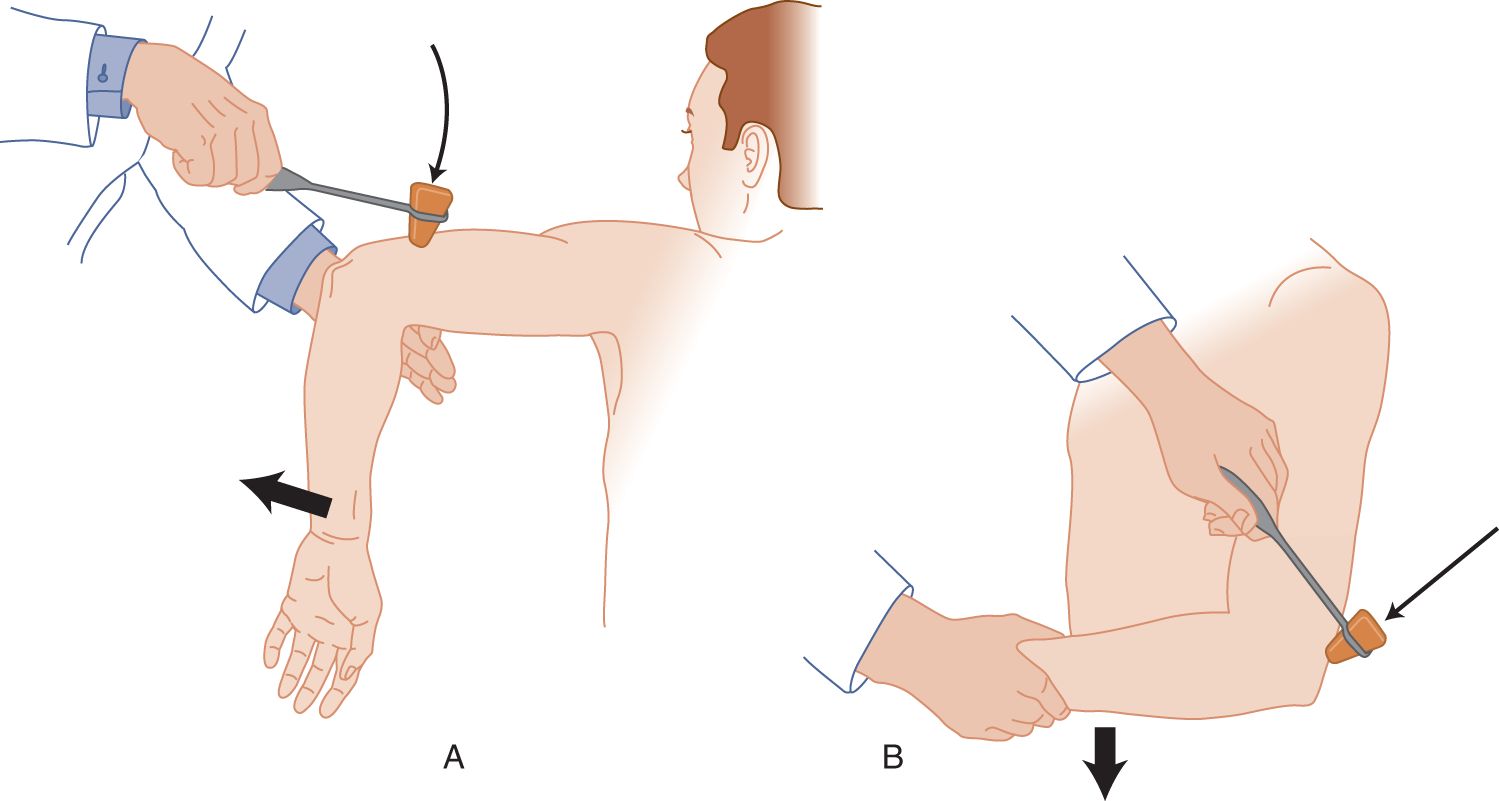
FIGURE 7-8. Triceps reflex. (A) Dangle the patient’s forearm over your hand and strike the triceps tendon. (B) Cradle the patient’s forearm in your hand and strike the triceps tendon.
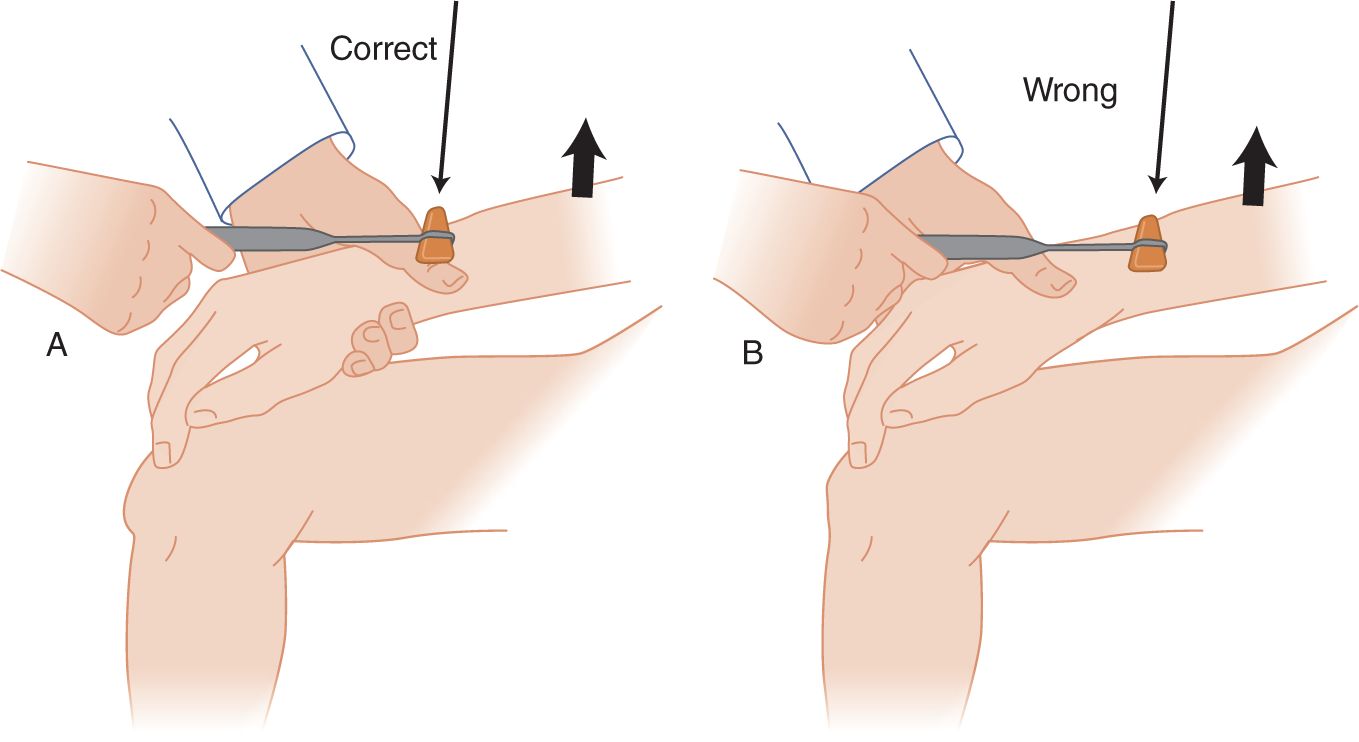
FIGURE 7-9. Brachioradialis reflex. Cradle the patient’s forearm in one hand, placing the thumb on top of the radius. (A) The hammer strikes the examiner’s thumbnail rather than the patient’s radius. (B) Do not whack away on the patient’s unprotected bone. The examiner may cradle both forearms side by side for accurate comparison of the responses of the two arms.
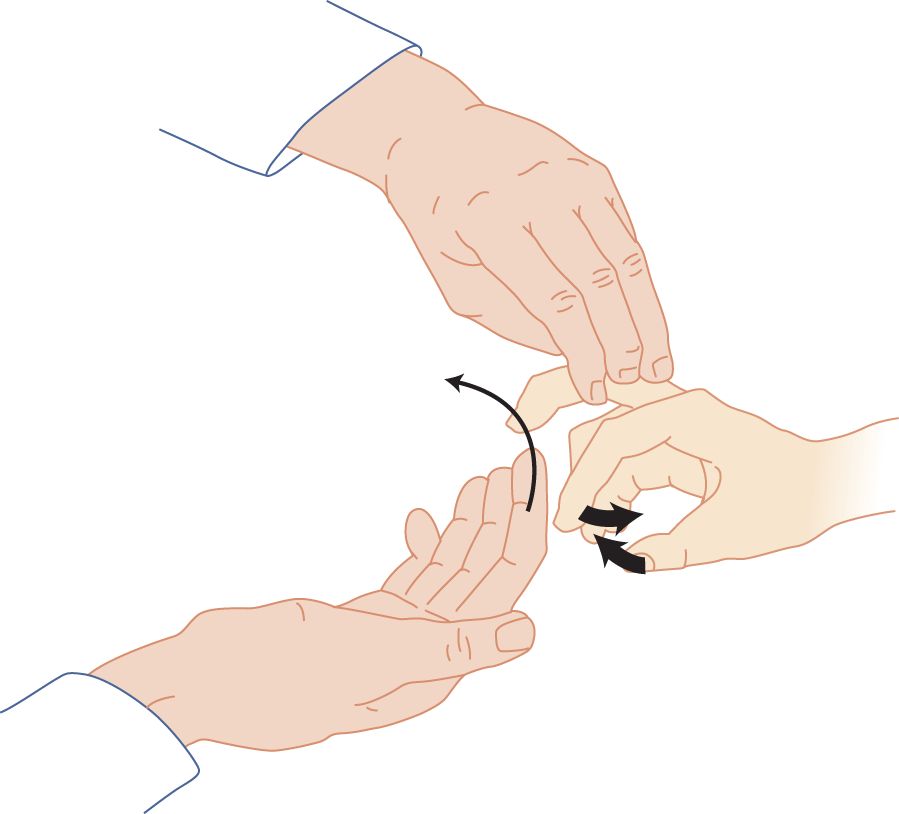
FIGURE 7-10. Finger flexion reflex (Tromner method). The examiner supports the patient’s completely relaxed hand and briskly flips the patient’s distal phalanx upward, as though to flip a handful of water high into the air. The patient’s fingers and thumb flex in response to the stretch of the finger flexor muscles.
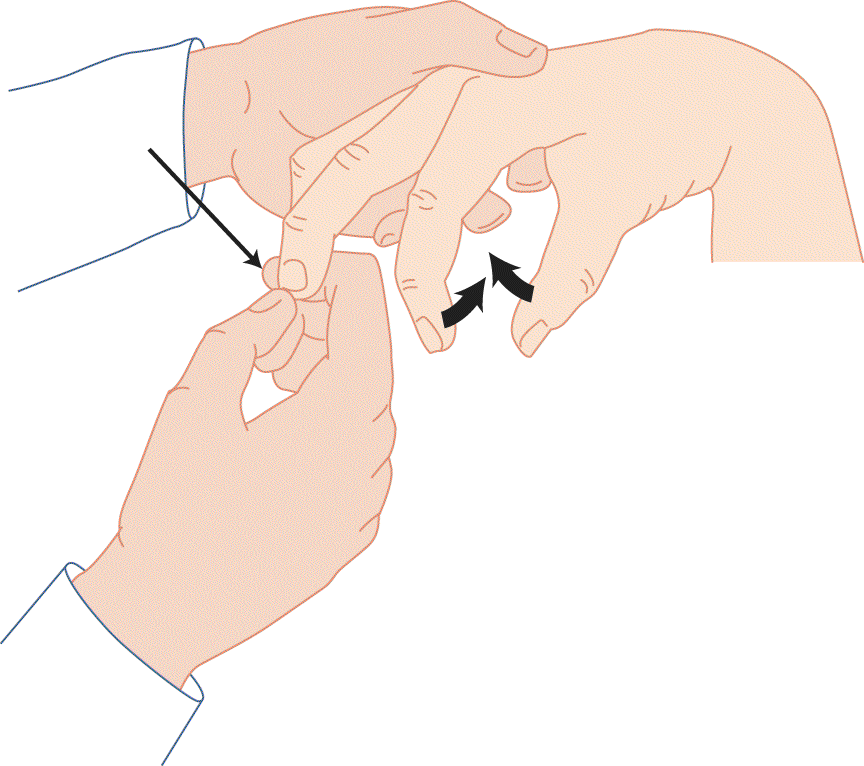
FIGURE 7-11. Finger flexion reflex (Hoffman method). The examiner depresses the distal phalanx and allows it to flip up. The extension of the phalanx stretches the flexor muscles, causing the fingers and thumb to flex. This method is effective only with very brisk muscle stretch reflexes.
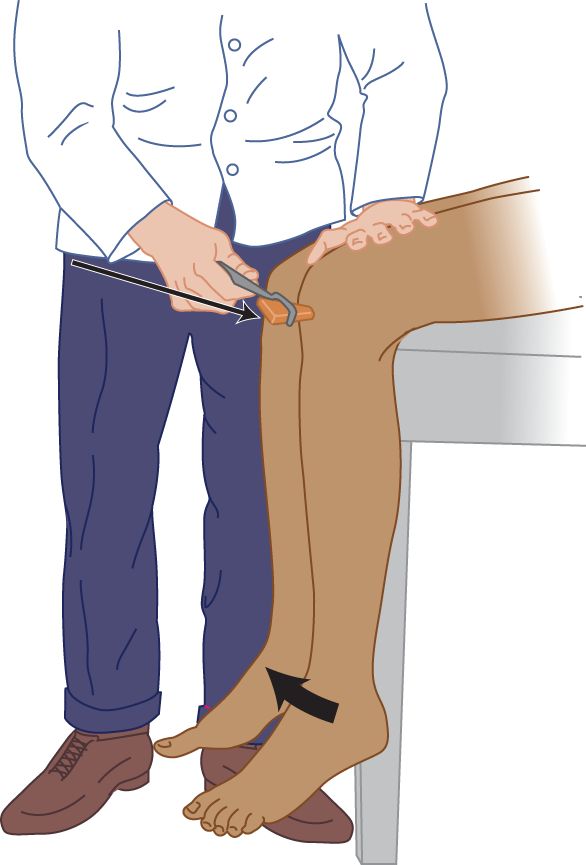
FIGURE 7-12. Knee (quadriceps femoris) reflex, with the patient sitting. The examiner strikes the patellar tendon a crisp blow. By placing a hand on the patient’s knee, the examiner feels and sees the magnitude of the response.
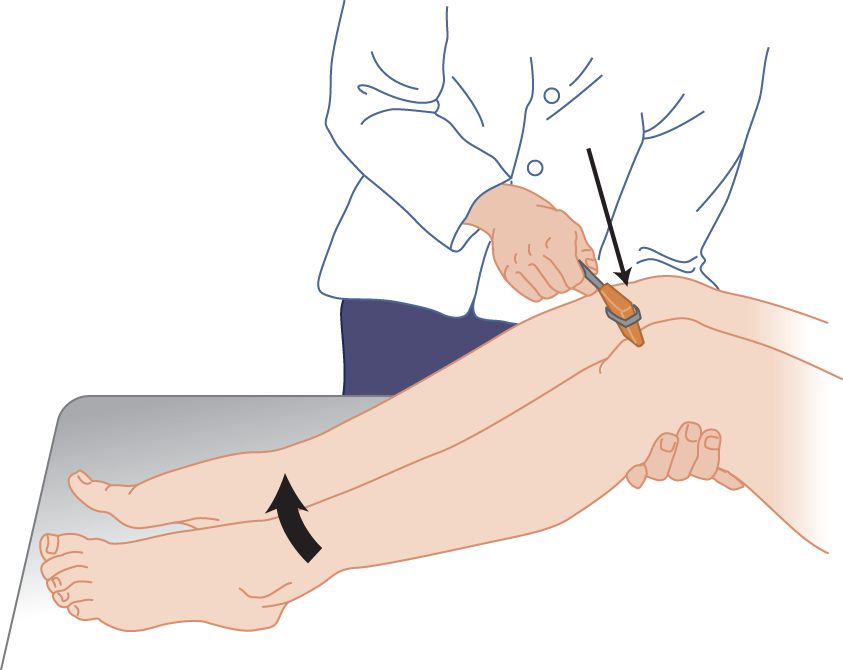
FIGURE 7-13. Knee reflex, with the patient supine. The examiner bends the patient’s legs to place slight tension on the patellar tendon. The blow then will deform the tendon and transmit a stretch to the muscle.
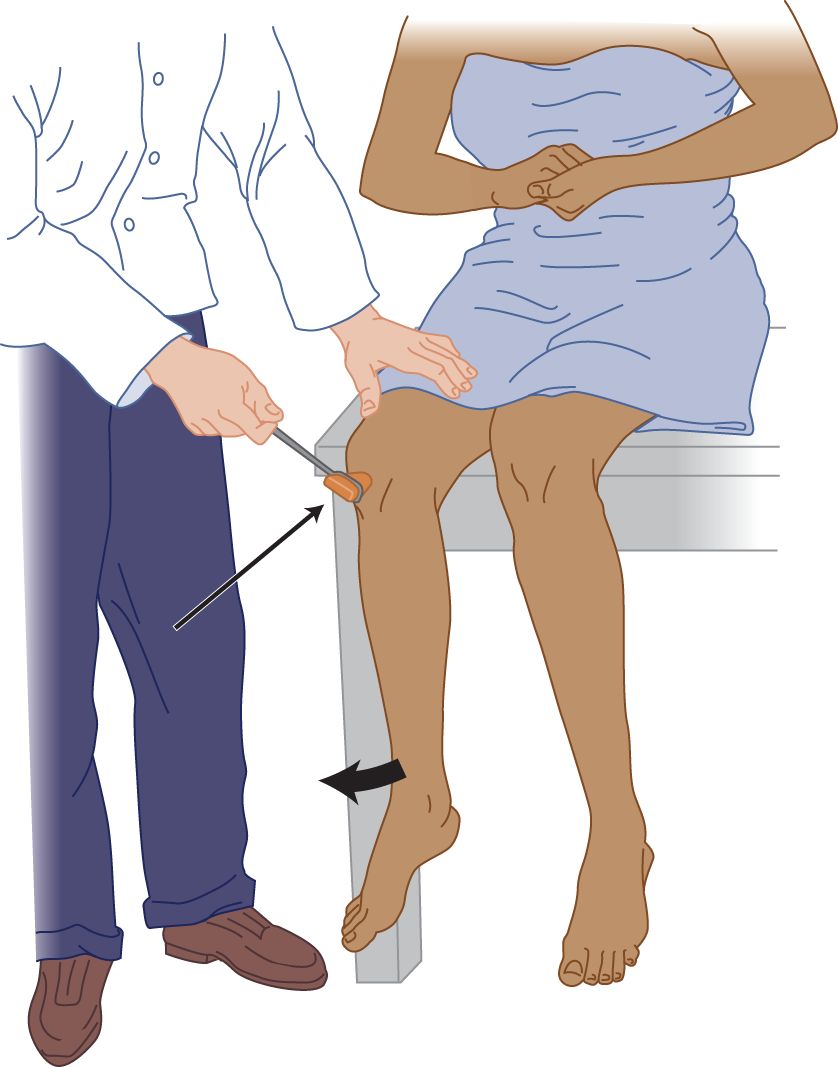
FIGURE 7-14. Pull method (of Jendrassik) for reinforcing the knee reflex. The patient locks the hands and pulls apart hard while the examiner strikes the tendon.
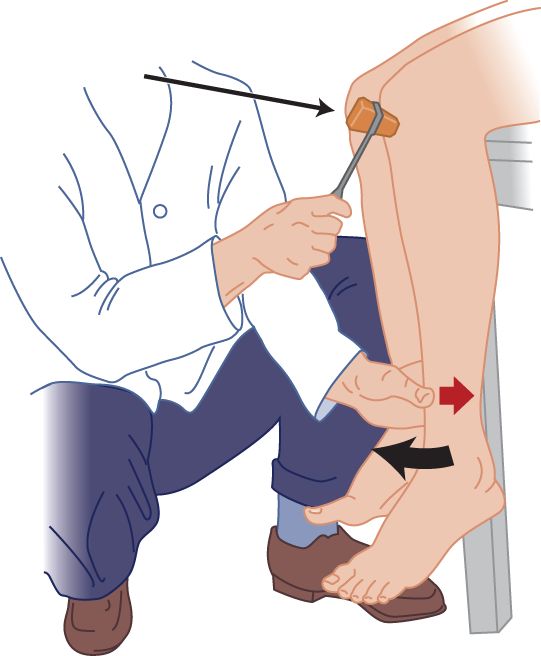
FIGURE 7-15. Counterpressure method for the knee reflex. The examiner applies slight thumb pressure (small arrow) against the patient’s tibia.
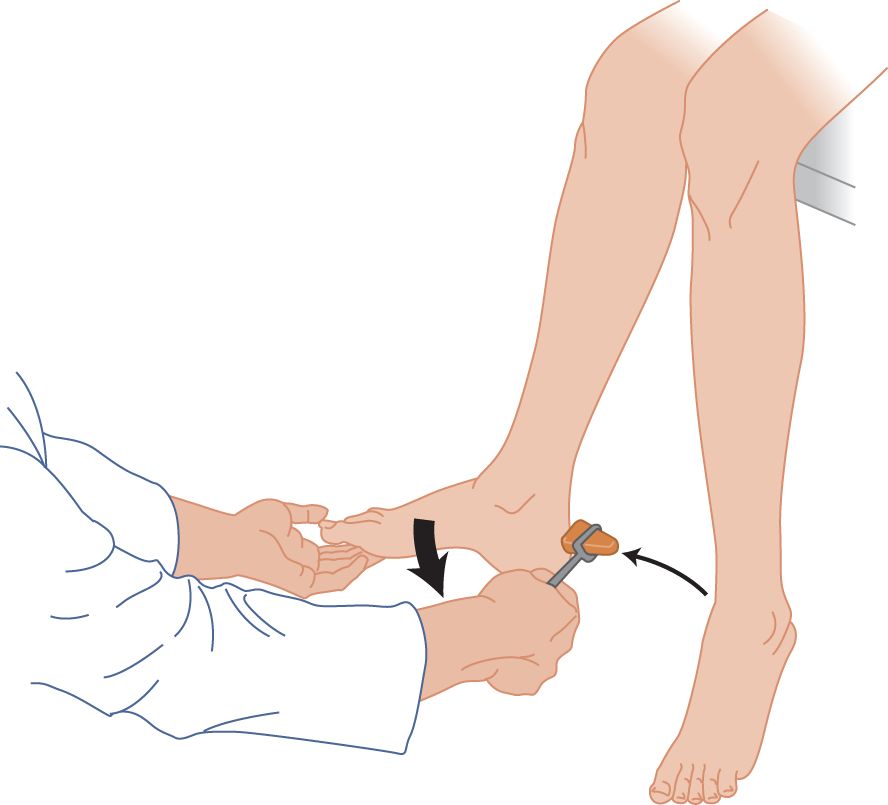
FIGURE 7-16. Ankle reflex, with the patient sitting. The patient completely relaxes the leg. The examiner dorsiflexes the foot to place slight tension on the triceps surae muscle (collectively the two-headed gastrocnemius muscle and the soleus). Try reinforcement if no reflex occurs.
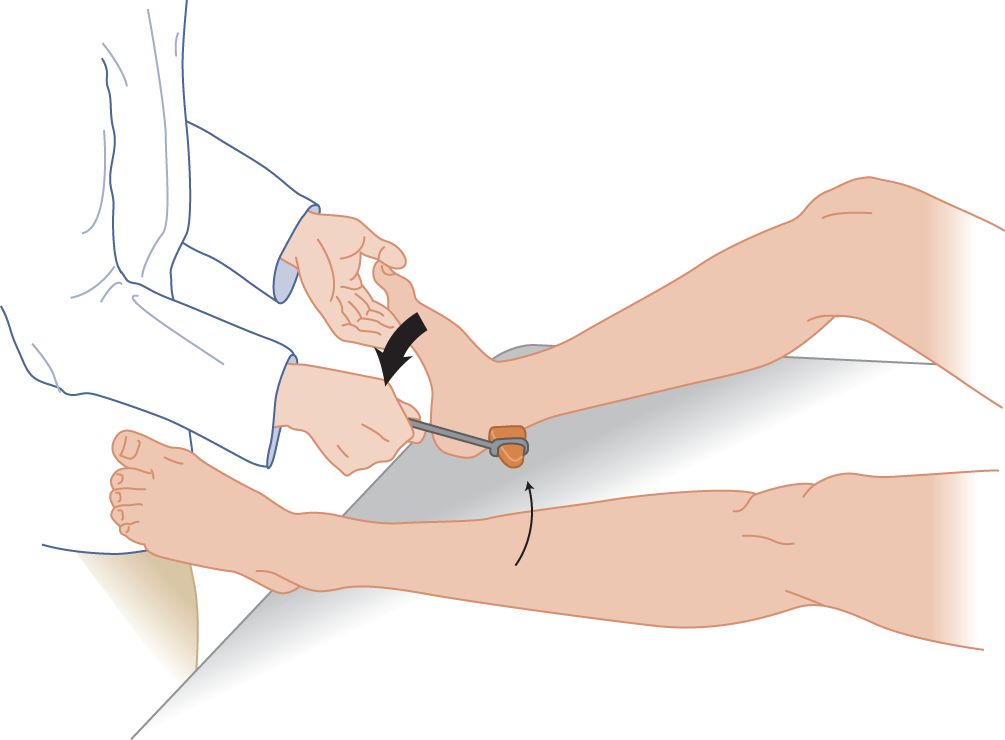
FIGURE 7-17. Ankle reflex, with the patient supine. With the patient’s knee bent and relaxed, the examiner dorsiflexes the patient’s foot to place slight tension on the triceps surae muscle. Try reinforcement if no reflex occurs.
FIGURE 7-18. Toe flexion reflex (Rossolimo sign), a muscle stretch reflex. The maneuver is identical with the finger flexion method shown in Fig. 7-9. Tapping the ball of the foot also elicits toe flexion.
c. In testing the knee jerks (quadriceps femoris reflex), have the Pt sit with the legs dangling over the edge of a table (Fig. 7-12, or when the Pt is supine with their knees bent and supported, Fig. 7-13) (Videos 7-1 and 7-2). With the Pt sitting the Ex can also perform a Pendulum test where gravity is used to provoke an MSR from the quadriceps femoris. It is elicited by lifting the relaxed leg of the Pt to a horizontal position, letting go and allowing the limb to swing freely. The degree of “pendulousness” can be observed, which usually amounts to three after-swings before the leg stops swinging. Normally the foot swings back and forth in an exact straight line. Spasticity diminishes the amplitude and number of after-swings (Fowler et al, 2000) and causes the foot to swing in irregular, rotatory, or sidewise arcs.
Video 7-1. Lower extremity spasticity and patellar and ankle hyperreflexia with bilateral crossed adductor responses in a patient with spastic paraparesis and T11 end plate fracture.
Video 7-2. Lower extremity hyperreflexia in a patient with a spinal cord dural arteriovenous fistula (DAVF).
Related posts:
 A Synopsis of the Neurologic Investigation and a Formulary of Neurodiagnosis
Clinical and Laboratory Tests to Distinguish Conversion Disorder (Functional Neurologic Symptom Disorder) from Organic Disease
The Patient’s Mental Status and Higher Cerebral Functions
Examination of the Patient Who Has a Disorder of Consciousness
Examination of the Special Senses
Examination of the Motor Cranial Nerves V, VII, IX, X, XI, and XII
A Synopsis of the Neurologic Investigation and a Formulary of Neurodiagnosis
Clinical and Laboratory Tests to Distinguish Conversion Disorder (Functional Neurologic Symptom Disorder) from Organic Disease
The Patient’s Mental Status and Higher Cerebral Functions
Examination of the Patient Who Has a Disorder of Consciousness
Examination of the Special Senses
Examination of the Motor Cranial Nerves V, VII, IX, X, XI, and XII
Stay updated, free articles. Join our Telegram channel

Full access? Get Clinical Tree


