Chapter 20 Ultrasound-Guided Lumbar Spine Injections


 For novices, it is best to start with easy blocks such as intramuscular or trigger point injections.
 For a medial branch block, reaching the cranial part of the transverse process with the needle tip immediately at the first puncture attempt can be accomplished as follows: With a paramedian short-axis view between two transverse processes and a transducer movement from cranial to caudal, the first bony line encountered is the cranial edge of the transverse process.


Basic Principles of Ultrasound-Guided Injections
Ultrasound Machines, Transducers, and Knobology
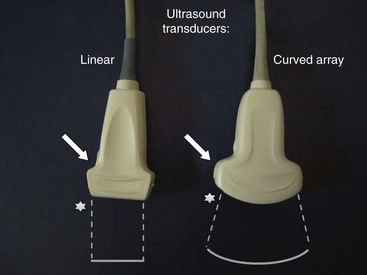
Today a huge variety of ultrasound machines in different sizes from different companies is available. Portable machines have reached quality levels comparable to larger scale gear. For applications in regional anesthesia and pain therapy, high-resolution technology combined with excellent musculoskeletal imaging properties is of great help to the practitioner. Linear broadband transducers with high frequencies up to 15 MHz are preferred when small structures close to the surface have to be targeted. Curved-array broadband probes with lower frequencies around 5 MHz are used for deeper targets. At least one of each of these two basic types of transducers should be available to physicians routinely performing ultrasound-guided interventions in pain management. Fig. 20-1 shows a typical linear probe on the left side of the image and a curved-array probe on the right with a schematic shape of the resulting sonographic images. Please note that the side of the mark on the transducer (arrow) is corresponding to the mark on the image (star). This is important for correct image orientation. Color-flow Doppler ultrasonography helps to identify vessels and is part of the basic machine equipment today. Finally, the operator has to be familiar with basic machine settings such as depth, gain, and focus.
Needles, Techniques, and Sterility
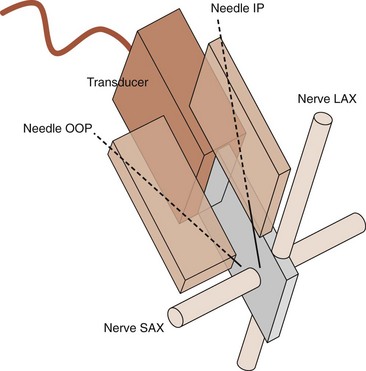
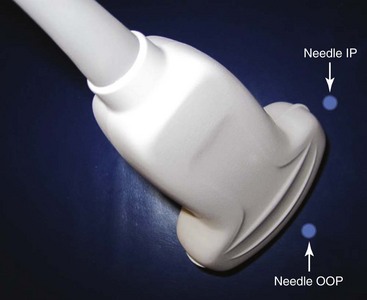
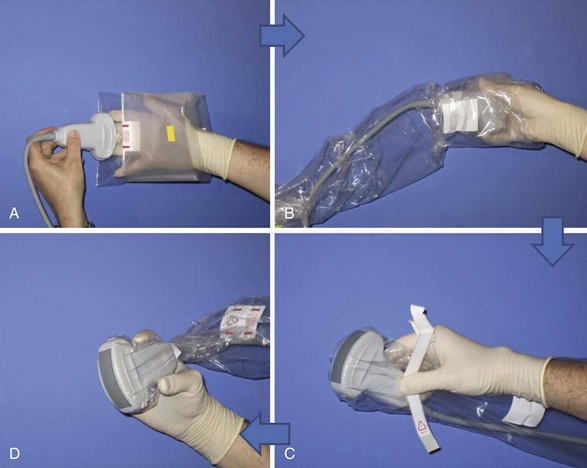
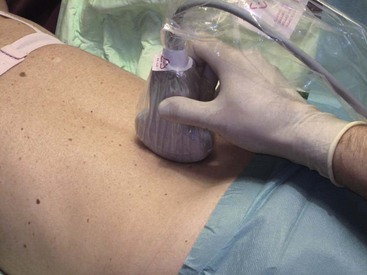
Needle choice depends on both target depth and operator preference. Better visualization is possible with larger diameter needles and shallow insertion angles; however, patient comfort is often associated with the contrary. Good choices are needles with facet tips and diameters between 20 and 25 gauges. Recently, higher reflective ultrasound needles have been developed and are the subject of evaluation at the moment. Image orientation can be short or cross axis (SAX; i.e., transverse plane) or long axis (LAX; i.e., longitudinal plane relative to the target nerve or the spinal column). Needle insertion can be out of plane or in plane relative to the LAX of the transducer’s footprint. Whereas out-of-plane techniques offer shorter access but only visualization of the needle tip, in-plane techniques are associated with a longer path to the target but visualization of the entire needle (Fig. 20-2). The needle insertion point for the out-of-plane technique is close to the longer side; for the in-plane technique, it is close to the shorter side of the transducer’s footprint (Fig. 20-3). Sometimes the transducer has to be turned 90 degrees after needle insertion to ensure proper positioning in a second plane. Sterile working conditions are mandatory for invasive procedures, including covering of the probe and use of sterile ultrasound gel. Special covers designed for this purpose are available today; the image shows how to cover a probe with such a shield (Fig. 20-4).
Sonography of the Lumbar Spine—Basic Scanning Sequence
The basic scanning sequence can be done before skin disinfection and sterile draping with nonsterile gel and no probe cover or after the preparation but then necessarily with sterile gel and a probe cover on. The patient is in prone position with a pillow under the stomach to compensate for lumbar lordosis. The sonographer sits on the patient’s left side facing the ultrasound machine next to the head of the patient. The basic scanning sequence consists of five standard planes and starts in the midline above the spinous processes of the lower lumbar spine (Fig. 20-5).
Related posts:


Stay updated, free articles. Join our Telegram channel

Full access? Get Clinical Tree


