Chapter 23 Ultrasound-Guided and Fluoroscopically Guided Joint Injections


 Ultrasound or fluoroscopic guidance is indicated for certain joint injections when there is increased needle depth required (e.g., hip joint) or when important surrounding neurovascular structures are present.
 A thorough understanding of the advantages and disadvantages of ultrasonography and fluoroscopy is needed for successful use of the imaging modality.
Introduction
Peripheral intraarticular injections have been successfully used for several decades in several locations.1 Injections may be performed into joints for diagnostic or therapeutic purposes (or both). Diagnostically, local anesthetic injection into a target area can facilitate identification of pain-generating structures and facilitate proper treatment.2–7 Therapeutically, appropriately placed corticosteroid injections can reduce pain and inflammation and promote functional gains. For both diagnostic and therapeutic intents, precise placement of injectate may be necessary to optimize outcome.8,9 Although peripheral joint injections have been traditionally performed primarily using palpatory landmarks (i.e., “blind”), the possibility of incorrect needle and injectate placement has led many clinicians to consider the use of image guidance for peripheral joint injections. Whereas an inappropriately placed injection will compromise the diagnostic utility of the procedure, incorrect placement of a therapeutic injectate such as corticosteroid or visco-supplementation may compromise outcome.
More recently, ultrasonography has been used to ensure accurate and safe needle placement for a variety of interventional procedures, including joint injections.10–24 Advantages of ultrasonography include no additional exposure to ionizing radiation, no use of contrast (thus lower cost and less risk of allergic reaction), and the ability to directly visualize surrounding soft tissue and neurovascular structures.
Hip Joint Injections
Establishing a Diagnosis
Pain coming from the hip joint can be caused by a variety of pathologic conditions, including degenerative and inflammatory arthritis, labral tears, avascular necrosis, and femoroacetabular impingement.25 The pain is often felt in the groin, although pain in the buttocks, lateral hip, and thigh can also be referred from the hip joint. Even after performing a careful history, physical examination, and imaging studies, it can, at times, be challenging trying to differentiate between pain emanating from an intraarticular hip source versus pain referred from surrounding soft tissue structures or being referred pain from the spine. In this clinical situation, an intraarticular hip joint injection with anesthetic may provide useful information to ensure an accurate diagnosis.2,7 Therapeutically, corticosteroid injections into the hip joint can reduce pain and inflammation.
Imaging
Because of the deep location of the hip joint along with the femoral neurovascular bundle in close proximity to the target injection site, image guidance is recommended for this injection. Although previous studies have described hip joint injections using palpatory landmarks, the results were suboptimal and may have increased complications.26,27 Using fluoroscopy, a straight anteroposterior (AP) view of the hip allows accurate visualization of the target area. Alternatively, ultrasonography may be used to visualize the femoral head and neck along with the overlying hip joint capsule in a sagittal oblique plane.28–30 The proper ultrasound probe needs to be selected for the hip joint, depending on the patient’s body habitus. Higher frequency linear ultrasound probes provide better spatial resolution but have less penetration to see deeper structures. Lower frequency curvilinear probes allow better depth penetration and a wider field of view but less spatial resolution.
Indications
Anesthetic injections into the hip joint may be helpful diagnostically to confirm the source of the patient’s symptoms.2,7 Lack of improvement suggests other causes for the patient’s pain, such as surrounding soft tissue structures or referred pain from spine pathology. Therapeutically, corticosteroid injections may help with intraarticular pain and inflammation in the appropriate clinical situation.


Technique
Fluoroscopically Guided Hip Joint Injection
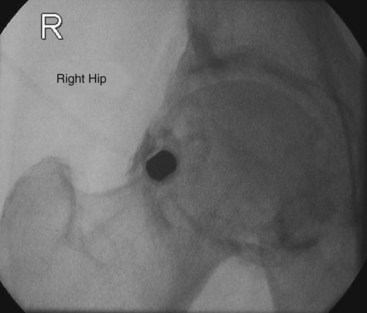
Fluoroscopically guided hip joint injections can be performed by a variety of approaches, including a direct vertical approach parallel to the fluoroscopic beam and an oblique approach from inferior/lateral to superior/medial. The vertical approach is described here. The patient is placed supine on the fluoroscopy table. A direct AP image over the hip joint to be injected is obtained (Fig. 23-1). After clear visualization of the femoral head and neck, a radiopaque object is then used to identify the proper location of needle insertion on the skin. The target site will be the lateral aspect of the femoral head–neck junction to avoid the neurovascular bundle that is usually located medially. Using a surgical marker, this location is then marked on the skin. The femoral artery should be palpated to identify the location of the neurovascular bundle. This location can also be marked on the skin with a surgical marker. The procedure field over the anterior hip should then be sterilely prepped and draped. Using a 25- or 27-gauge needle, the skin and subcutaneous tissue is then anesthetized using 1% lidocaine. Next, a 22-gauge needle is advanced through the overlying soft tissues using intermittent fluoroscopy to ensure proper needle trajectory. Os should be contacted at the femoral head–neck junction. The needle is then slightly withdrawn 1 to 2 mm. After removal of the stylet from the spinal needle, sterile tubing with a syringe containing contrast is attached. A small amount of contrast is slowly injected under fluoroscopy to ensure intraarticular placement. The contrast should flow smoothly into the hip joint without significant resistance. If resistance is encountered, the needle should be adjusted slightly followed by repeat injection of contrast. Contrast should flow freely and away from the needle tip. A hip arthrogram should be obtained, confirming intraarticular needle placement. The syringe is then changed, and the injectate (anesthetic, corticosteroid, or both) is then slowly injected. After placement of the injectate into the hip joint, the needle is then removed, and the overlying area is cleaned.
Ultrasound-Guided Hip Joint Injection
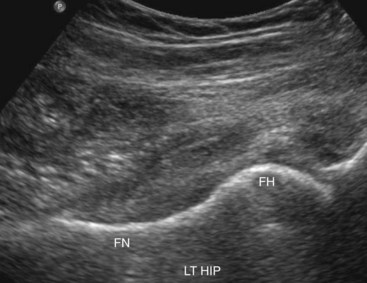
Numerous previous reports have described intraarticular hip joint injections under ultrasound guidance.10,14,19–21,23,24 We follow the method previously described by one of the authors, which is described here.21 The patient is placed in the supine position with the hip in a neutral position. The anterior-superior iliac spine is palpated, and the transducer is oriented in a sagittal plane with the superior end of the transducer located just medial to this structure. The transducer is then kept in the sagittal orientation and moved medially until the hyperechoic (i.e., bright), round femoral head is visualized. The transducer is then rotated into the transverse plane and moved medially to identify the femoral neurovascular bundle. This is easily visualized using color or power Doppler, which is usually now standard on most ultrasound machines. The transducer is then slid back laterally to the femoral head. The transducer is slowly rotated in the orientation of the femoral neck. During this rotation, the superior aspect of the ultrasound probe should keep the femoral head visualized while the inferior aspect of the probe will then bring the femoral neck into view (Fig. 23-2). In this long-axis femoral head–neck view, the ultrasound settings (e.g., depth, gain) can then be further adjusted to provide the optimal image of the femoral head–neck junction and overlying hip joint capsule. While this sagittal oblique orientation is maintained, the examiner slowly slides the transducer medially and laterally to judge the width of the femur neck. The transducer should be positioned at the most lateral aspect possible while all structures are kept clearly in view, thus keeping the neurovascular bundle a greater distance away from the target needle trajectory. With the ultrasound transducer held steady, a surgical marker can then be used to outline the position of the inferior aspect of the ultrasound probe.
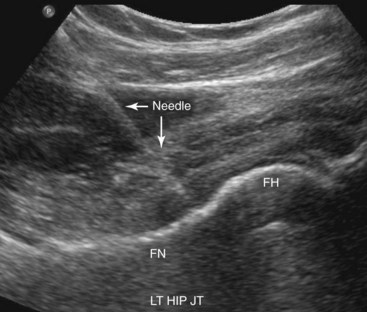
The procedure field over the anterior hip should then be sterilely prepped and draped. With a sterile ultrasound transducer cover and sterile ultrasound gel, the transducer is placed back onto the skin as previously marked, and an optimal image is obtained again. Local anesthesia is provided at the puncture site with 1% lidocaine under live ultrasound guidance. A 25-gauge needle is often used for this part of the procedure to anesthetize the skin and deeper subcutaneous layers. Next, a free-hand technique is used with the injectate syringe attached to a 22-gauge 9-cm (or longer based on the clinical situation) spinal needle. The needle is slowly advanced through the overlying soft tissues while the target femoral head–neck junction and needle tip are visualized at all times. The hip joint capsule can be visualized, and a “pop” is often felt as the needle advances through the capsule and into the hip joint. With the needle tip clearly in view, the injectate is then slowly injected while the hip capsule is visualized rising away from the femoral head and neck (Fig. 23-3). If corticosteroid is injected, it appears as hyperechoic (bright) under ultrasonography. If only local anesthetic is injected, it appears anechoic (dark) under ultrasonography. After the injection is completed, the needle is removed, and the area is cleaned.
Related posts:
 Facet (Zygapophyseal) Intraarticular Joint Injections
 Fluoroscopy, Ultrasonography, Computed Tomography, and Radiation Safety
 Nerve Destruction for the Alleviation of Visceral Pain
Stay updated, free articles. Join our Telegram channel

Full access? Get Clinical Tree


