Vascular Access and Arteriotomy Closures
Arterial Anatomy and Access
Femoral Artery
Anatomy
The common femoral artery is the distal extension of the external iliac artery. It begins after the take-off of the epigastric artery as it travels deep to the inguinal, or Poupart’s, ligament. Distally, it branches into the superficial and deep femoral artery, and the deep femoral artery branches at the knee into the anterior and posterior tibial arteries. The dorsalis pedis artery is the distal extension of the anterior tibial artery. The common femoral artery is bordered medially by the femoral vein and laterally by the femoral nerve.
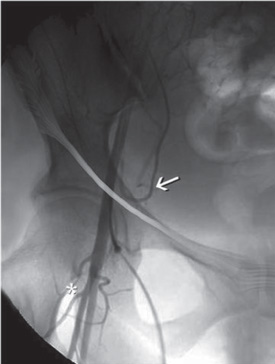
The optimal location for femoral artery access is over the femoral head (which provides a firm surface for manual compression), distal to the epigastric artery (which prevents retro- or intra-peritoneal hemorrhage), and proximal to the common femoral bifurcation (which prevents occlusion with large-bore vascular sheaths and allows usage of a closure device) (Fig. 6.1). The puncture site can be estimated to be within 1 cm to 2 cm craniocaudally of the midpoint of the inguinal ligament, which runs from the anterior superior iliac crest to the lateral edge of the symphysis pubis. At this area, the point of maximal pulse intensity may be felt, which usually correlates with the common femoral artery. The common femoral artery overlies the femoral head in 92% of patients, and the bifurcation is above the inguinal crease 78% of the time.1
Fig. 6.1 Anatomy of the femoral artery. Common femoral artery angiogram showing the bifurcation (asterisk) into the profundus and superficialis branches distal to the femoral head and cannulation over the upper, inner quadrant of the femoral head to prevent vascular complications. Note the location of the inferior epigastric artery (arrow) just above the inguinal ligament.
Equipment
Below are listed the basic pieces of equipment necessary for intra-arterial access, whether through the femoral or radial arteries or even the femoral vein.
Access Needle
Typically, a micropuncture set is used, containing a 21 gauge needle, microwire, and microsheath dilator. In some arteries that are difficult to access, an 18 gauge needle and Benston wire can be used, but their use increases the risk of arterial injury.
Guidewire
• 0.038 inch J-tip guidewire or Benston wire
• For difficult access cases (stenosis or tortuosity) when it is not possible to pass a J-wire or Benston wire, an access microwire or floppy straight-tipped glidewire may be used to gain access safely, using direct visualization with fluoroscopy.
Vascular Sheath
• Sheaths vary in length from 10 to 90 cm. Longer sheaths should be used in older patients with tortuous arteries (45 cm) and patients undergoing intervention (65–80) to decrease the redundancy and friction on the catheter and to improve stability.
• Sheaths vary in diameter from 4 to 10 French. Most diagnostic angiograms are performed through a 4 Fr or 5 Fr diagnostic sheath. Pediatric angiograms should be performed either through a 4 Fr sheath or without any sheath to prevent common femoral artery occlusion. Most adult interventions can be performed through a 6 Fr sheath, although the use of additional balloons, stents, or thrombolytic devices may require a larger bore for access.
Access Technique
Prior to performing angiography, it is essential to assess the pulses at the dorsalis pedis and the posterior tibial with palpation and Doppler for baseline comparison. After the initiation of local anesthesia (without epinephrine to avoid vasoconstriction) and intravenous conscious sedation (Chapter 4), both groins are sterilely prepped and draped.
Before arterial cannulation is performed, it is imperative that all vascular catheters and sheaths are available, properly set up, and flushed. All flush lines and Touhy-Borst adapters should be carefully checked for microbubbles, as air embolization into the distal circulation can cause occlusion. For routine diagnostic angiography, we attach the vascular sheath to a pressurized flush line of heparinized saline (1000 units/L). All wires and catheters are flushed and soaked in saline, followed by laying out all the equipment on the table in preparation. The use of a flush line connected to the diagnostic catheter is useful to prevent thrombus from forming in the catheter while setting up the diagnostic views or preparing other equipment for use. Some angiographers, however, do not attach the diagnostic catheter to a flush line and therefore must be particularly careful about preventing air and clots from either entering the catheter during wire/syringe exchange or forming inside the catheter from stagnant blood. For prevention of clots forming in the catheter, “double-flushing” the catheter by first drawing back 2 to 5 cc of blood and then using a second saline-filled syringe is recommended to flush and clean the inner lumen of the catheter. Most angiographers who do not use a flush line will advance the diagnostic catheter with a syringe connected to the catheter, intermittently “puffing” contrast to reduce the amount of stagnant blood in the catheter.
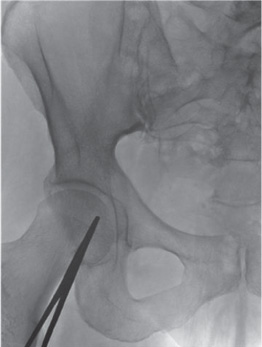
At this point, the area of arterial puncture is estimated by using palpation of the pulse with the anatomic landmarks discussed above, and a radiopaque object can be used to confirm the location of the upper, inner quadrant of the femoral head (Fig. 6.2). It is sometimes helpful to compress manually the area medial to the artery and trap it with slight lateral pressure prior to puncturing the artery, to prevent the artery from rolling away from the needle. If the patient is awake, local anesthesia (2% lidocaine) will be administered to the local and deep areas where the sheath will be placed. For patients with particularly tough skin, a history of several prior angiograms, or anticipated placement of a closure device, a small cutaneous nick with a scalpel can be made. The tract may be dilated to further accommodate the sheath and closure device, but dilation is not absolutely necessary. Although double-wall puncture (or through-and-through technique) is still used to ensure intra-luminal arterial access, the risk of hematoma may be unnecessarily high in patients on anticoagulation or antiplatelet medications. For this reason, many angiographers prefer a single-wall puncture technique, in which arterial entry is confirmed by brisk arterial blood flow. For patients on antiplatelet or anticoagulation therapy, pediatric patients, elderly patients with a high probability of atherosclerosis, or patients with poorly definable pulses (such as ones dealing with obesity), a micropuncture set can reduce the risk of arterial injury, pseudoaneurysm formation, and subcutaneous/retroperitoneal hematoma.
Once the micropuncture needle is in the artery and arterial backflow is confirmed by the color and pulsitility of flow, the microwire is advanced. Fluoroscopy is often used to visualize the advancement of the microwire, allowing confirmation of the left of midline position that usually ensures arterial cannulation.
Once arterial cannulation is confirmed, a Cope Mandril (Cook Medical), 0.038 J- or Benston wire is placed using the Seldinger technique through the 18 gauge needle or microsheath. During the sliding of the needle over the wire with the right hand, compression of the artery is maintained with the left hand to minimize subcutaneous hematoma formation. The wire can be stabilized with the left thumb to prevent inadvertently pulling out the wire. The wire is then wiped with a damp Telfa dressing (preferred over cotton-based gauze to prevent a microembolic shower from particulate cotton materials) to remove blood clots. If a dilator is used, it is then placed, and the Cope Mandril wire is removed. Once the cap is removed from the microdilator, the left thumb should be held over the opening to prevent the excessive escape of blood. The 0.038 J- or Benston wire is then placed through the dilator. Once again, the left hand is used to hold pressure and stabilize the wire while the right hand removes the dilator from over the wire. The wire is again wiped with a damp Telfa dressing, and the sheath is placed with gentle pressure and a slight twisting motion.
After placement, back-bleeding and flushing the sheath ensure the absence of air and clot in the access sheath. It then can be affixed to the skin with a clear adhesive covering or stitch, to prevent inadvertent removal of the sheath and to maintain direct visualization of the groin site for hematoma.
Pediatric Nuances
Vascular access in pediatric patients is similar to that in adults, but the arterial caliber is smaller, and the arteries are more mobile and more prone to vasospasm. For this reason, we always perform micropuncture access with a gentle advancement of the wire without rotation. A 4 Fr short vascular sheath can be used and advanced without rotation to prevent tearing or spasm of the artery. As the sheath is short, it must be affixed to the skin with a sterile adhesive. We also may administer low doses of verapamil and heparin into the sheath to prevent clotting or vasospasm. In infants and toddlers, it is possible to use the catheter directly through the skin without a sheath to avoid arterial occlusion with the sheath. Distal occlusion, however, is a rare issue, as children often have significant collateral circulation in the lower extremities.
Radial Artery Access
Anatomy
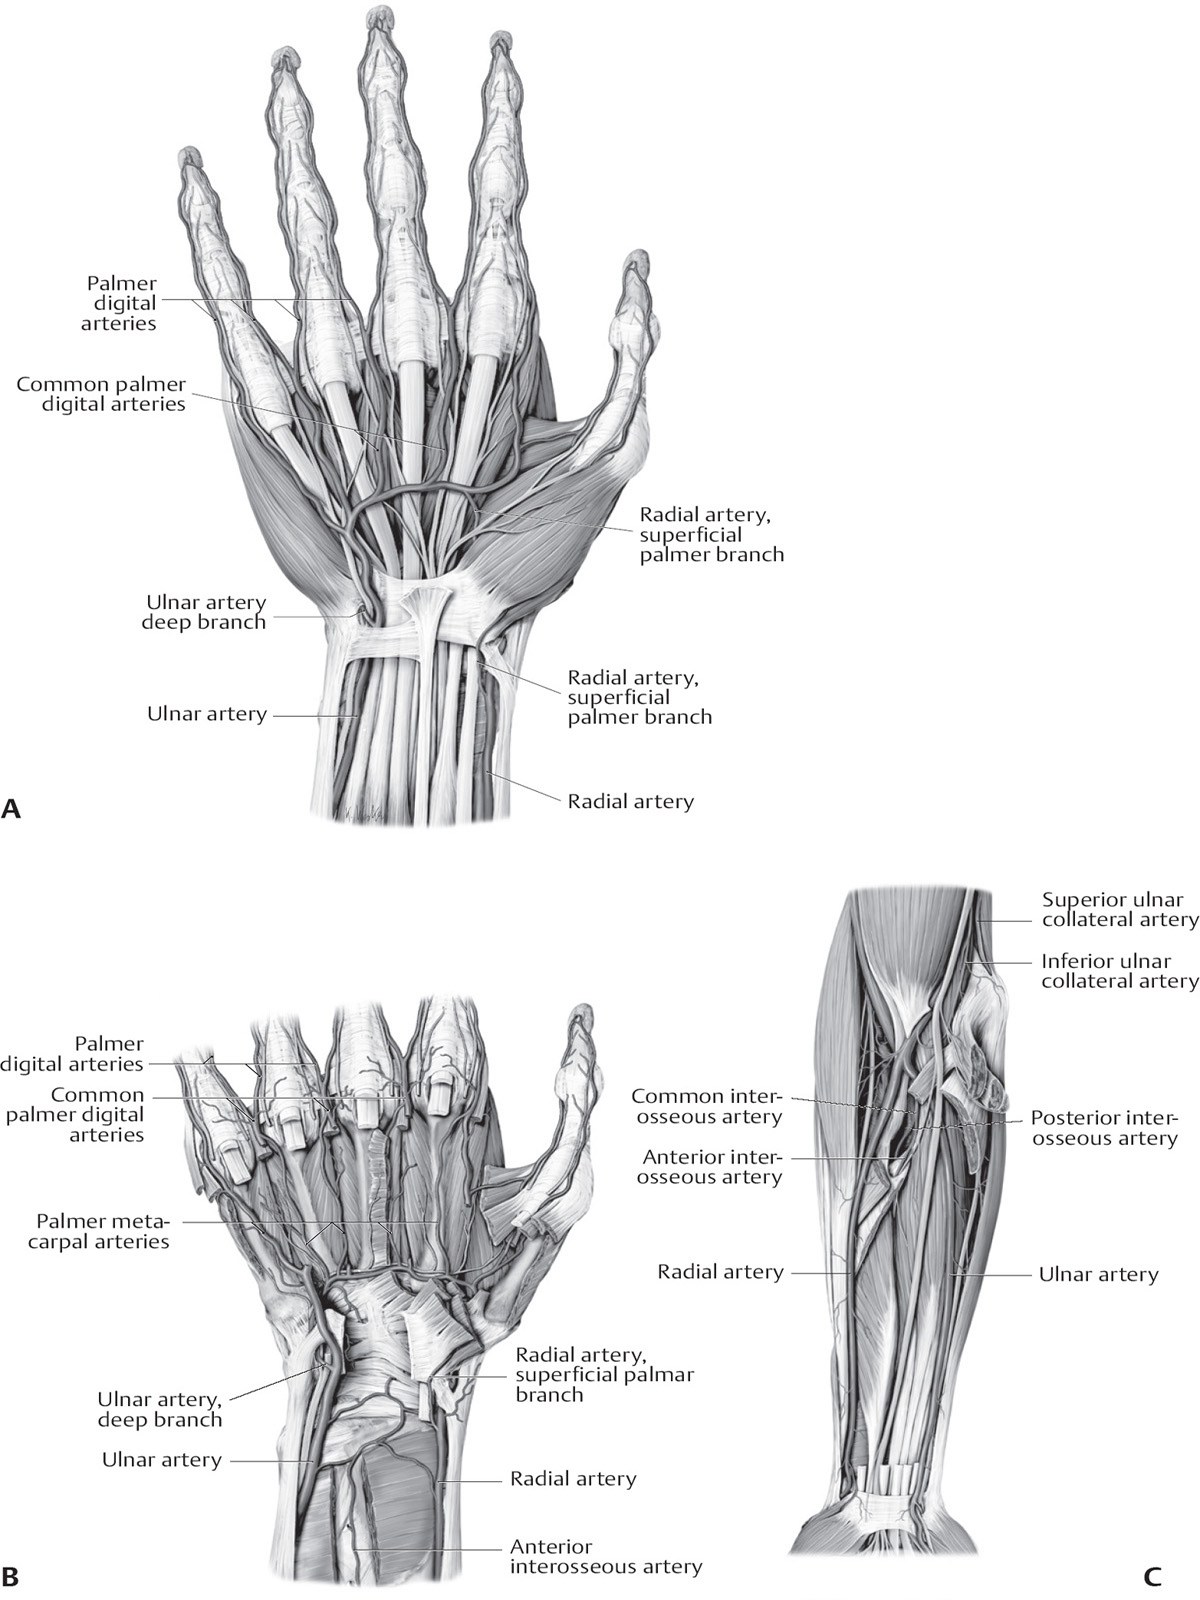
At the elbow, the brachial artery branches into the radial and ulnar arteries. As the larger of the two branches, the radial artery runs along the radial side of the forearm to the wrist. It then winds around the lateral side of the carpus, beneath the tendons of the abductor pollicis longus and extensor pollicis longus and brevis into the palm of the hand, where it unites with the deep volar branch of the ulnar artery to form the deep volar arch (Fig. 6.3).
Equipment
• Micropuncture set with 4 Fr introducer sheath
• Antispasmodic cocktail (Table 6.1)
• Dilators ranging from 5–8 Fr, depending on the size of sheath


