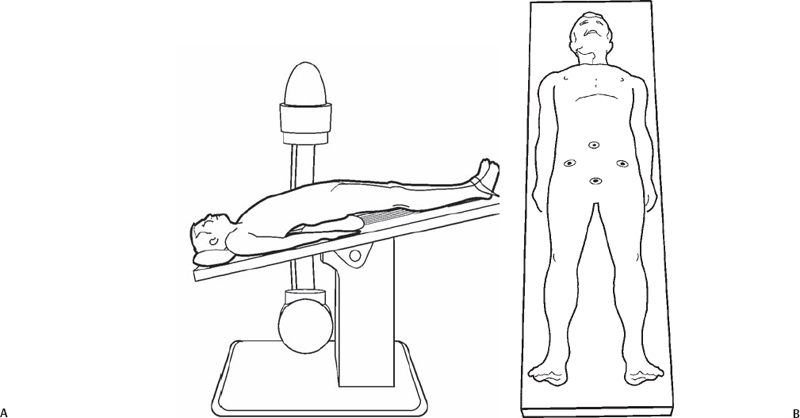
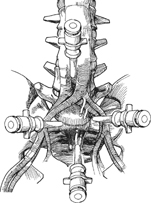
47 Matías G. Petracchi , Federico P. Girardi , and Frank P. Cammisa, Jr. Disk resection by an approach that provides direct visualization of the anterior or lateral aspect of the lumbar spine. Good exposure, retraction of the great vessels when necessary, especially in gaining anterior access to the disk. Complete diskectomy permits insertion of an interbody spacer to allow either motion preservation with a device such as a disk arthroplasty or insertion of an allograft, autograft, or cage to aid fusion. Direct debridement of a diskitis is also possible via this approach. Finally, anterior release as part of the correction of a spinal deformity can be undertaken. Interbody fusion, release for correction of spinal deformities, debridement in spondylodiskitis, open biopsy, corpectomy, disk replacement, nucleoplasty. Related to the approach: abdominal or pelvic infection. The interbody space can be accessed by anterior, anterolateral, or lateral windows, depending on the indication for the diskectomy and interbody reconstruction. If the procedure requires the insertion of an interbody device such as a strut graft, cage, arthroplasty, or nucleoplasty, recommendations of the manufacturer should be followed. There are various interbody spreaders that help to open the disk space when performing diskectomy. Usually a wide resection of the disk and precise preparation of the end plate is necessary. This permits accurate contact of the interbody device with the vertebral end plates’ surfaces and better release. Some devices require resection of posterior osteophytes or the longitudinal ligament. Special care should be taken to preserve or restore the size of the disk space. Frontal and sagittal alignment evaluation is crucial to avoid iatrogenic imbalance. Also, it is important to preserve or restore the disk height, which can be evaluated with the preoperative studies, measuring the adjacent normal levels. In general, fusion or motion preservation implants are designed with different size options, which can help to reconstruct the alignment and height of the disk space. Patient positioning on the operating table can greatly facilitate diskectomy. Ideally the operative level should be positioned over the “break” in the table so that the disk space can be opened up by changing the angulation of the table at the level of the break. This can be very helpful, both in preparing the disk space and inserting the interbody device. A radiolucent table should be used to allow intraoperative imaging. The arms of the patient can be strapped in by the side, around the chest, or abducted, but special attention should be paid to avoid distraction of the brachial plexus and ensure adequate intraoperative radiographic quality. After the approach and before starting the diskectomy lateral and anteroposterior images, confirm the level and locate the midline of the disk space. During the diskectomy, tilting the table toward the surgeon, proper illumination, and magnification loupes are essential to visualize the space and work comfortably. If an interbody rigid device is to be used, the table should be replaced in a neutral position after its insertion, and the position of the device checked with x-ray or fluoroscopy. Be sure that the device is well aligned in the frontal and sagittal plane, maintains or restores the lumbar lordosis, and does not create an iatrogenic imbalance (Fig. 47.1). Fig. 47.1 (A) The patient is positioned supine with a bolster under the pelvis to allow for proper visualization. The steep Trendelenburg position is desirable and beneficial. The patient must be stabilized to avoid migration during the procedure. (B) The same patient as seen from above. Patient positioning is crucial and permits good intraoperative visualization of both the disk space and end plates in addition to adequate radiographic imaging. Visualization of the disk space is further aided by the use of a combination of self-retaining and hand-held retractors. Long curettes and rongeurs are useful to perform the diskectomy. Interbody spreaders help to distract the space during the diskectomy. If the level to be treated has osteophytes, they can complicate the localization and initial disk resection. A spinal needle is utilized to confirm the level. A large rongeur or osteotome is useful to remove the osteophytes and identify the disk space. After resecting the majority of the disk, it is important to evaluate the residual disk located on the opposite side of the approach. Interbody spreaders help to distract the space during the diskectomy and permit a better evaluation of the remnant disk. Small curettes, Woodson or dental elevators, and nerve hook or ball-tip palpators are valuable to evaluate the opposite surface. After exposing the levels, good visualization of the disk space is necessary. Retraction of the paraspinal structures is required prior to diskectomy. The presacral plexus of nerves, the genitofemoral nerve, and the sympathetic chain should be preserved. The presacral plexus runs vertically across the L5-S1 disk space, superficially to the middle sacral artery and veins (Fig. 47.2). The genitofemoral nerve lies on the psoas and exits the muscle belly at the L3 level. The sympathetic chains are closely applied to the vertebral bodies medial to the psoas muscle. They can be mobilized by blunt dissection. Avoid dissecting directly over them, cutting transversely across them, or using cautery (especially unipolar). If the disk has to be resected through an anterior window, proximal to the great vessels bifurcation, the vascular structures should be mobilized laterally to the opposite side of the approach (Fig. 47.3). Distal to the great vessel bifurcation each vessel can be mobilized to its own side. Sometimes it is necessary to ligate and divide the adjacent segmental vessels, the iliolumbar vein (L4-5 disk space), or the middle sacral artery and veins (L5-S1 disk space) to permit the mobilization of the great vessels. The retraction of the vessels can be done with a retractor blade, protected pin or combination of both.
Anterior Lumbar Diskectomy
Description
Key Principles
Expectations
Indications
Contraindications
Special Considerations
Special Instructions, Position, and Anesthesia

Tips, Pearls, and Lessons Learned
Difficulties Encountered
Key Procedural Steps

Stay updated, free articles. Join our Telegram channel

Full access? Get Clinical Tree


