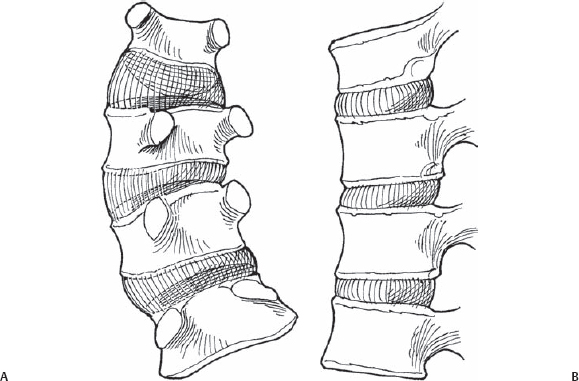
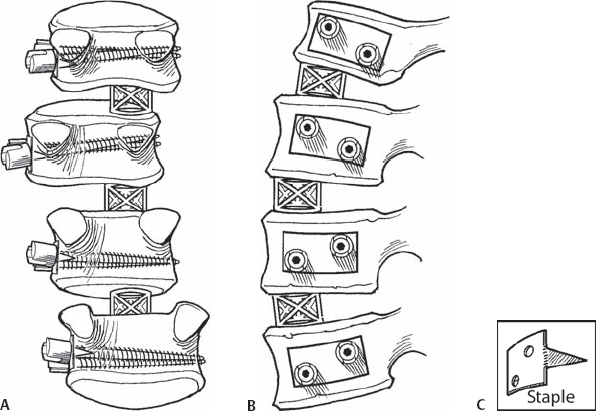
58 Keith H. Bridwell Surgical technique for two-screw/two-rod construct for thoracic, thoracolumbar, or lumbar scoliosis. To correct the coronal plane deformity and to normalize the sagittal plane. Most importantly for thoracolumbar and lumbar curves, this means preserving or enhancing lumbar lordosis. The expectation with a two-screw/two-rod construct is that the correction will be enhanced by either rod rotation or direct vertebral derotation through the screws. Lordosis will be maintained by eliminating the amount of compression and by utilizing anterior structural support in the anterior disk space. Finally, the construct will be stable enough with a two-screw/two-rod system that patients can return to activities at an early date. The advantages of anterior over posterior surgery include a shorter construct with more segmental correction. In most cases, the patient should have a coronal Cobb measurement of at least 45 degrees and usually not to exceed 70 degrees (curves over 70 degrees usually cannot be adequately corrected enough to allow for an anterior-only construct). Otherwise, the patient should be at least physiologically young and nonosteoporotic (Fig. 58.1). Fig. 58.1 The scoliotic spine in coronal (A) and sagittal (B) planes. Note: there is a component of kyphosis from T12 to L3. The screws need to be bicortical in all circumstances. Standard general anesthesia is used with the patient in a lateral decubitus position. The convex side is up, the concave side down. We do not recommend anterior constructs for thoracic curves anymore because of the impact on pulmonary functions. We have found with thoracolumbar and lumbar curves and lower thoracotomies that thoracoabdominal approaches do not have a negative impact on pulmonary functions. If the spine is exposed below T9, it is not necessary to deflate a lung. It is very important to complete the diskectomy all the way over to the concave anterior corner. Use disk spreaders to open the disk space to facilitate exposing the corner. It is also useful to perform fluoroscopy after the disks have been removed to be sure the diskectomy has been completed all the way over to the other side. For fairly large curves, it may be somewhat difficult to reach the top and bottom. There may be a tendency with the anterior screw, both proximally and distally, to inadvertently put it into the adjacent disk space. Also, it is helpful to take a rib at least one level, if not two levels, higher than the intended proximal vertebra. If the anterior fusion extends up to T11, it is best to take the ninth rib rather than the tenth rib. The procedure for a lumbar curve is described here through a thoracoabdominal approach. Typically, this is a left lumbar curve. The patient is placed in the lateral decubitus position, right side down, left side up. A curvilinear incision is made paralleling the tenth rib. The latissimus dorsi and external oblique muscles are incised down to the tenth rib. This rib is then subperiosteally stripped, exposed, and resected. The chest is then entered through the bed of the tenth rib. The retroperitoneum is then entered through the cartilage of the tenth rib. Peritoneum is swept off the undersurface of the deep abdominal muscles, which are then taken down parallel to the skin incision. The peritoneum is then swept off the undersurface of the diaphragm, which is taken down with a 1.5-cm peripheral radial cuff. Next, the segmental vessels are ligated at mid-body level from T12 to L3. Exposure of the vertebral bodies is then accomplished from the base of the pedicle around to the other side. Care is taken not to injure any segmental vessels on the opposite side. Next, diskectomies are performed. It is very helpful to use disk distractors to be able to facilitate getting to the concave anterior corner. The next step is to place an appropriate-size cage in the anterior concave portion of the apical three disk spaces. Fluoroscopy is then performed to confirm that the cages are over far enough. The staples are then placed at T12, L1, L2, and L3. It is important that each staple be equidistant from the pedicles. It is important not to inadvertently place the staples around the front. If this is inadvertently accomplished, there will be a tendency to direct the screws into the spinal canal. In placing the screws through the staples, the surgeon needs to visualize the posterior longitudinal ligament (PLL) and be absolutely sure the screws are being directed anteriorly well away from the PLL. The surgeon will be leaning his hand back further on the more apical segments than the end segments. The staples and screws will appear to sit more posteriorly at the apical segments than the end segments, but in fact, they are all equidistant from the base of the pedicle. After placing the staples and screws, it is helpful to verify under fluoroscopy that the screws are all placed correctly and that they are bicortical. Having the cages in the anterior disk spaces facilitates opening up the disk space enough to visualize the PLL (Fig. 58.2).
Anterior Spinal Anchor Strategy Placement and Rod Reduction Techniques
Description
Key Principles
Expectations
Indications

Contraindications
Special Considerations
Special Instructions, Position, and Anesthesia
Tips, Pearls, and Lessons Learned
Difficulties Encountered
Key Procedural Steps

Stay updated, free articles. Join our Telegram channel

Full access? Get Clinical Tree


