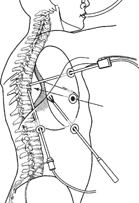
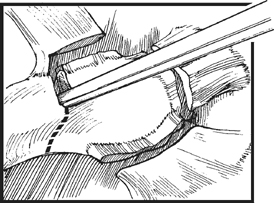
69 Max C. Lee and Daniel H. Kim Thoracic decompressions include diskectomies and corpectomies with intervertebral grafting with anterior instrumentation, as well as thoracoscopic decompression and stabilization in the setting of trauma to the thoracolumbar junction (TLJ). The goals of operative treatment include (1) adequate decompression of the spinal canal to provide the maximum chance of neurologic recovery; (2) correction of the spinal deformity and restoration of anatomic alignment to prevent delayed spinal deformity and neurologic deficits; and (3) immediate rigid fixation for early mobilization and rehabilitation with fixation of the least number of motion segments. The approach and instrumentation selected should be able to achieve all these goals with minimal trauma to the patient. Early on in our experience, we often reserved the thoracoscopic approaches for thoracic fractures involving the T4 to T10 vertebrae. With increasing experience, we extended the indications to thoracolumbar injuries. As many of these patients have multiple injuries, all major injuries are stabilized before the spinal procedure is done. Thoracoscopic procedures are contraindicated in patients with previous cardiopulmonary disease with restricted cardiopulmonary function, acute posttraumatic lung failure, severe pleural adhesions, and severe medical instability. Routine bowel preparation is required to reduce intraabdominal pressure and facilitate the retraction of the diaphragm. A detailed informed consent is obtained after explaining the various risks involved in the procedure, such as visceral injury, vascular injury, blood loss, instrumentation failure, failed fusion, and possible conversion to open procedure. The thoracoscopic transdiaphragmatic approach (TTA) presents several unique challenges to spine surgeons that necessitate a clear understanding of the diaphragmatic, thoracic, and retroperitoneal anatomy. The entire TLJ can be exposed thoracoscopically with minimal diaphragmatic detachment. This is made possible by an anatomic peculiarity of the pleural cavity and the diaphragmatic insertion, the lowest point of which, the costodiaphragmatic recess, is projected onto the spine perpendicularly just above the base plate of the second lumbar vertebrae. To avoid inadvertent injury to the lungs, the diaphragm, and the organs beneath the diaphragm, the most cranial portal is inserted first by a mini-thoracotomy approach. Through a 1.5-cm skin incision placed above the intercostal space, the muscle layers of thoracic wall are cut through in a zigzag fashion following the direction of the fibers. The 30-degree scope is introduced through the portal, and the other trocars are inserted under direct thoracoscopic vision. The endoscopic image is rotated to obtain an orientation of the spine parallel to the lower edge of the video monitor screen. The cephalocaudal axis of the camera is oriented to the view of the primary operative surgeon to allow for normal translation of his or her hand movements to the monitor (Fig. 69.1). Fig. 69.1 Orientation using a three- or four-portal approach. With the patient in a supine position, double-lumen endotracheal intubation is performed. A Foley catheter, central venous line, and arterial line for continuous blood pressure monitoring are inserted. The patient is placed in a stable lateral decubitus position. The top-lying arm is placed flat on an arm support and raised to 90 degrees of elevation to avoid a collision during placement and manipulation of the endoscope. Sterile draping extends from the middle of the sternum anteriorly to the spinous processes posteriorly as well as from the axilla down to approximately 8 cm caudal to the iliac crest. Monitors are placed at both lower ends of the operating table on opposite sides to enable free vision for the surgeon and the assistant. The surgeon and the assistant holding the camera stand behind the patient. The C-arm monitor and the second assistant are placed on the opposite side. Under direct fluoroscopic guidance, the target fracture vertebra is projected onto the skin level. The borders of the fractured vertebra are marked on the skin. The working channel (10 mm) is centered over the target vertebrae. The optical channel (10 mm) is placed two or three intercostal spaces cranial to the target vertebra. The approach for suction/irrigation (5 mm) and retractor (10 mm) is placed approximately 5 to 10 cm anterior to the working and optical channel. The fractured area is now exposed with the help of a fan retractor inserted through the anterior port. The fan retractor performs the dual function of holding down the diaphragm and exposing the insertion of the diaphragm on the spine. Exposure of the spine below L1 usually requires detachment of the diaphragm. Then the extent of the planned corpectomy is defined with an osteotome. The disk spaces are opened to define the borders. Trauma can obscure normal anatomic landmarks. After resection of the intervertebral disks, the fragmented parts of the vertebra are removed carefully with rongeurs. Resection close to the spinal canal is facilitated with the use of high-speed burrs. If decompression of the spinal canal is necessary, the lower border of the pedicle should first be identified with a blunt hook. The base of the pedicle is then resected in a cranial direction with a Kerrison rongeur and the thecal sac can be identified. Finally, the posterior fragments, which occupy the spinal canal, are removed. The preparation of the graft bed is completed by aggressive preparation of the adjacent end plates and complete removal of all soft tissue. The length and depth of the bone graft/spacer required are measured with a caliper. For vertebral fractures, autologous iliac crest is used in most patients. Distractible titanium cages may also be used. The graft or cage is mounted on the graft holder and inserted through the working portal incision. Longer bone grafts (>2 cm) are inserted along their long axis through the opening and then mounted onto the graft holder inside the thoracic cavity. It is best to place the graft/cage under distraction. With the distractible titanium cages, additional reduction can be achieved by further increasing the height of the cage within the graft site. Insert a self-tapping screw under fluoroscopic control in the vertebra superior to the fractured one, as well as in the fractured vertebra. Next, insert the first screw of the MACS-TL system (Aesculap, Tuttlingen, Germany) into the caudal vertebral body. Afterward, place the polyaxial, posterior screw over a Kirschner wire (K-wire). The stabilization plate is placed over the centralizer onto the polyaxial heads. In cases of multisegmental assemblies, rod connection has to be chosen. After the plate or rod is placed and the polyaxial plate is well aligned, the assembly can be closed by using a fixation nut. For final fixation, the torque wrench is applied to the nut driver, and countertorque is again applied by using the handle on the insertion sleeve. Remove the centralizer from the polyaxial clamp. Next, the assembly must be brought into final position directly onto the surface of the vertebral bodies. The screw-guiding sleeve for the anterior stabilization screw has to be attached to the polyaxial clamp. After selecting the appropriate screw length, fix the anterior screw to the screwdriver with a retaining clip, and then insert it through the guiding instrument into the vertebral body. Then, lock the polyaxial mechanism. The gap in the diaphragm is closed with endoscopic suturing or hernia stapler. We prefer endoscopic suturing from the cost point of view. Smaller incisions, less than 4 cm, close by themselves without any approximating sutures. During diaphragmatic repair, care must be taken to avoid needle puncture of the lung, which may result in a bronchopleural fistula. The thoracic cavity is irrigated and blood clots are removed. A chest tube is inserted with the end placed in the costodiaphragmatic recess. The portals are closed with sutures or staples after removal of the trocars (Figs. 69.2, 69.3, and 69.4).
Endoscopic Thoracic Decompression, Graft Placement, and Instrumentation Techniques
Description
Expectations
Indications
Contraindications
Special Considerations
Tips, Pearls, and Lessons Learned

Key Procedural Steps

Stay updated, free articles. Join our Telegram channel

Full access? Get Clinical Tree


