Figure 1.1 Testing smell
Optic nerve (cranial nerve 2)
Visual acuity
Ask if the patient has any difficulty seeing. Visual acuity (VA) is tested and measured routinely by using a Snellen chart. The patient should stand 6 metres away from the chart and correct for any known refractive error by wearing appropriate glasses. Ask the patient to cover each eye in turn with his hand and find the smallest line that he can read fully without difficulty. VA is expressed as the distance between the chart and the patient over the smallest line completely visible to the patient. The numbers on the chart (below the line) correspond to the distance at which a person with normal vision should be able to see and identify the appropriate line. Below the age of 40 years most should see 6/6 or better. If 6/6 is normal and 36 represents the line that the patient can comfortably read at 6 metres with both eyes then visual acuity for that patient should be recorded as 6/36 in the right (VAR) and left eye (VAL). If VA is 6/60 or less then you can assess the patient’s ability to see at 1 meter distance by counting fingers (CF), VA = CF, or seeing hand movements (HM), VA = HM or perceiving light (PL) VA = PL, if unable to perceive light then the patient is blind (NPL). At the bedside setting crude levels of visual acuity can be established by using a small hand held chart e.g. Jaeger chart or by using ordinary newspaper print. Colour vision is not tested routinely, however it can be tested by a using a book of Ishihara plates where at least 15/17 coloured plates identified correctly is considered normal. The most common causes of decreased visual acuity are optical problems, mainly refractive errors in lens, followed by cataracts and lastly diseases involving the retina, macula and optic nerve.
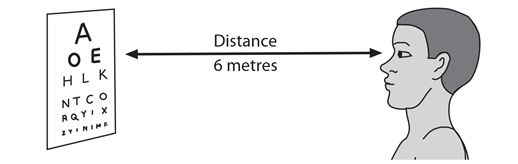
Figure 1.2 Testing visual acuity
- VA is measured standing 6 metres from a Snellen chart
- VA is distance between patient and chart over the smallest line identified correctly
- VA can be tested at bedside using a small hand held chart or newspaper
- most common causes of decreased VA are refractive errors and cataracts
Visual fields
The organization of the visual pathways means that the pattern of visual field loss varies at different sites along its way. This means that testing for the pattern of visual field loss is useful for localization of lesions along the visual pathway. Visual fields are always described and recorded from the perspective of the patient looking outwards with the fields divided into nasal and temporal halves. At the bedside visual fields are examined by confrontation. The main patterns of loss are homonymous & bitemporal hemianopia, & monocular blindness.
Confrontation
This involves sitting about 1 meter in front of the patient with your eyes at the same horizontal level. Ask the patient to look with both eyes at your eyes (the bridge of your nose). Hold your hands upright halfway between you and the patient held approximately half a meter apart and at about 30 cm above the horizontal. While looking at the patient’s eyes first move the index finger tip of one hand (or a 5-7 mm red pin head) and ask the patient to correctly identify which finger moved. The patient should immediately point or indicate the hand on which the finger moved. Do the same with the other hand. Repeat the manoeuvre with the hands held about 30 cm below the horizontal. To examine the visual fields in each eye separately, ask the patient to cover one eye e.g. patient’s right eye and the examiner covers the eye opposite, in this case his own left eye. Ask the patient to focus on your uncovered eye. Move your index finger in each of the four quadrants starting in the temporal field followed by the nasal field in same manner as you did on confrontation for both eyes. Repeat for the other eye. Remember that the nose and prominent eyebrows may partially block vision and mistakenly give a field deficit.
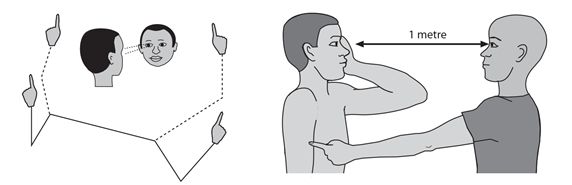
Figure 1.3 Examining visual fields. Testing for visual defects by confrontation.
Field perimetry
Field perimetry can be tested in the same manner using a moving finger tip or a white pin head 5-7 mm target. Start behind the patient’s visual field coming forward diagonally in a convex plane from all four quadrants at a 45 degree angle, northeast to southwest and northwest to southeast and the same in reverse asking the patient to indicate as soon as he sees the movement. This establishes the posterior limit of the patient’s visual field. The blind spot (optic nerve head) and any central field defects can be easily identified using red pin head moving in the horizontal plane from outside.
Key points
- patients are often unaware of loss of visual fields
- major visual field loss is identified by confrontation
- peripheral visual fields are tested by perimetry examination
- main patterns of loss are homonymous & bitemporal hemianopia & monocular blindness
Ocular fundi
Ocular fundi are tested by fundoscopy. The aim of fundoscopy is to inspect the optic nerve head, arterioles, veins and retina. This is an important part of the neurological examination and is used mainly to exclude papilloedema or swelling of the optic nerve. The main cause of papilloedema in Africa is raised intracranial pressure secondary to CNS infections and mass lesions. Swelling of the optic disc may also be caused by inflammation of the optic nerve and this is called papillitis. The main cause of papillitis is optic neuritis.
How to use an ophthalmoscope
Students and young doctors at first find fundoscopy difficult but the skill comes with training and practice. The most important thing to understand is the position of the optic nerve head within the field of vision you are testing. The optic nerve head lays 15-20 degrees lateral to the point of fixation of the patient’s eyes and slightly below the horizontal and corresponds to the blind spot.
The following instructions should be helpful. The patient should fix his gaze straight ahead. Check the focus on the ophthalmoscope is set at zero and the light is bright, then sit opposite the patient and examine the right eye. With the ophthalmoscope in the right hand approach from the patient’s right side, look at the patient’s right eye from 30 cm away with the ophthalmoscope level or slightly below the patient’s eye about 15-20 degrees outside or lateral to the patient’s line of fixation or direction of gaze. Aim at the centre of the back of head and keep out of the line of sight of the other eye. You should be able to see the pupil as pink in colour; this is the normal retinal or red reflex. Gradually move in towards the eye, encourage patient to continue to look or fixate at a point behind you straight ahead and bring ophthalmoscope to within 1-2 cm of the patient’s right eye. It’s important to keep patient’s eye, point of fixation and ophthalmoscope all on the same plane. Adjust the lens for focus so that you can see the blood vessels clearly and follow blood vessels as they get larger and converge on the disc. Look at the optic disc, blood vessels, retinal background and repeat for the other eye.

Figure 1.4 Fundoscopy
What you find
The normal disc is circular and pale pink in colour, the edge of the disc is clear although not as well demarcated on the nasal side as the temporal side (Chapter 12). The temporal half of the disc is normally paler than the nasal half. The physiological optic cup from which the blood vessels emerge is a well defined depression in the centre of the nerve head. It is pale and occupies about 40-50% of size of the optic disc. The rest of the fundus has an even red background because of blood in the choroid layer. The retina may be darkly pigmented depending on racial background. The macula with a central darker area called fovea lies about one and a half disc spaces from the disc on its temporal side and is free of blood vessels. It can easily be found by asking the patient to look directly at the light of the ophthalmoscope. The arterioles are normally two thirds the sizes of veins and appear a brighter shade of red than veins. The veins on the disc appear to pulsate in 70-80% of normal people in the sitting position, and the absence of pulsation may be an early sign of papilloedema. In papilloedema the whole disc is usually pink red and the veins become distended and lose their pulsation. The optic cup is lost and the edge of the disc and the vessels emerging may appear elevated. Later the whole disc itself becomes indistinct and blurred especially on the nasal side which is normally less distinct and haemorrhages and exudates may be seen on or near its margins and vessels disappearing without an obvious optic disc (Chapter 12). In chronic papilloedema the disc becomes pale as occurs in optic atrophy.
Key points
- approach patient’s right eye at same eye level from 30 cm out & 15-20 degrees laterally
- identify red reflex and follow beam of light into eye looking for a normal pale pink disc
- main sign of papilloedema is swelling of the optic disc with blurring of the disc margins
- main sign of optic atrophy is a pale white optic disc
- practise on colleagues and patients with normal eyes
Pupillary reactions
These are examined after the optic nerve and before eye movements. The normal pupillary reactions include the light reflex, the accommodation reflex and the consensual reflex.
Assessing the pupils
Inspect the pupils at rest for size and shape and whether they are equal, central and circular and react to light. It’s not always easy to assess pupillary size in a darkened room or in patients with a darkened iris. A difference in pupil size is called anisocoria. It helps to inspect the pupils at rest by shining a torch on the bridge of the patient’s nose allowing light to scatter but not affecting the pupils.
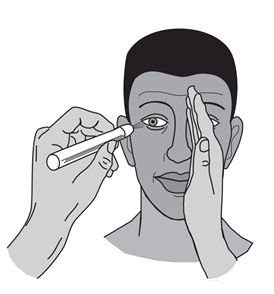
Figure 1.5 Testing the light reflex
The light reflex
To test the pupillary light reflex, ask the patient to look in the distance and not into direct light. It may help to block off the other eye in the manner shown in the diagram.
Then bring a bright light in from behind or from the side into the patient’s field of vision and observe the eye for direct or ipsilateral pupillary constriction. This is called the direct light reflex. Then repeat this again in the same eye now looking for the same response in the other eye. This is called the consensual reflex. Check for the same reflexes in the other eye.
The accommodation reflex
The accommodation reflex has two components and is much less clinically important than the light reflex. To test this reflex ask the patient to look in the distance and then at the examiner’s finger held 10 cm in front of the patient’s nose. As the gaze is shifted from a distant to near object the eyes adduct and pupils constrict. The first component is convergence which requires adduction of both eyes at the same time. The other component involves bilateral simultaneous constriction of the pupils; this combined with adduction is the normal accommodation reflex.
Pupillary disorders
Large and small pupils which react to light and accommodation can occur normally in young and old persons respectively. Pupillary disorders are generally categorized as those resulting in large dilated non or slowly reacting pupils and those resulting in small constricted reacting or non reacting pupils. The main causes of these are to be found in disorders affecting the optic nerve and the iris and its autonomic parasympathetic and sympathetic nerve supply.
Key points
- inspect pupils for size, shape and whether they are equal or not
- · light reflex: shine a bright light into the eye and watch for pupillary constriction
- · consensual reflex: inspect the other eye at the same time for pupillary constriction
- · accommodation reflex: watch eyes adduct & pupils constrict as gaze is shifted to a near object
Oculomotor, Trochlear and Abducens (cranial nerves 3, 4 & 6)
Eye movements
The 3rd 4th and 6th cranial nerves are tested together by examining eye movements. Eye movements are generated in two main ways each of which should be tested separately. Firstly voluntary movements are generated from the frontal lobe; they are also called saccadic because of the rapid jumping movement from one point of fixation to another. These are tested by asking the patient to look rapidly from one side to the other or right and left and are impaired in cortical brain disease. Secondly and more important clinically are pursuit eye or tracking movements which are generated from the occipital lobe when the eyes stay on and follow the point of fixation. These are tested by asking the patient to follow the examiner’s moving finger and are impaired in brain stem and cranial nerve disorders. Lastly the cerebellum also plays a main role in controlling eye movements in response to body movements in order to keep the point of fixation. All eye movements are integrated in the brain stem so that the eyes can move together conjugately in all directions. Eye movement abnormalities are usually noted because the patient complains of double vision or diplopia and because the eyes appear to the observer be looking in different directions. When this happens it is called a squint or strabismus. The main causes of diplopia are disorders affecting the function of the 3rd 4th and 6th cranial nerves. The main sites for these disorders are eye muscles, the neuromuscular junction, or the individual nerves and their central connections in the brain stem. The most common causes are vascular and inflammatory disorders affecting the individual nerves and neuromuscular junction respectively.
Testing for pursuit eye movements
Pursuit eye movements are routinely examined during the neurological examination. The examiner tests for horizontal and vertical eye movements by instructing the patient “to follow my finger with your eyes” whilst keeping the patient’s head steady. The examiner holds a finger about half a meter away from the patient’s face and makes horizontal and vertical movements in the shape of a cross sign being careful not to move the hand too rapidly. The movement is carried out with the index finger held vertically moving horizontally 30-45 degrees right and left from mid point and then repeated in the same way moving vertically with the finger held horizontally. The trochlear nerve is tested by repeating the same movements but this time in the shape of H sign. This should be carried out in each eye field separately to confirm any weakness. Any loss or impairment of normal eye movement or jerkiness (nystagmus) should be noted.
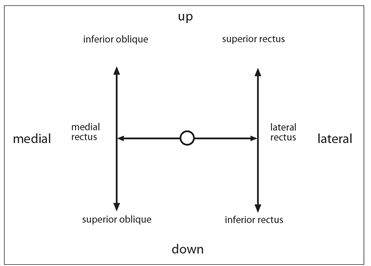
Figure 1.6 Testing eye movements
Nystagmus
Nystagmus is an involuntary rhythmic oscillatory movement of the eyes. Nystagmus is usually asymptomatic. To test for nystagmus ask the patient to follow the examiner’s fingers using the same method as when testing for normal eye movements. Nystagmus should be examined in three main positions, at rest, looking right and left horizontally and looking up and down vertically. Be careful not to move the eyes too quickly or too far laterally (not beyond 30 degrees from midline) and note the presence of any nystagmus. Nystagmus is only considered pathological when it is sustained. The characteristics of nystagmus help to localize the site of neurological disease. The main causes of nystagmus are disorders affecting the vestibular system and its central connections, the brain stem, cerebellum and the eye including early onset blindness. It can also rarely be congenital, and then is pendular and multidirectional.
Key points
- eye movements are tested by following examiner’s finger as it traces a cross (+) or (H) sign in the air
- H sign tests the trochlear nerves in addition to the oculomotor and the abducens
- nystagmus is an involuntary oscillatory movement of the eyes
- diplopia is mostly caused by weakness of the ocular muscles
Trigeminal nerve (cranial nerve 5)
The trigeminal nerve has three divisions ophthalmic (V1), maxillary (V2), and mandibular (V3). It is responsible for facial sensation and mastication.
Sensation
To test sensation, first ask if the patient feels any numbness or altered sensation on the face. Then test for light touch (and gentle pinprick and temperature only if necessary) in each of the three divisions of the trigeminal nerve comparing one side with the other. If a sensory loss is found then determine its limits by moving from an abnormal area to normal. Remember that the ophthalmic division extends posteriorly to the vertex and also supplies the cornea and the tip of the nose. The angle of the jaw is supplied by the C2 nerve root rather than the trigeminal nerve. Sensory loss on the face is caused mainly by lesions in the brain stem and the trigeminal nerve.
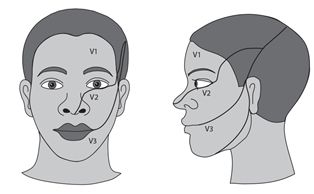
Figure 1.7 Testing facial sensation
Motor
The motor division of the trigeminal nerve can be tested by inspecting for wasting above the zygomatic arch and asking the patient to clench the teeth and to palpate the masseters and pterygoids for force of contraction. Power can be assessed by jaw opening and jaw closure and side to side movements against resistance. Ask the patient to open and close his mouth against the resistance of your hand. In unilateral paralysis the jaw deviates to the weak or affected side. Motor involvement affecting the trigeminal nerve is very uncommon. Causes include myasthenia gravis, motor neurone disease and muscular dystrophy.
Jaw jerk
The jaw jerk is a brain stem stretch reflex which may be absent or present in normal people. To elicit the reflex the patient should let his jaw sag open. Place your finger lightly on the chin. Then tap your finger gently and feel and observe for a brief contraction or movement upwards of the lower jaw. The jaw jerk may be increased in an upper motor neurone lesion and indicates a lesion in the midbrain or above.
Corneal reflex
The trigeminal nerve provides the afferent arc of the corneal reflex. The facial nerve provides the efferent arc. It is a consensual reflex and may be tested by lightly touching the cornea (the coloured part of the eye) with a wisp of cotton wool and observe for reflex blinking in both eyes. The lower lid may be held down while the patient looks up making access to the cornea from below easy. The normal response to touching the cornea is that blinking of both eyes should occur. A unilateral trigeminal nerve lesion therefore results in loss of blinking on both sides whereas a unilateral seventh nerve lesion results in loss of the reflex on the affected side.
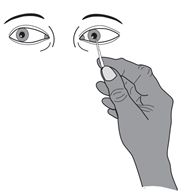
Figure 1.8 Testing the corneal reflex (V and VII)
Key points
- trigeminal nerve supplies sensation to the face and power to the muscles of mastication
- sensation is tested touching in each division of trigeminal nerve & comparing sides
- power is tested by resisting jaw opening, closure & side to side movements
- corneal reflex is tested by touching the cornea lightly from below with a wisp of cotton
- loss of the corneal reflex may be caused by either a 5th or 7th cranial nerve lesion
Facial nerve (cranial nerve 7)
The facial nerve is primarily a motor nerve that is responsible for facial expression, which includes wrinkling of the forehead, eye closure, closure of the lips and smiling. The sensory portion is responsible for special sensation to the anterior two thirds of tongue via the chorda tympani branch. There are also a few sensory fibres to the outer ear canal. In clinical practice there are two types of facial nerve paralysis, a lower motor neurone type which includes Bell’s palsy and an upper motor neurone type which is most frequently seen in stroke. It is important to be able to distinguish clinically these two types from each other.
In a lower motor neurone facial palsy there is a complete ipsilateral facial weakness with loss of forehead wrinkling, eye closure, nasolabial fold and drooping of the lips on the affected side. This is in contrast to an upper motor neurone lesion where the facial paralysis affects mainly the lower half of the face with preservation of wrinkling and partial eye closure although they may be reduced.
Examining the facial nerve
To objectively test motor function in the facial nerve start in the upper half of the face by asking the patient to look upwards towards the ceiling by elevating his eyebrows or wrinkling the forehead. Then test eye closure by asking the patient to shut the eyes tightly and assess strength by trying to open patient’s eyes with your fingers. If there is a lower motor neurone pattern of weakness there is loss of wrinkling and reduced or no resistance to forced eye opening on the affected side. Movements in the lower half of the face are tested by asking the patient to smile, whistle and finally to blow out of the cheeks and to keep the lips closed against the examiner’s attempt to open them. Any weakness or asymmetry implies a lesion in the seventh nerve. The reason that both the forehead and eye closure are partially spared in a unilateral upper motor neurone lesion is that they are bilaterally innervated. A bilateral lower motor neurone weakness can be easily missed clinically unless the facial nerves are specifically tested. To assess taste apply a solution of salt, sweet, sour or bitter to the anterior tongue comparing the response on both sides.
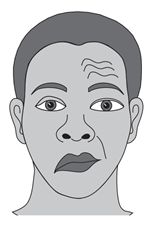
Figure 1.9 Testing facial movements. Facial nerve palsy, right (lower motor neurone lesion) Loss of wrinkling of forehead. Loss of nasolabial fold. Drooping of mouth.
Key points
- inspect for drooping of the mouth, loss of nasolabial fold, eye closure and wrinkling
- ask the patient to smile, close their eyes and look up
- a complete facial weakness on one side indicates a lower motor neurone lesion
- facial weakness on one side confined to the lower half indicates an upper motor neurone lesion
Acoustic nerve (cranial nerve 8)
The acoustic nerve has two divisions: the cochlear (hearing) and the vestibular (balance).
Hearing
Hearing is first assessed by asking if the patient has a hearing problem. Hearing can be tested clinically by rubbing the thumb and finger close to the patient’s ear and asking if hearing is different between the two sides. Hearing loss is then crudely confirmed by whispering numbers and asking the patient to repeat them whilst standing behind the patient about 60 cm away from the test ear. At the same time hearing in the non affected ear is masked by rubbing fingers close to the tragus or by occluding it with a finger. If the patient cannot hear whispering, then a normal or louder voice is used. The test is then repeated on the other side if necessary. Bedside testing is relatively insensitive and may miss lower levels of hearing loss for which audiometry is required. There are two main types of hearing loss, conductive deafness where there is a failure of transmission of sound (air conduction AC) from the outer to the inner ear or cochlea, and sensorineural deafness or (bone conduction BC) which is due to disease in the cochlea or its neural connections. The Rinne and Weber tuning fork tests can help distinguish whether the hearing loss is conductive or sensorineural in type. The main causes of conductive hearing loss are wax in the outer ear and infection in the middle ear. The main causes of sensorineural hearing loss deafness are ototoxicity, infections, Ménière’s disease and presbyacusis.
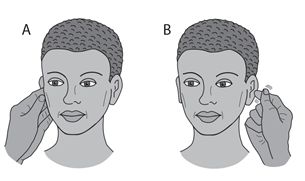
Figure 1.10 Testing hearing
Related posts:

Stay updated, free articles. Join our Telegram channel

Full access? Get Clinical Tree


